Introduction
The No-Bake Oreo Cheesecake Dream is a dessert that combines the irresistible flavor of Oreo cookies with the smooth, creamy texture of cheesecake—all without the need for an oven. This rich, indulgent treat is a crowd-pleaser perfect for birthdays, holidays, or any time you want to impress guests with minimal effort. With a crunchy Oreo crust and a fluffy, tangy cream cheese filling swirled with crushed cookies, this dessert is as delightful to look at as it is to eat. Whether you’re a baking novice or an experienced cook, this recipe is straightforward, forgiving, and rewarding. It’s a dessert that delivers maximum flavor with minimal stress, making it a go-to option for warm-weather entertaining or any situation where oven-free is the way to go. Assembling it is as satisfying as eating it, and its chilled texture is a welcome relief during hot summer days. Moreover, it’s the perfect make-ahead dessert, as chilling it overnight enhances both the flavor and the structure.
The History of Oreo Cheesecake
Oreo cookies, first introduced in 1912 by Nabisco, quickly became one of the most beloved snacks worldwide. The concept of combining them with cheesecake started to appear in home kitchens and bakeries during the 1980s and 1990s when the popularity of no-bake desserts surged. This trend allowed home cooks to create elaborate treats without requiring professional equipment or baking expertise. The rise of no-bake cheesecakes was partly fueled by the widespread availability of cream cheese and whipped topping products, which made dessert-making more accessible. Oreo cheesecakes began appearing in restaurants and commercial bakeries as decadent, eye-catching menu items. Eventually, no-bake versions gained popularity because of their simplicity and the luxurious texture achieved by chilling instead of baking. Today, no-bake Oreo cheesecakes are a staple in cookbooks, food blogs, and social media feeds, celebrated for their rich taste and customizable nature.
Ingredients Breakdown
For the crust:
- 24 Oreo cookies (regular, not Double Stuf)
- 6 tablespoons unsalted butter, melted
For the filling:
- 16 oz (2 blocks) full-fat cream cheese, softened
- 1 cup powdered sugar
- 1 teaspoon vanilla extract
- 2 cups heavy whipping cream, cold
- 12–15 crushed Oreo cookies
For the topping (optional but recommended):
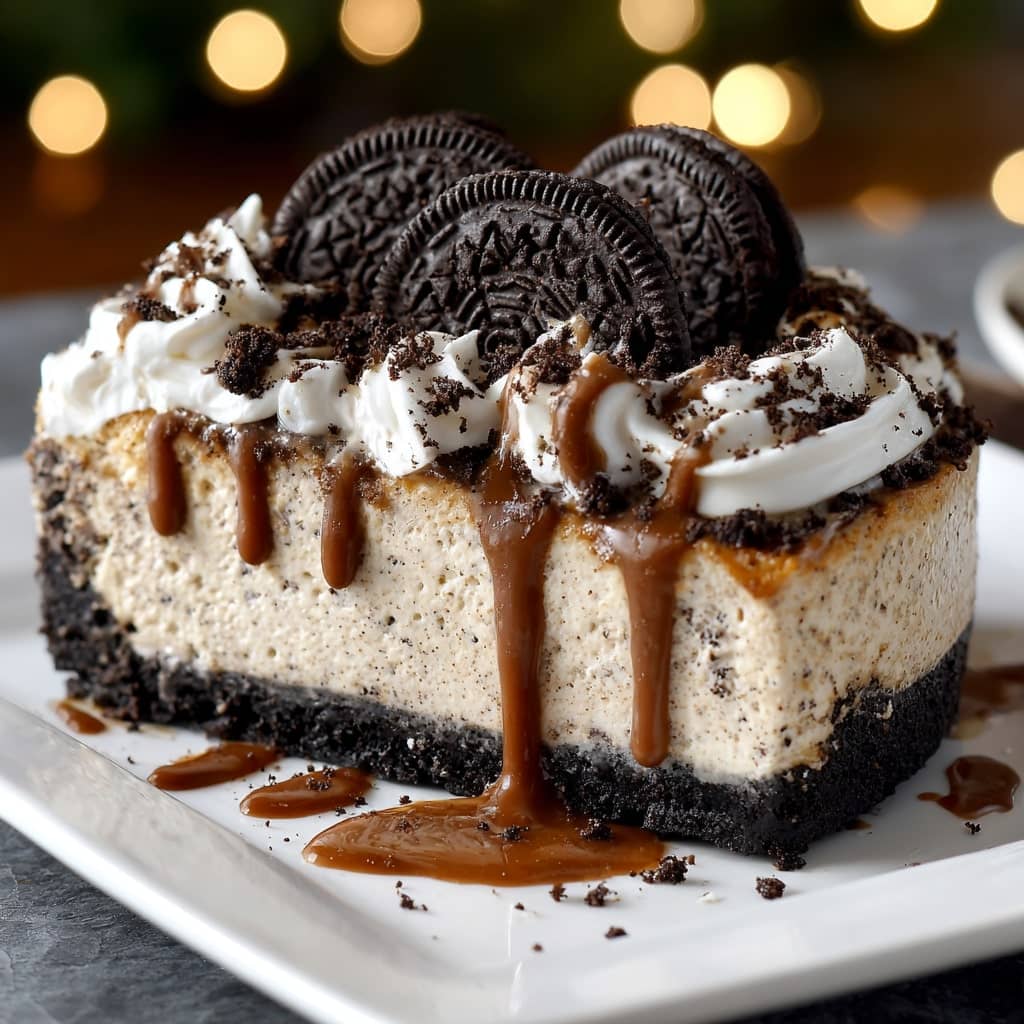
- Crushed Oreo cookies
- Whipped cream or whipped topping
- Chocolate drizzle or ganache
Each ingredient plays a crucial role. The Oreo crust forms the sturdy base and adds a signature chocolate crunch. The melted butter binds the crushed cookies and helps them set when chilled. The cream cheese provides the essential tang and creamy body of the cheesecake, while powdered sugar sweetens it without adding grittiness. Vanilla extract enhances the overall flavor profile. Heavy whipping cream, when whipped, adds volume and lightness to the filling. The additional crushed Oreos mixed into the filling offer texture and intensify the chocolate cookie flavor. Optional toppings elevate presentation and add a final burst of decadence.
Step-by-Step Recipe:
- Prepare the crust: In a food processor or by hand, crush 24 Oreo cookies into fine crumbs. Combine the crumbs with 6 tablespoons of melted butter and stir until evenly moistened. Press the mixture firmly into the bottom of a 9-inch springform pan or pie dish. Use the back of a spoon or a flat-bottomed glass to pack it tightly. Chill in the refrigerator for at least 30 minutes while preparing the filling.
- Make the filling: In a large bowl, beat the softened cream cheese until smooth and fluffy. Gradually add the powdered sugar and vanilla extract, beating until fully incorporated and creamy. In a separate bowl, whip the cold heavy cream to stiff peaks using a hand mixer or stand mixer (this may take 3–5 minutes). Gently fold the whipped cream into the cream cheese mixture in batches to maintain the volume and fluffiness. Add the crushed Oreos and fold them in evenly.
- Assemble the cheesecake: Remove the crust from the refrigerator and spoon the filling over it. Spread evenly with a spatula or offset knife. Smooth the top, then cover tightly with plastic wrap. Refrigerate for at least 6 hours or overnight for best results.
- Add toppings and serve: Once set, remove the cheesecake from the pan and transfer to a serving plate. Decorate with additional crushed Oreos, whipped cream swirls, and chocolate drizzle if desired. Slice with a warm knife for clean cuts and serve chilled.
Tips for the Perfect No-Bake Oreo Cheesecake
Always use full-fat cream cheese for the richest flavor and firmest texture. Soften the cream cheese completely to avoid lumps in your filling. Whip the heavy cream to stiff peaks before folding it into the mixture—this gives your cheesecake structure and a mousse-like texture. Be patient with the chilling time; at least six hours is essential, but overnight is ideal. Don’t skip chilling the crust beforehand; it helps it stay firm when the filling is added. If you want neater slices, use a hot, dry knife and wipe it between cuts. A springform pan allows for easy removal, but if using a pie dish, line it with parchment for better slicing. For added depth of flavor, consider adding a pinch of salt to the crust or a tablespoon of sour cream to the filling.
Variations and Customizations
There are endless ways to personalize this cheesecake. Swap out regular Oreos for flavored varieties such as Golden Oreos, Mint, Peanut Butter, or Birthday Cake. Use a chocolate cookie crust or a graham cracker crust instead of Oreos for a different flavor base. Mix in chocolate chips, peanut butter swirls, caramel drizzle, or fruit preserves for added variety. For a festive touch, add food coloring to the filling for holidays or themed parties. If you want a lighter version, use reduced-fat cream cheese and a sugar substitute, though the texture may be slightly different. To make it gluten-free, use gluten-free Oreo-style cookies. Vegan versions can be made using dairy-free cream cheese, coconut whipped cream, and plant-based butter and cookies. For individual servings, assemble the dessert in jars or cups. You can even freeze it for a firmer, ice-cream-like texture—just thaw slightly before serving.
Health Considerations and Nutritional Value
While undeniably indulgent, the No-Bake Oreo Cheesecake Dream can be enjoyed in moderation as part of a balanced lifestyle. A typical slice contains about 400–600 calories, with high fat and sugar content due to the cream cheese, heavy cream, and cookies. Those watching their intake can reduce the portion size or substitute ingredients such as light cream cheese, reduced-fat cookies, or sugar-free whipped topping. However, keep in mind that texture and flavor may be compromised with low-fat alternatives. This dessert is not suitable for those with dairy allergies, but lactose-free and vegan substitutions can make it more inclusive. Always check product labels for allergens and nutritional details. While not a health food, it is a source of comfort and joy, which is a valid component of wellness. Enjoying it on special occasions can contribute to emotional satisfaction and social bonding.
FAQ
Can I freeze the cheesecake? Yes, it freezes well. Wrap it tightly and store for up to 1 month. Thaw in the fridge before serving.
Can I make it ahead of time? Absolutely—making it a day in advance is ideal as it gives the cheesecake time to fully set and enhances the flavor.
How long does it last in the fridge? Stored in an airtight container, it lasts 4–5 days.
Can I use Cool Whip instead of heavy cream? Yes, about 2½ to 3 cups of Cool Whip can replace the whipped cream, though the texture will be slightly different.
What if I don’t have a springform pan? Use a pie dish or any similar container; just be aware it may be more difficult to remove neatly.
Can I use different cookies? Yes, you can experiment with other sandwich cookies or even graham crackers for the crust and mix-ins.
Why is my cheesecake not setting? Make sure you used full-fat cream cheese and whipped the cream properly. Also, don’t skip the chilling time.
Can I add gelatin to help it set? You can, especially if serving in a warmer environment, but it’s not strictly necessary if the filling is whipped well and chilled properly.

No-Bake Oreo Cheesecake Dream
Ingredients
- Oreo Crust
- 22 Oreo cookies 250g
- 5 tablespoons unsalted butter melted (72g)
- Oreo Cheesecake Filling
- 1 1/4 cups cold heavy whipping cream 300ml
- 24 oz full-fat brick-style cream cheese softened to room temperature (678g) — avoid using the spreadable type
- 1/2 cup granulated sugar 100g
- 2 tablespoons powdered sugar
- 1/4 cup sour cream room temperature (60g)
- 2 teaspoons Amoretti French Vanilla Compound or 1 teaspoon pure vanilla extract
- 16 Oreo cookies chopped (182g)
- Homemade Whipped Cream
- 1/2 cup heavy whipping cream 120ml
- 2 tablespoons powdered sugar
- 1/4 teaspoon pure vanilla extract
- Garnish
- 6 Oreo cookies halved
Instructions
Prepare the Oreo Cookie Crust
- Begin by placing the Oreo cookies into a food processor and pulsing them into a fine crumb. Transfer the crumbs to a medium-sized mixing bowl and pour in the melted butter. Stir together until the mixture is evenly combined. Press the crumb mixture firmly into the bottom and up the sides of a 9-inch or 10-inch springform pan. To ensure the crust is compact and holds together well when sliced, use a flat-bottomed glass or jar to press it down tightly. Place the pan in the freezer for 10 to 20 minutes to allow the crust to firm up while you prepare the filling.
Make the Oreo Cheesecake Filling
- In a mixing bowl, use a hand mixer or a stand mixer with a whisk attachment to whip the cold heavy cream on medium-high speed until stiff peaks form, which should take about 4 to 5 minutes. Set this whipped cream aside. In a separate large bowl, beat the softened cream cheese together with the granulated sugar on medium speed until smooth and creamy, scraping down the sides of the bowl as needed. Add in the powdered sugar, sour cream, and either the Amoretti French Vanilla Compound or pure vanilla extract. Continue beating on medium-high speed for 2 to 3 minutes until the mixture is silky and free of lumps. Using a rubber spatula, gently fold the whipped cream into the cream cheese mixture until fully incorporated. Then, fold in the chopped Oreo cookies, distributing them evenly throughout the filling. Retrieve the crust from the freezer and spoon the cheesecake filling into it. Spread it out evenly to the edges, then smooth the surface with an angled spatula. Cover the pan tightly with plastic wrap or foil and refrigerate for at least 8 hours, or up to 2 days. For the best consistency and flavor, allow the cheesecake to chill overnight.
Make the Homemade Whipped Cream
- Ensure the cheesecake has fully set before preparing the whipped cream. For best results, place the bowl you’ll be using—a metal bowl is ideal—in the refrigerator to chill for 15 to 30 minutes. Once chilled, pour in the heavy whipping cream, powdered sugar, and vanilla extract. Using a hand mixer or a stand mixer with the whisk attachment, beat the mixture on high speed for 1 to 2 minutes, or until stiff peaks form.
Assemble the Cheesecake
- When you’re ready to serve, carefully remove the outer ring of the springform pan. Top the cheesecake with swirls of the freshly whipped cream and garnish with additional Oreo cookie halves or crumbs for a decorative and delicious finish.