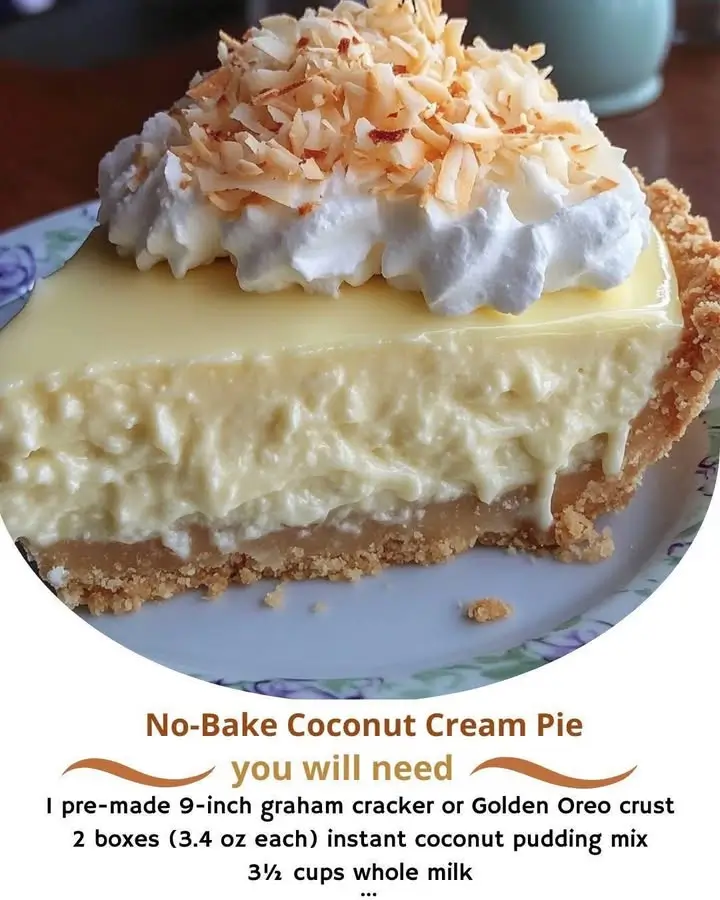
No-Bake Coconut Cream Pie – Creamy, Dreamy, and Oven-Free Dessert Delight
There’s something irresistibly comforting about a creamy, rich coconut cream pie—especially when you don’t have to turn on your oven. This no-bake version delivers all the lusciousness of the classic dessert with none of the hassle. With a buttery graham cracker crust, a velvety coconut custard filling, and a cloud-like topping of whipped cream, this No-Bake Coconut Cream Pie is the ultimate indulgence for warm summer days, holiday gatherings, or any time you’re craving a tropical treat. Best of all? It comes together in under 30 minutes and sets beautifully in the refrigerator. Let’s dive into why this pie has become a beloved favorite across generations—and how you can make it perfectly every single time.
The History
Coconut cream pie has its roots in American Southern cuisine, where coconuts were considered a luxury ingredient brought in from tropical regions via trade routes. By the early 20th century, with the widespread availability of canned coconut milk and shredded coconut, home bakers began experimenting with creamy desserts that captured the tropical essence of the Caribbean and Hawaii. The traditional baked version involves a cooked custard made with egg yolks, milk, sugar, and coconut, poured into a pre-baked pie shell. However, as convenience cooking gained popularity in the mid-century, especially with the rise of instant pudding mixes and refrigeration, the no-bake variation emerged as a quick, accessible alternative. This modern twist maintains the soul of the original while streamlining preparation—making it perfect for picnics, potlucks, and last-minute desserts. Today, the no-bake coconut cream pie stands as a testament to culinary evolution, blending tradition with innovation for maximum flavor and minimal effort.
Ingredients Breakdown
Every great dessert starts with quality ingredients, and this no-bake pie is no exception. Here’s a detailed look at each component and why it matters:
- Graham Cracker Crumbs: The foundation of our crust, these provide a slightly sweet, honeyed crunch that pairs beautifully with coconut. You can use store-bought crumbs or crush full sheets of graham crackers for a fresher taste.
- Butter (unsalted): Melted butter binds the crust together and adds richness. Unsalted allows you to control the salt level precisely.
- Brown Sugar: Adds depth and caramel notes to the crust, enhancing the overall warmth of the pie.
- Shredded Coconut (sweetened): The star of the show! Sweetened shredded coconut gives the filling its signature texture and intense tropical flavor. For extra toastiness, lightly toast the coconut before using.
- Cream Cheese (full-fat, softened): Provides structure and tanginess to balance the sweetness. Full-fat ensures a luxuriously smooth texture.
- Vanilla Pudding Mix (instant): A convenient shortcut that thickens the filling quickly without cooking. Opt for premium brands for better flavor.
- Cold Milk (whole): Used to activate the pudding mix. Whole milk yields the creamiest consistency.
- Sweetened Condensed Milk: Adds sweetness, body, and silkiness. It’s essential for that dreamy mouthfeel.
- Heavy Whipping Cream: Whipped to soft peaks, it gives the pie its airy lightness and professional finish.
- Pure Vanilla Extract: Enhances all the flavors and rounds out the sweetness.
- Salt: Just a pinch to elevate and balance the sweetness.
- Additional Toppings (optional): Toasted coconut flakes, maraschino cherries, chocolate shavings, or fresh berries for garnish.
Step-by-Step Recipe
- Prepare the Crust: In a medium bowl, combine 1½ cups graham cracker crumbs, ¼ cup packed brown sugar, and ½ teaspoon salt. Pour in 6 tablespoons melted unsalted butter and stir until the mixture resembles wet sand. Press firmly into the bottom and up the sides of a 9-inch pie dish using the back of a spoon or a flat-bottomed glass. Chill in the refrigerator for at least 20 minutes to set.
- Toast the Coconut (Optional but Recommended): Spread 1 cup of sweetened shredded coconut evenly on a baking sheet. Bake at 350°F (175°C) for 5–8 minutes, stirring once, until golden brown. Watch closely to avoid burning. Set aside to cool completely.
- Beat the Cream Cheese: In a large mixing bowl, beat 8 oz softened cream cheese with an electric mixer on medium speed until smooth and creamy, about 1–2 minutes. Scrape down the sides as needed.
- Add Condensed Milk and Flavorings: Gradually add 1 cup sweetened condensed milk, 1 teaspoon vanilla extract, and a pinch of salt. Beat on medium until fully incorporated and fluffy, about 2 minutes.
- Prepare the Pudding: In another bowl, pour 2 cups cold whole milk. Add one 3.4-oz package of instant vanilla pudding mix. Whisk vigorously for 2 minutes until thickened. Let stand for 5 minutes to set further.
- Combine Filling Layers: Gently fold the prepared pudding into the cream cheese mixture until smooth and uniform. Stir in ½ cup of toasted (or untoasted) coconut. Reserve the remaining ½ cup for topping.
- Whip the Cream: In a clean bowl, beat 1 cup cold heavy whipping cream with a hand mixer or stand mixer until soft peaks form, about 3–4 minutes. Avoid over-beating.
- Fold in Whipped Cream: Carefully fold the whipped cream into the coconut filling in two additions, using a spatula. This keeps the mixture light and airy.
- Assemble the Pie: Remove the chilled crust from the refrigerator. Pour the filling into the crust and smooth the top with an offset spatula or the back of a spoon.
- Chill: Cover loosely with plastic wrap and refrigerate for at least 4 hours—or ideally overnight—to allow the pie to set completely.
- Final Touches: Before serving, spread or pipe additional whipped cream around the edges. Sprinkle the reserved toasted coconut over the top. Add optional garnishes like cherries or berries.
Tips for Success
- Use Cold Ingredients: Ensure your milk and heavy cream are well-chilled. This helps the pudding thicken properly and the whipped cream to peak faster.
- Don’t Skip the Chill Time: Rushing this step leads to a runny pie. For best results, let it set for at least 4 hours, but 6–8 is ideal.
- Toast Your Coconut: Even if you’re short on time, take 5 minutes to toast the coconut. It transforms the flavor from good to extraordinary.
- Prevent Weeping: If your whipped cream starts to weep (release liquid), it’s overbeaten. Stop as soon as soft peaks hold their shape.
- Crust Stability: Press the crust firmly and evenly. If it cracks after chilling, press it again gently with damp fingers.
- Slice Cleanly: Dip a sharp knife in hot water and wipe dry between cuts for neat slices.
- Make Ahead Friendly: This pie can be made up to 2 days in advance. Add whipped cream and garnish just before serving to maintain freshness.
Variations and Customizations
This no-bake coconut cream pie is incredibly versatile. Here are some delicious ways to personalize it:
- Gluten-Free Version: Use gluten-free graham crackers or a nut-based crust (like almond flour and dates) for a celiac-friendly option.
- Dairy-Free/Vegan Option: Substitute cream cheese with vegan cream cheese, use coconut milk beverage instead of dairy milk, and replace heavy cream with chilled coconut cream. Use dairy-free condensed milk or homemade substitute (coconut milk + sugar, reduced).
- Chocolate Coconut Fusion: Add ½ cup crushed chocolate cookies to the crust and swirl melted dark chocolate into the filling. Top with chocolate-dipped coconut clusters.
- Tropical Twist: Mix in ½ cup diced mango or pineapple for a fruity upgrade. Pair with macadamia nuts in the crust for extra crunch.
- Mocha Coconut Pie: Add 1 tablespoon instant espresso powder to the pudding mix for a coffee-coconut blend.
- Layered Parfait Style: Skip the pie dish and layer crust, filling, and whipped cream in mason jars for individual servings.
- Almond Coconut Delight: Replace vanilla pudding with almond-flavored pudding and add a few drops of almond extract to the filling.
- Boozy Version (Adults Only): Add 1–2 tablespoons of rum, coconut liqueur (like Malibu), or Kahlúa to the filling for a spirited kick.
Health Considerations and Nutritional Value
While undeniably decadent, this pie does come with considerations for those monitoring their dietary intake:
- Sugar Content: This recipe contains significant sugar from sweetened condensed milk, pudding mix, brown sugar, and shredded coconut. One slice (1/8 of pie) may contain 30–40g of sugar. For lower sugar options, consider using sugar-free pudding mix, low-sugar condensed milk, and unsweetened coconut.
- Fat Content: High in saturated fat due to butter, cream cheese, and heavy cream. A single serving may contain 20–25g of fat. Lighter versions can use reduced-fat cream cheese and whipped topping, though texture may be affected.
- Dairy Sensitivity: Contains milk, cream, and cream cheese. Lactose-intolerant individuals should opt for dairy-free alternatives.
- Calories: Estimated at 450–550 calories per slice depending on ingredients. Best enjoyed in moderation as an occasional treat.
- Nutritional Benefits: Coconut provides medium-chain triglycerides (MCTs), which some studies suggest may support metabolism. However, portion size matters. The pie also offers calcium from dairy and small amounts of fiber from graham crackers and coconut.
Ingredients
- 1½ cups graham cracker crumbs (about 10 full crackers)
- 6 tbsp unsalted butter, melted
- ¼ cup packed brown sugar
- ½ tsp salt
- 1 cup sweetened shredded coconut, divided
- 8 oz cream cheese, softened
- 1 cup sweetened condensed milk
- 1 tsp pure vanilla extract
- 1 (3.4 oz) package instant vanilla pudding mix
- 2 cups cold whole milk
- 1 cup cold heavy whipping cream
- Additional whipped cream and toasted coconut for garnish (optional)
Directions
- In a bowl, mix graham cracker crumbs, brown sugar, and salt. Stir in melted butter until combined. Press into a 9-inch pie dish and chill for 20 minutes.
- Meanwhile, toast ½ cup of the shredded coconut on a baking sheet at 350°F for 5–8 minutes until golden. Cool completely. Reserve remaining ½ cup for later.
- In a large bowl, beat cream cheese until smooth. Add sweetened condensed milk, vanilla, and salt; beat until fluffy.
- In another bowl, whisk cold milk and pudding mix for 2 minutes. Let sit 5 minutes.
- Fold pudding into cream cheese mixture. Stir in ½ cup toasted coconut.
- Beat heavy cream until soft peaks form. Gently fold into filling.
- Pour filling into chilled crust. Smooth top and refrigerate 4+ hours until firm.
- Before serving, top with whipped cream and sprinkle reserved coconut. Garnish as desired and slice.
FAQ
Can I make this pie ahead of time?
Yes! This pie keeps well in the refrigerator for up to 3 days. Add whipped cream and garnish just before serving.
Why is my filling runny?
This usually happens if the pudding wasn’t mixed long enough or the milk wasn’t cold. Also, insufficient chilling time prevents proper setting.
Can I freeze this pie?
Freezing is not recommended. The texture of the cream cheese and whipped cream breaks down upon thawing, resulting in a watery, grainy pie.
Can I use coconut milk instead of regular milk?
Yes! For a more intense coconut flavor, substitute full-fat canned coconut milk for whole milk. Shake the can well before measuring.
Is there a way to make this without cream cheese?
You can omit it, but the filling will be less stable and rich. Consider adding an extra ½ cup of whipped cream and increasing pudding to two boxes for thickness.
What kind of shredded coconut should I use?
Sweetened is traditional and most widely available. Unsweetened works too but will result in a less sweet, more natural-tasting pie—adjust sugar accordingly.
Can I use whipped topping instead of heavy cream?
Absolutely. Substitute 1 cup of thawed frozen whipped topping (like Cool Whip) for the freshly whipped cream to save time.
Summary
This No-Bake Coconut Cream Pie is a heavenly, creamy dessert that requires no oven and delivers maximum flavor with minimal effort. Rich, tropical, and luxuriously smooth, it’s the perfect make-ahead treat for any occasion.