Introduction
Indulging in rich, buttery caramels doesn’t have to mean spending hours over a stove or mastering complex candy-making techniques. With the convenience of modern kitchen appliances, you can now create delicious homemade caramels right in your microwave. Microwave caramels offer a quick, easy, and mess-free way to enjoy this classic confection without the need for candy thermometers or constant stirring. Whether you’re preparing a sweet treat for yourself, crafting holiday gifts, or looking for an impressive dessert to serve at gatherings, microwave caramels are a delightful option that anyone can master—even beginners. This guide dives deep into everything you need to know about making perfect microwave caramels, from the history of caramel to ingredient insights, detailed step-by-step instructions, helpful tips, variations, nutritional facts, and frequently asked questions.
The History
Caramel has a long and rich culinary history that dates back centuries. The word “caramel” is believed to originate from the Spanish and Portuguese word “caramelo,” which itself may have roots in Late Latin “cannellum,” meaning “sugar cane.” Originally, caramel was made by heating sugar until it melted and turned golden brown—a process known as dry caramelization. Over time, cooks began adding cream, butter, and other ingredients to create a softer, chewier confection. By the 19th century, caramel candies became popular in Europe and North America, especially as milk and sugar became more widely available. The industrial revolution allowed for mass production, but homemade versions remained cherished family treats. Today, with innovations in kitchen technology—including microwaves—making caramels at home has become simpler than ever. The microwave method preserves the authentic flavor and texture while drastically reducing preparation time and effort, making it a favorite among modern home bakers.
Ingredients Breakdown
The magic of microwave caramels lies in just a few high-quality ingredients that come together to form a smooth, creamy, and deeply flavorful candy. Here’s a detailed breakdown:
- Sugar: The foundation of any caramel, granulated sugar provides sweetness and undergoes transformation when heated to develop the characteristic golden color and rich flavor.
- Brown Sugar: Adds depth, moisture, and a hint of molasses flavor, enhancing the complexity of the final product.
- Heavy Cream: Essential for creating a smooth, creamy texture. Its high fat content prevents crystallization and contributes to a luxurious mouthfeel.
- Unsalted Butter: Adds richness and helps emulsify the mixture. Using unsalted butter allows better control over the salt content.
- Corn Syrup: Prevents sugar recrystallization, ensuring the caramels remain soft and chewy instead of grainy.
- Salt: Enhances flavor and balances sweetness. You can use regular table salt or elevate the taste with flaky sea salt or Himalayan pink salt.
- Vanilla Extract: A touch of pure vanilla adds warmth and aromatic depth, rounding out the overall flavor profile.
Optional additions include nuts (like pecans or walnuts), chocolate drizzle, espresso powder, or even a splash of liqueur such as bourbon or rum for an adult twist.
Step-by-Step Recipe
Follow these simple steps to make perfect microwave caramels at home:
- Prepare Your Pan: Line an 8×8-inch baking dish with parchment paper, allowing the edges to overhang for easy removal. Lightly grease the parchment with butter or non-stick spray.
- Combine Ingredients: In a large microwave-safe bowl, add 1 cup of granulated sugar, 1 cup of packed light brown sugar, 1/2 cup of corn syrup, 1/2 cup of water, 1 cup of heavy cream, and 1/2 cup (1 stick) of unsalted butter. Stir gently to combine.
- Microwave Mixture: Place the bowl in the microwave and heat on high power for 5 minutes. Remove and stir well. Continue microwaving in 2-minute intervals, stirring after each interval. After the first few rounds, reduce to 1-minute increments to prevent overheating. Total cooking time will typically be 10–14 minutes, depending on your microwave’s wattage.
- Monitor Consistency: The caramel is ready when it reaches a deep golden amber color and thickens considerably. It should coat the back of a spoon and leave a clear trail when you run your finger through it. Be cautious—overheating can cause burning.
- Add Flavorings: Once cooked, carefully remove the bowl (it will be very hot) and stir in 1 teaspoon of pure vanilla extract and 1/2 teaspoon of salt. Mix thoroughly until fully incorporated.
- Pour Into Pan: Slowly pour the hot caramel mixture into the prepared baking dish. Use a spatula to smooth the top evenly.
- Cool Completely: Allow the caramels to cool at room temperature for at least 2 hours, or refrigerate for 1 hour to speed up the process. Do not cover until set to avoid condensation.
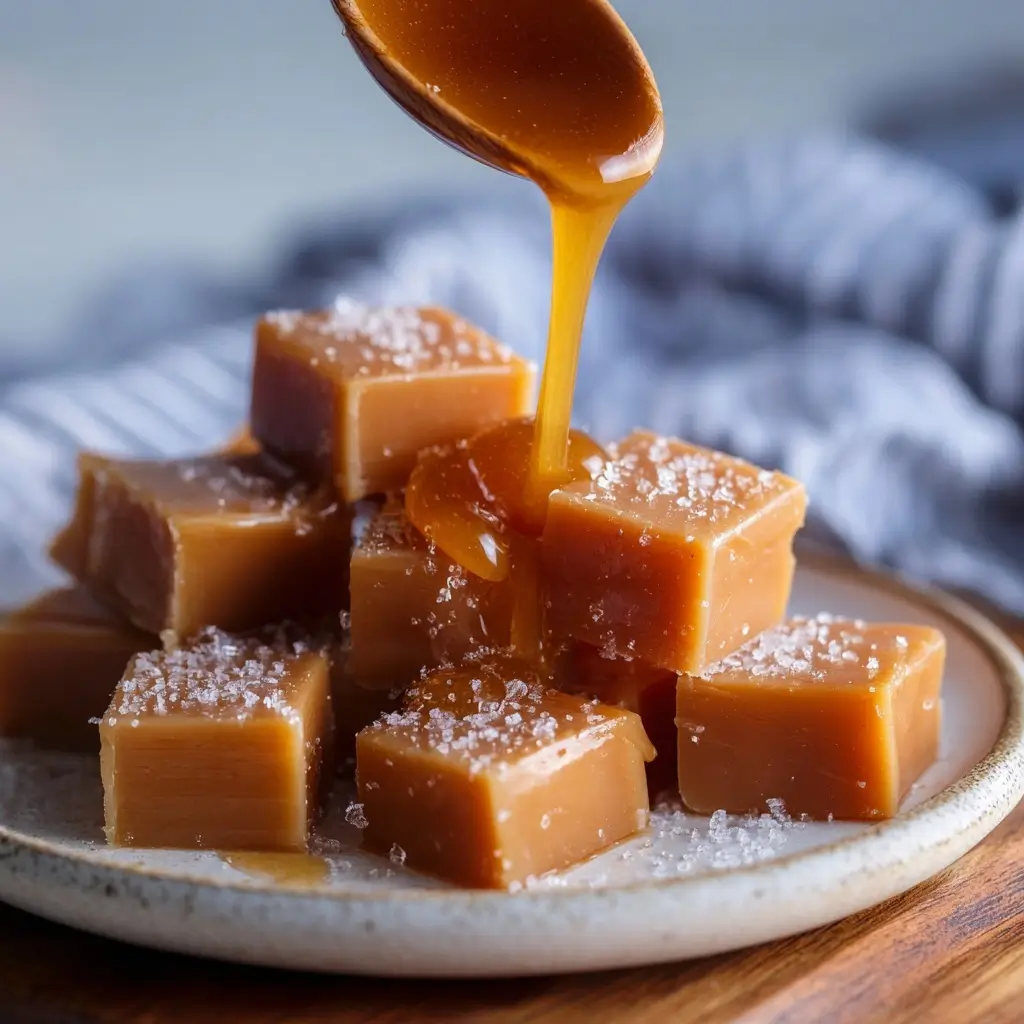
- Cut Into Pieces: Once firm, lift the caramel slab using the parchment overhang. Place on a cutting board and cut into small squares (about 1 inch) using a sharp knife lightly coated with butter or oil.
- Wrap or Store: Wrap individual pieces in wax paper or store in an airtight container with layers separated by parchment paper.
Tips
- Use a Large Bowl: Always use a microwave-safe bowl that is significantly larger than the initial volume of ingredients, as the mixture will bubble up during heating.
- Stir Thoroughly Between Intervals: This ensures even cooking and prevents hot spots or scorching.
- Watch Closely During Final Minutes: Caramel can go from perfect to burnt quickly. Stay nearby and check every minute near the end.
- Avoid Covering While Cooling: Trapped steam can make the surface sticky or lead to condensation, affecting texture.
- Chill Before Cutting: For clean cuts, refrigerate the set caramels for 30 minutes before slicing.
- Keep Children Away: Hot caramel is extremely hot and can cause serious burns. Supervise closely if kids are helping.
- Adjust for Altitude: At higher elevations, liquids boil at lower temperatures, so you may need slightly longer cooking times.
- Taste and Adjust: After cooling, taste a piece. You can sprinkle extra flaky salt on top if desired.
Variations and Customizations
One of the joys of making microwave caramels is the ability to personalize them to suit your taste. Here are some creative variations:
- Sea Salt Caramels: Sprinkle flaky sea salt on top immediately after pouring into the pan for a sweet-and-salty sensation.
- Chocolate-Dipped Caramels: Melt dark, milk, or white chocolate and dip cooled caramel squares halfway. Let harden on parchment paper.
- Nutty Caramels: Fold in 1/2 to 1 cup of toasted chopped pecans, walnuts, or almonds before pouring into the pan.
- Spiced Caramels: Add a pinch of cinnamon, nutmeg, or pumpkin spice for a warm, seasonal twist.
- Coffee Caramels: Dissolve 1–2 teaspoons of instant espresso powder into the warm mixture for a mocha flavor.
- Bourbon or Whiskey Caramels: Stir in 1–2 tablespoons of your favorite spirit after cooking for a sophisticated kick.
- Coconut Caramels: Replace heavy cream with full-fat coconut milk for a dairy-free, tropical version.
- Peppermint Caramels: Add a few drops of peppermint extract and swirl in crushed candy canes during the holidays.
- Swirls and Layers: Create marbled effects by gently swirling in peanut butter, dulce de leche, or fruit preserves.
- Gourmet Gift Boxes: Package different varieties in decorative tins or boxes tied with ribbon for thoughtful handmade presents.
Health Considerations and Nutritional Value
While microwave caramels are undeniably delicious, they are also high in sugar and calories, so moderation is key. A typical 1-inch square (about 20 grams) contains approximately:
- Calories: 100–120
- Total Fat: 5–6g (mostly from butter and cream)
- Saturated Fat: 3–4g
- Carbohydrates: 14–16g
- Sugars: 12–14g (including added sugars)
- Protein: 0.5g
- Sodium: 50–70mg (depending on added salt)
Dietary Notes:
- Gluten-Free: This recipe is naturally gluten-free, provided all ingredients (especially extracts and additives) are certified gluten-free.
- Dairy-Free Option: Substitute butter with coconut oil and heavy cream with full-fat coconut milk. Results may vary slightly in texture and flavor.
- Vegan Adaptation: Use plant-based butter, coconut cream, and agave syrup instead of honey (if needed). Note that traditional corn syrup is vegan, but check labels.
- Low-Sugar Alternatives: Sugar substitutes like erythritol or monk fruit blends can be experimented with, though results may differ in texture and browning due to lack of caramelization.
- Diabetes and Blood Sugar: Due to high glycemic load, individuals with diabetes should consume sparingly or avoid unless modified with low-glycemic sweeteners under dietary guidance.
- Portion Control: Enjoy one or two pieces as a treat rather than eating multiple servings at once.
Ingredients
- 1 cup granulated sugar
- 1 cup packed light brown sugar
- 1/2 cup light corn syrup
- 1/2 cup water
- 1 cup heavy cream (preferably whole, not ultra-pasteurized)
- 1/2 cup (1 stick) unsalted butter, cut into pieces
- 1 teaspoon pure vanilla extract
- 1/2 teaspoon salt (adjust to taste)
- Optional: flaky sea salt, nuts, chocolate, extracts, or liqueurs for customization
Directions
- Line an 8×8-inch square baking pan with parchment paper, leaving overhang on two sides for lifting later. Lightly grease the parchment.
- In a large microwave-safe glass or ceramic bowl, combine granulated sugar, brown sugar, corn syrup, water, heavy cream, and butter.
- Stir gently until the sugars are moistened and the mixture is combined.
- Microwave on high for 5 minutes. Remove and stir thoroughly with a heat-resistant spatula or wooden spoon.
- Return to microwave and cook in 2-minute bursts, stirring well after each interval. After 9–10 minutes total, begin checking every minute.
- Continue cooking until the mixture turns a rich golden amber color and thickens enough to coat the back of a spoon (typically 10–14 minutes total).
- Carefully remove the bowl (it will be extremely hot) and stir in vanilla extract and salt until fully blended.
- Pour the caramel into the prepared pan and spread evenly with a greased spatula.
- Let cool at room temperature for 2 hours, or refrigerate for 1 hour until firm.
- Once set, lift the caramel block out using the parchment overhang.
- Place on a cutting board and cut into 1-inch squares using a sharp knife dipped in hot water or lightly greased.
- Wrap individually in wax paper or store in an airtial container between layers of parchment.
- Store at cool room temperature for up to 2 weeks, or refrigerate for up to 3 weeks. Bring to room temperature before serving for best texture.
FAQ
Can I double the recipe?
Yes, but only if your microwave-safe bowl is large enough to handle the increased volume safely. Doubling increases bubbling risk, so monitor closely and consider cooking in batches.
Why did my caramels turn out grainy?
Graininess usually occurs due to sugar crystallization. Ensure you stir well in the beginning and use corn syrup, which inhibits crystal formation. Avoid stirring during cooking once boiling begins.
Can I use margarine instead of butter?
It’s not recommended. Margarine contains more water and less fat, which can alter texture and cause separation. Stick to real unsalted butter for best results.
How do I store microwave caramels?
Keep in an airtight container at cool room temperature for up to 2 weeks. In humid climates, refrigeration is advised (up to 3 weeks), but let them come to room temperature before eating.
Can I freeze microwave caramels?
Yes! Wrap tightly in plastic wrap and place in a freezer-safe container. Freeze for up to 3 months. Thaw in the refrigerator overnight, then bring to room temperature before serving.
My caramel didn’t set—what went wrong?
The mixture likely wasn’t cooked long enough. Caramel must reach a sufficient temperature (around 245°F/118°C, the firm-ball stage) to set properly. Next time, cook a bit longer, watching for color and thickness.
Is it safe to make candy in the microwave?
Absolutely, as long as you use microwave-safe containers, monitor closely, and follow safety precautions. The microwave is actually safer than stovetop methods, eliminating open flames and reducing burn risks from splattering.
Can I make soft caramels instead of chewy ones?
For softer caramels, reduce cooking time slightly so the mixture doesn’t thicken as much. Alternatively, increase cream by 1–2 tablespoons for a silkier texture.
What kind of bowl should I use?
A large, deep glass or ceramic bowl labeled microwave-safe. Avoid plastic, metal, or bowls with metallic trim.
Can I use skim milk instead of heavy cream?
No—skim milk lacks the necessary fat content and will result in thin, brittle, or grainy caramels. Always use heavy cream or a suitable high-fat alternative like coconut cream.
Summary
Micro caramels made in the microwave are a fast, foolproof way to enjoy homemade candy with rich flavor and perfect chewiness. With minimal equipment and simple ingredients, you can create gourmet treats ideal for gifting or savoring anytime.