Loaded Cheeseburger Sliders: The Ultimate Mini Burger Experience
If you’re craving a bite-sized explosion of savory, cheesy, and juicy goodness, look no further than Loaded Cheeseburger Sliders. These mini masterpieces pack all the flavor of a classic cheeseburger—juicy beef, melted cheese, crisp lettuce, tangy pickles, onions, and special sauce—into a convenient, shareable format. Whether you’re hosting a backyard BBQ, game day party, or just want to treat your family to something fun and delicious, these sliders are guaranteed to be a hit. In this comprehensive guide, we’ll dive deep into the history, ingredients, step-by-step preparation, tips, variations, health considerations, and frequently asked questions about this beloved comfort food favorite.
The History of the Cheeseburger Slider
The concept of the “slider” dates back to the early 20th century, with origins often attributed to the White Castle restaurant chain, which began serving small, square hamburgers in 1921. These tiny burgers were nicknamed “sliders” because they were so greasy and small that they’d “slide” right down your throat. Over time, the term evolved to describe any miniature burger, typically served on small buns and perfect for parties or appetizers.
Fast forward to modern times, and the idea has been elevated with gourmet toppings, premium ingredients, and creative twists. The loaded cheeseburger slider takes the original concept and amps it up with extra cheese, crispy bacon, caramelized onions, sautéed mushrooms, and a variety of sauces. Today, these sliders are a staple at gatherings, food trucks, and even high-end restaurants, proving that good things really do come in small packages.
Ingredients Breakdown: What Makes a Loaded Cheeseburger Slider So Irresistible?
The magic of a loaded cheeseburger slider lies in its balance of textures and flavors. Each ingredient plays a crucial role in creating a harmonious bite. Here’s a detailed breakdown of what goes into these decadent little burgers:
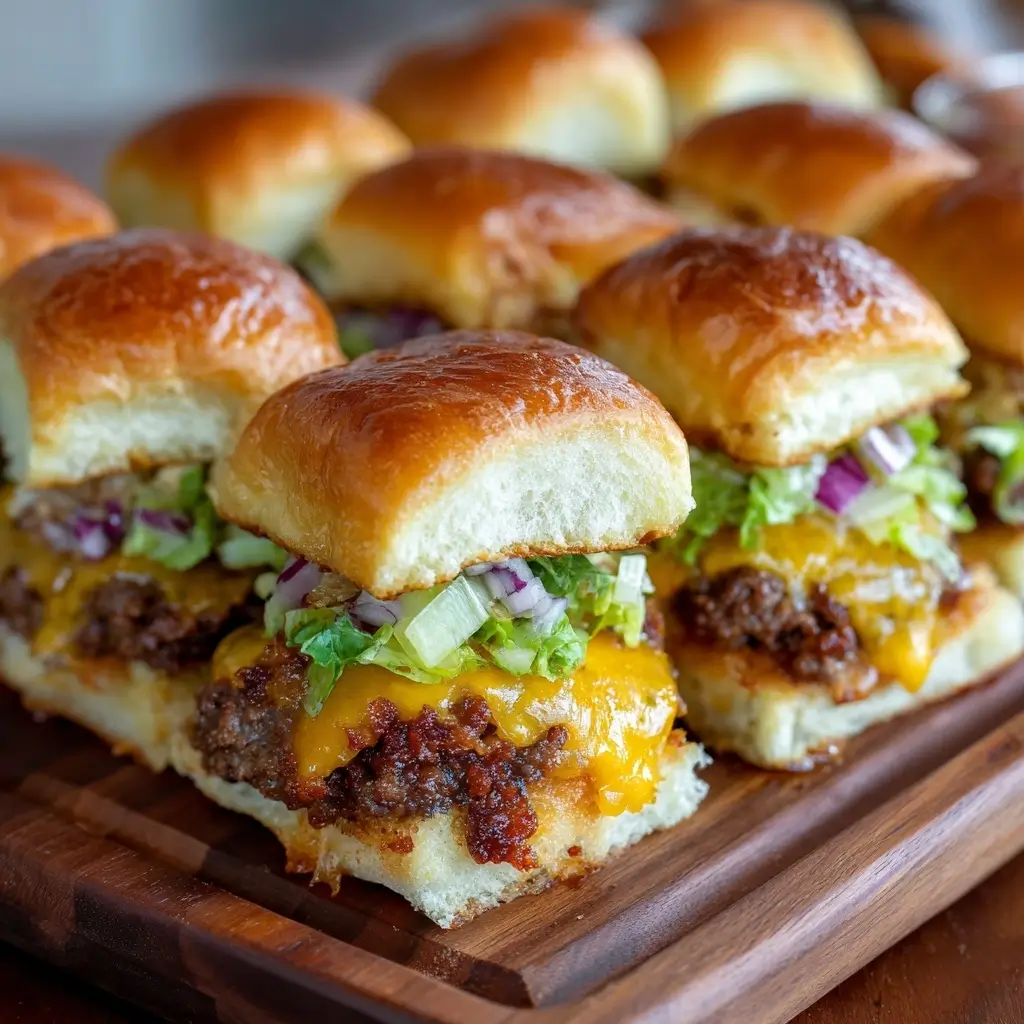
- Ground Beef (80/20 Lean-to-Fat Ratio): This ratio ensures juiciness and rich flavor without being overly greasy. It holds together well during cooking and develops a beautiful crust when seared.
- Brioche Slider Buns: Soft, slightly sweet, and buttery, brioche buns provide the perfect vessel. They hold up well against juicy fillings without getting soggy.
- American Cheese Slices: Known for their excellent meltability and creamy texture, American cheese gives that classic diner-style cheeseburger experience. However, cheddar, pepper jack, or provolone can be used for more robust flavor.
- Crisp Lettuce: Typically iceberg or romaine adds freshness and crunch, balancing out the richness of the meat and cheese.
- Sliced Tomatoes: Ripe but firm tomatoes add juiciness and a touch of acidity.
- Pickles: Dill or bread-and-butter pickles bring tanginess that cuts through the fat and enhances overall flavor.
- Red Onion or Grilled Onions: Raw red onion offers sharpness and color; grilled or caramelized onions add sweetness and depth.
- Bacon (Optional but Recommended): Crispy bacon introduces smoky, salty notes and an extra layer of indulgence.
- Special Sauce: A blend of mayonnaise, ketchup, mustard, relish, garlic powder, onion powder, and a splash of Worcestershire sauce creates a creamy, zesty spread reminiscent of Big Mac sauce.
- Butter (for Toasting Buns): Enhances flavor and gives the buns a golden, crisp exterior.
- Salt and Pepper: Essential seasonings to enhance the natural flavor of the beef.
- Optional Add-ons: Sautéed mushrooms, jalapeños, avocado, fried egg, or blue cheese crumbles for those who love bold variations.
Step-by-Step Recipe: How to Make Perfect Loaded Cheeseburger Sliders at Home
Follow this detailed guide to create mouthwatering, restaurant-quality loaded cheeseburger sliders in your own kitchen. This recipe yields approximately 12 sliders and takes about 45 minutes from start to finish.
Ingredients
- 1 ½ pounds ground beef (80% lean, 20% fat)
- 12 slices American cheese (or preferred melting cheese)
- 12 brioche slider buns, split
- 6 strips thick-cut bacon
- 1 cup shredded iceberg lettuce
- 1 large tomato, thinly sliced
- ½ cup dill pickle chips
- ¼ cup finely sliced red onion
- 3 tablespoons unsalted butter, softened
For the Special Sauce:
- ½ cup mayonnaise
- 2 tablespoons ketchup
- 1 tablespoon yellow mustard
- 1 tablespoon sweet pickle relish
- 1 teaspoon white vinegar
- ½ teaspoon garlic powder
- ½ teaspoon onion powder
- 1 dash Worcestershire sauce
- Salt and pepper to taste
Directions
- Prepare the Special Sauce: In a small bowl, combine mayonnaise, ketchup, mustard, relish, vinegar, garlic powder, onion powder, Worcestershire sauce, salt, and pepper. Mix until smooth and uniform. Cover and refrigerate until ready to use. This allows the flavors to meld together.
- Cook the Bacon: In a skillet over medium heat, cook the bacon strips until crispy, about 4–5 minutes per side. Transfer to a paper towel-lined plate to drain excess grease. Once cooled, crumble or cut into pieces suitable for sliders.
- Preheat the Grill or Skillet: Heat a grill, griddle, or non-stick skillet over medium-high heat. You want it hot enough to sear the patties but not burn them.
- Form the Patties: Divide the ground beef into 12 equal portions (about 2 ounces each). Gently shape them into thin patties slightly wider than your slider buns (they’ll shrink as they cook). Avoid overworking the meat to keep the burgers tender. Season both sides lightly with salt and pepper.
- Cook the Patties: Place the patties on the hot surface. Cook for about 2–3 minutes on the first side until nicely browned. Flip and cook for another 1–2 minutes. During the last minute of cooking, place a slice of cheese on each patty to melt. If desired, cover the pan briefly with a lid to help the cheese melt faster.
- Toast the Buns: While the patties are cooking, spread softened butter on the cut sides of the buns. Toast them on the grill, skillet, or in a toaster oven until golden brown, about 1–2 minutes. Be careful not to burn them.
- Assemble the Sliders: Start with the bottom bun. Spread a generous layer of special sauce. Add the cheesy beef patty, then layer with bacon, lettuce, tomato, pickles, and red onion. Drizzle a little extra sauce on top if desired. Cap with the top bun.
- Serve Immediately: Arrange the sliders on a platter and serve warm. For parties, you can secure them with decorative picks or small skewers for easy handling.
Tips for Making the Best Loaded Cheeseburger Sliders
- Don’t Overmix the Meat: Handle the ground beef gently when forming patties. Overworking leads to dense, tough burgers.
- Keep Patties Thin: Since sliders are small, thinner patties cook quickly and evenly, ensuring they don’t dry out.
- Use Room-Temperature Buns: Cold buns crack when toasted. Let them sit out for 10–15 minutes before toasting.
- Double Up on Cheese: For extra cheesiness, place a second slice under the patty while cooking—it melts into a gooey base layer.
- Make Ahead Components: Prepare the special sauce, cook bacon, and slice veggies a day ahead. Store separately in airtight containers in the fridge.
- Warm Buns Before Assembly: Cold buns make the whole slider feel less cohesive. Warming them enhances flavor and texture.
- Customize Per Guest: Set up a slider bar with toppings so everyone can build their own creation.
- Use a Cookie Cutter for Uniformity: Press ground beef into a round mold using a biscuit cutter for perfectly shaped, consistent patties.
- Drain Excess Grease: After cooking patties, blot with a paper towel if needed to avoid soggy buns.
- Add a Splash of Beer to the Sauce: For a gourmet twist, deglaze the pan with a bit of lager after cooking the burgers and reduce into a rich au jus for dipping.
Variations and Customizations
One of the best things about loaded cheeseburger sliders is how easily they can be customized to suit different tastes, dietary needs, or themed events. Here are some creative ideas:
- Breakfast Sliders: Use sausage or bacon patties, add a fried egg, and swap cheese for cheddar. Serve on croissant buns for a brunch twist.
- Veggie Sliders: Replace beef with plant-based patties or portobello mushrooms. Add hummus, sprouts, and roasted red peppers for a fresh, earthy flavor.
- BBQ Bacon Cheddar Sliders: Top with smoked gouda, crispy onions, and a drizzle of barbecue sauce.
- Spicy Jalapeño Popper Sliders: Mix cream cheese and chopped jalapeños into the beef, top with pepper jack cheese and crispy bacon.
- Hawaiian Sliders: Add a slice of pineapple and teriyaki glaze for a sweet and savory tropical flair.
- Deli Style: Use pastrami or corned beef instead of hamburger, top with Swiss cheese, sauerkraut, and Russian dressing on rye slider buns.
- Blue Cheese & Mushroom: Sauté mushrooms in butter and thyme, then pile onto patties with crumbled blue cheese and arugula.
- Keto-Friendly Sliders: Skip the bun and wrap the filling in lettuce cups or serve between two slices of cheese “bread.”
- Mini Turkey Sliders: Use ground turkey mixed with herbs and spices for a lighter option. Top with goat cheese and sun-dried tomatoes.
- International Flair: Add taco seasoning to the beef, then top with guacamole, salsa, and cotija cheese for Mexican-style sliders—or go Greek with feta, tzatziki, and spinach.
Health Considerations and Nutritional Value
While loaded cheeseburger sliders are undeniably indulgent, there are ways to enjoy them as part of a balanced diet. Here’s a nutritional estimate per slider (based on standard recipe):
- Calories: ~270–320 kcal
- Protein: 12–15g (excellent source from beef and cheese)
- Fat: 18–22g (including saturated fat from cheese and beef)
- Carbohydrates: 14–18g (mostly from the brioche bun)
- Fiber: 1–2g
- Sodium: 450–600mg (can vary based on cheese, bacon, and sauce)
Healthier Swaps:
- Use leaner ground beef (90/10) or ground turkey/chicken.
- Opt for whole wheat or seeded slider buns for added fiber.
- Reduce cheese quantity or use reduced-fat varieties.
- Limit bacon to one piece per slider or omit entirely.
- Make a low-fat version of the special sauce using Greek yogurt instead of mayo.
- Increase vegetable content by adding sprouts, avocado, or grilled zucchini.
Moderation is Key: Enjoy these sliders occasionally as a treat. Pair them with a fresh green salad, fruit platter, or roasted vegetables to balance the meal. For portion control, serve two sliders per person as an appetizer rather than three or four as a main course.
Frequently Asked Questions (FAQ)
Can I make loaded cheeseburger sliders ahead of time?
Yes! You can prep components in advance. Cook and chill the patties, store in the fridge for up to 2 days. Reheat in a skillet or oven before assembling. Assemble sliders just before serving to prevent sogginess.
Can I freeze cheeseburger sliders?
Absolutely. Fully assemble and wrap individually in foil, then place in a freezer-safe bag. Freeze for up to 3 months. Reheat in a 350°F oven for 15–20 minutes (from frozen) until heated through.
What kind of buns work best?
Brioche is ideal for its softness and richness. Hawaiian rolls are another popular choice. For gluten-free options, try almond flour buns or lettuce wraps.
How do I prevent the buns from getting soggy?
Toast the buns thoroughly and apply a thin layer of special sauce as a moisture barrier. Also, pat dry any wet ingredients like tomatoes or pickles before adding them.
Can I bake the sliders instead of grilling?
Yes. Place assembled sliders in a baking dish, cover with foil, and warm at 350°F for 10–12 minutes. This method is great for feeding a crowd.
Are these kid-friendly?
Definitely! Kids love the small size and familiar flavors. You can simplify toppings for picky eaters or let them customize their own.
Can I use a different meat?
Yes—ground lamb, pork, chicken, or even a beef-bison mix can be used. Adjust seasoning accordingly to complement the meat.
What sides go well with sliders?
Classic pairings include french fries, sweet potato fries, coleslaw, onion rings, mac and cheese, or a simple garden salad.
Summary
Loaded Cheeseburger Sliders are the ultimate crowd-pleasing appetizer or main dish, combining juicy beef, melty cheese, crispy bacon, fresh veggies, and signature sauce in a delightful mini format. Easy to customize and perfect for any occasion, these sliders bring big flavor in a small package.