Introduction
Japanese Katsu Bowls with Tonkatsu Sauce are a beloved and iconic comfort food originating from Japan that have found immense popularity around the world. At their heart, they consist of a golden-fried breaded cutlet—usually pork (tonkatsu) or chicken (chicken katsu)—served over a warm bed of steamed rice, drizzled generously with a tangy, sweet-savory tonkatsu sauce, and often accompanied by shredded cabbage, pickled vegetables, and sometimes a soft-cooked egg. These bowls perfectly balance textures and flavors: the crispiness of the katsu, the fluffiness of rice, and the richness of the sauce create an irresistible combination that delights the palate. Popular both in homes and restaurants, they embody the simplicity and depth of Japanese cuisine, where presentation, taste, and nutrition harmonize.
The History of Katsu Bowls
The origin of katsu can be traced back to the late 19th century during the Meiji era, a period marked by Japan’s rapid modernization and adoption of Western customs and cuisine. Tonkatsu, inspired by the Western breaded cutlet, particularly the French côtelette and the Austrian schnitzel, was adapted to Japanese tastes by using panko breadcrumbs and deep-frying pork cutlets. It became widely popular by the early 20th century and evolved into a dish served not just standalone but also in donburi (rice bowl) form, known as katsudon. The katsu bowl as we know it today, a casual meal composed of katsu over rice with toppings, became popular in the post-WWII era and continues to be a staple in bento lunches, casual eateries, and even high-end Japanese fusion restaurants. Tonkatsu sauce, an integral part of the dish, was developed to complement the cutlet, drawing influence from Worcestershire sauce and incorporating ingredients like fruits, soy sauce, and vinegar to match Japanese flavor preferences.
Ingredients Breakdown
For the Katsu: 2 boneless pork loin chops or chicken breasts, salt and pepper to taste, ½ cup all-purpose flour, 1 large egg (beaten), 1 cup panko breadcrumbs, vegetable oil for frying. For the Tonkatsu Sauce: ¼ cup ketchup, 2 tablespoons Worcestershire sauce, 1 tablespoon soy sauce, 1 tablespoon mirin (sweet rice wine), 1 teaspoon sugar, ½ teaspoon Dijon mustard (optional). For the Bowl: 2 cups cooked short-grain Japanese rice, 1 cup shredded cabbage, pickled ginger or takuan (optional), sliced green onions or sesame seeds for garnish. Optional additions include a soft-boiled egg, blanched vegetables like broccoli or snow peas, or a drizzle of Japanese mayo.
Step-by-Step Recipe:
- Prepare the meat: Pat dry the pork or chicken and season both sides with salt and pepper. If using chicken breasts, slice them in half horizontally for even cooking. Use a meat mallet to pound the meat to about ½ inch thickness for tenderness.
- Set up the breading station: Place flour, beaten egg, and panko breadcrumbs in three separate shallow bowls. Dredge each cutlet first in flour, then dip into the egg, and finally coat with panko, pressing gently to adhere well.
- Fry the cutlets: Heat about ½ inch of vegetable oil in a heavy skillet over medium-high heat until shimmering (around 350°F or 175°C). Carefully place the breaded cutlets into the oil and fry until golden brown and cooked through, about 3–4 minutes per side. Remove and drain on paper towels or a wire rack.
- Make the tonkatsu sauce: While the cutlets rest, combine ketchup, Worcestershire sauce, soy sauce, mirin, sugar, and mustard (if using) in a small saucepan. Simmer over low heat for 2–3 minutes, stirring until smooth and thickened. Set aside to cool slightly.
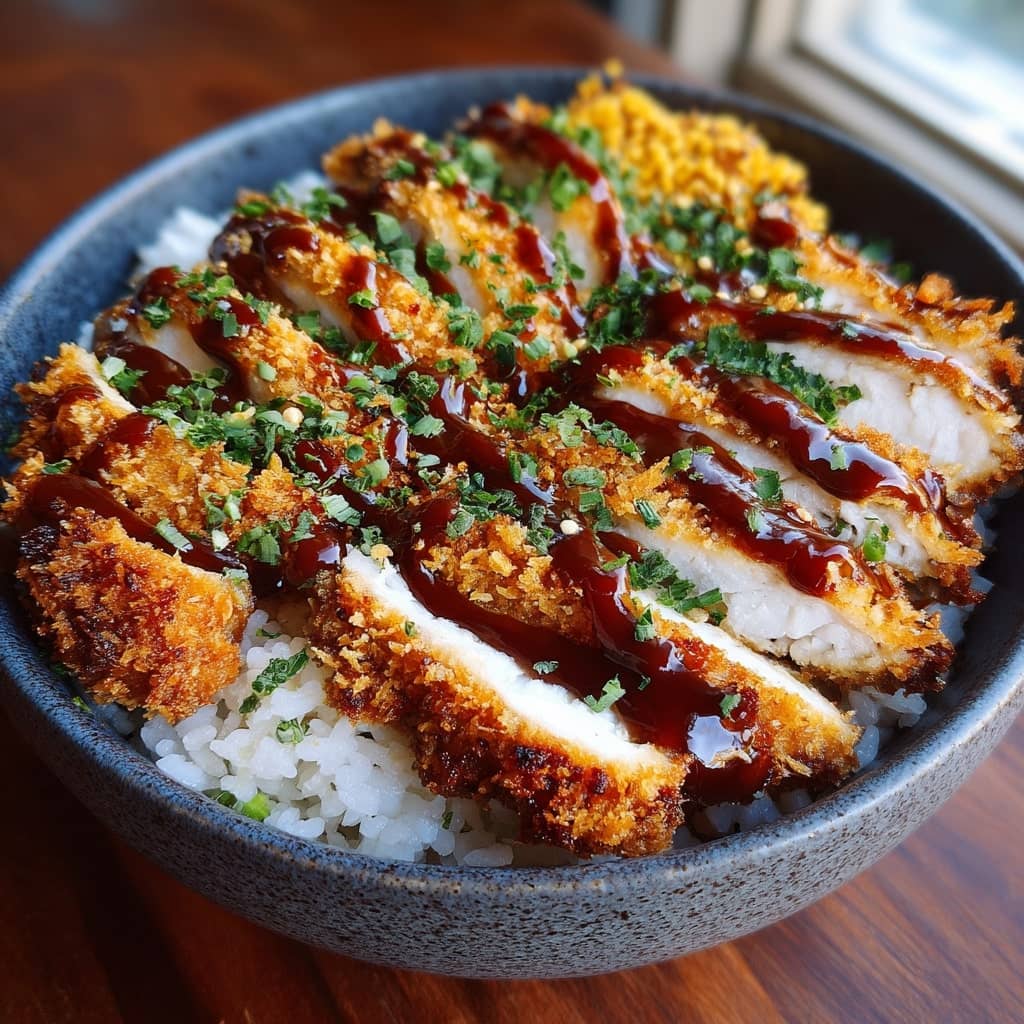
- Assemble the bowls: Divide the cooked rice between two bowls. Slice the katsu into strips and arrange on top of the rice. Drizzle with warm tonkatsu sauce, then garnish with shredded cabbage, pickled vegetables, and any desired toppings such as sesame seeds, green onions, or a soft-boiled egg. Serve immediately.
Tips for the Perfect Katsu Bowl
Use panko breadcrumbs rather than regular ones, as they create a lighter, crispier crust. Don’t skip pounding the meat—it ensures even cooking and tenderness. Let the breaded cutlets rest for a few minutes before frying; this helps the coating stick better. When frying, don’t overcrowd the pan, as this lowers the oil temperature and results in greasy katsu. For extra crunch, double-fry the cutlets: fry once until lightly golden, let rest, then refry until deep golden brown. When making the tonkatsu sauce, taste as you go—you can adjust the sweetness or tanginess depending on personal preference. Always use short-grain rice for authentic texture and stickiness, and fluff it with a rice paddle before serving to release excess moisture.
Variations and Customizations
Japanese Katsu Bowls are endlessly customizable. Swap pork for chicken, tofu, or even eggplant for a vegetarian version. Chicken katsu is especially popular among kids, while tofu katsu offers a satisfying plant-based alternative—press the tofu to remove excess moisture, then proceed with breading and frying. For a spicier kick, add a touch of sriracha or wasabi to the tonkatsu sauce. Serve with curry sauce instead of tonkatsu sauce for a Japanese curry katsu bowl. Another variation is katsudon, where the fried cutlet is simmered in a dashi-based broth with onions and beaten egg, then poured over rice. You can also add international flair by serving it with kimchi, spicy mayo, or avocado slices. Brown rice or quinoa can be used for a healthier grain base. For gluten-free versions, use rice flour and gluten-free panko, and replace soy sauce with tamari.
Health Considerations and Nutritional Value
While traditional katsu bowls are fried and relatively indulgent, they can still be enjoyed as part of a balanced diet. One typical serving provides a good amount of protein, especially if made with lean pork or chicken breast. Panko breadcrumbs absorb less oil than regular ones, helping reduce total fat intake. The shredded cabbage and optional veggies contribute fiber, vitamins, and a sense of freshness that offsets the richness of the meat and sauce. Tonkatsu sauce contains sugar and sodium, so it’s best used in moderation. To make the dish lighter, consider oven-baking or air-frying the cutlets instead of deep-frying. Opt for brown rice for added fiber, or go low-carb by replacing rice with cauliflower rice or a bed of greens. Watching portion sizes and pairing with a miso soup or simple cucumber salad can turn this comfort food into a well-rounded, satisfying meal. Homemade versions allow for control over ingredients, reducing sodium and unhealthy fats typically found in restaurant versions.
FAQ
Q: Can I make katsu ahead of time? A: Yes, you can bread and refrigerate the cutlets for up to 24 hours before frying. Fried katsu can also be reheated in the oven or air fryer to restore crispiness.
Q: Can I use chicken thighs instead of chicken breast? A: Absolutely! Chicken thighs are juicier and remain tender even after frying.
Q: Is tonkatsu sauce the same as Worcestershire sauce? A: Not exactly—tonkatsu sauce contains Worcestershire as a base but is thicker and sweeter, often with added fruit and spices.
Q: Can I freeze katsu? A: Yes, freeze uncooked breaded cutlets between layers of parchment. Fry directly from frozen, adjusting cooking time as needed.
Q: Is this dish gluten-free? A: Traditional katsu is not gluten-free, but with substitutions like gluten-free panko, tamari, and rice flour, it can be adapted easily.
Japanese Katsu Bowls with Tonkatsu Sauce
Ingredients
- 2 boneless skinless chicken breasts or pork chops
- 1 cup all-purpose flour
- 2 large eggs beaten
- 2 cups panko breadcrumbs
- 1 teaspoon salt
- ½ teaspoon black pepper
- ½ teaspoon garlic powder
- ½ cup vegetable oil for frying
- 2 cups cooked white rice
- ¼ cup tonkatsu sauce store-bought or homemade
- 2 tablespoons Japanese mayonnaise optional
- Chopped parsley or sliced green onions for garnish
- Special Equipment:
- Shallow frying pan
- Meat mallet to pound meat evenly
- Wire rack to drain excess oil after frying
Instructions
- Prepare the Chicken: Use a meat mallet to pound the chicken breasts to an even thickness of about ½ inch. Season both sides evenly with salt, black pepper, and garlic powder.
- Bread the Chicken: Create a dredging station with three shallow bowls—one filled with flour, another with beaten eggs, and the third with panko breadcrumbs. Coat each piece of chicken first in flour, then dip it into the egg, and finally press it into the panko until fully coated.
- Fry Until Golden: In a shallow frying pan, heat the vegetable oil over medium heat. Once the oil is hot, cook the breaded chicken for 3–4 minutes on each side until it’s golden brown and cooked through. Transfer to a wire rack to drain any excess oil.
- Build the Bowls: Spoon the cooked white rice evenly into serving bowls. Slice the crispy katsu and arrange it neatly on top of the rice. Drizzle with tonkatsu sauce and, if desired, a bit of Japanese mayo. Finish with a sprinkle of chopped parsley or sliced green onions.
- Serve and Enjoy: Serve immediately while the katsu is still hot and crispy for the best flavor and texture.