Introduction
The Heavenly Raspberry Chocolate Mousse Cake is an indulgent dessert that blends the richness of chocolate with the tartness of fresh raspberries. It is a luxurious treat that appeals to chocolate lovers and fruit enthusiasts alike, offering a balance of textures, from the smooth mousse to the tender cake base. This dessert is ideal for special occasions like birthdays, anniversaries, or holiday gatherings, providing a stunning and mouthwatering experience for your guests. With its elegant presentation and decadent flavors, it’s bound to become a favorite in your recipe repertoire. Whether you are a beginner or an experienced baker, this cake is sure to impress with its sophisticated taste and texture.
The History of Heavenly Raspberry Chocolate Mousse Cake
The combination of chocolate and raspberries dates back centuries, with chocolate being a prized food since the Mayans and Aztecs. Raspberries, on the other hand, have long been cherished for their natural sweetness and tangy flavor. Over time, bakers and chefs have experimented with incorporating these two ingredients into various dessert forms. The mousse cake, as a concept, has evolved from the traditional French mousse dessert, which was originally created to showcase light, airy textures. The Raspberry Chocolate Mousse Cake, as we know it today, likely emerged as part of the global trend for combining bold fruit flavors with rich, creamy desserts. Its popularity soared in the 20th century, when mousse became a trendy feature in many high-end restaurants and home kitchens alike. The cake brings together layers of chocolate sponge cake, raspberry puree, and velvety mousse, creating a delicious harmony between the flavors.
Ingredients Breakdown
To make this indulgent dessert, you’ll need a few basic ingredients, each contributing to the cake’s complex flavor and texture. The cake base is made from flour, eggs, sugar, and cocoa powder, which combine to create a light yet rich chocolate sponge. The raspberry mousse requires fresh raspberries (or raspberry puree), heavy cream, sugar, and gelatin to give it its smooth and airy texture. Chocolate mousse, made with dark or semi-sweet chocolate, heavy cream, sugar, and sometimes a hint of vanilla, provides an additional layer of creamy decadence. For garnishing, fresh raspberries and grated chocolate are often used to elevate the visual appeal. Additionally, a touch of liqueur like Chambord (raspberry-flavored) or even a dash of vanilla extract can enhance the flavors of both the raspberry and chocolate layers.
Step-by-Step Recipe:
- Prepare the cake base: Start by preheating your oven to 350°F (175°C). Grease and line a 9-inch round cake pan. In a bowl, whisk together flour, cocoa powder, baking powder, and salt. In a separate bowl, beat eggs and sugar until light and fluffy. Gradually fold in the dry ingredients until just combined. Pour the batter into the prepared cake pan and bake for 20-25 minutes or until a toothpick inserted into the center comes out clean. Let it cool completely.
- Prepare the raspberry mousse: In a small saucepan, heat a few tablespoons of water and dissolve gelatin in it. Puree fresh raspberries using a blender or food processor. In a mixing bowl, whip the cream until stiff peaks form. Gently fold in the raspberry puree and the gelatin mixture. Sweeten with sugar to taste.
- Prepare the chocolate mousse: Melt the chocolate in a heatproof bowl over simmering water or in the microwave. Let it cool slightly. Whip the cream in another bowl until stiff peaks form, then fold it into the cooled chocolate mixture.
- Assemble the cake: Place the cooled chocolate cake in the center of a springform pan or on a serving platter. Spread a layer of raspberry mousse evenly over the cake. Follow with a layer of chocolate mousse. Allow the mousse to set in the refrigerator for at least 4 hours, or overnight for best results.
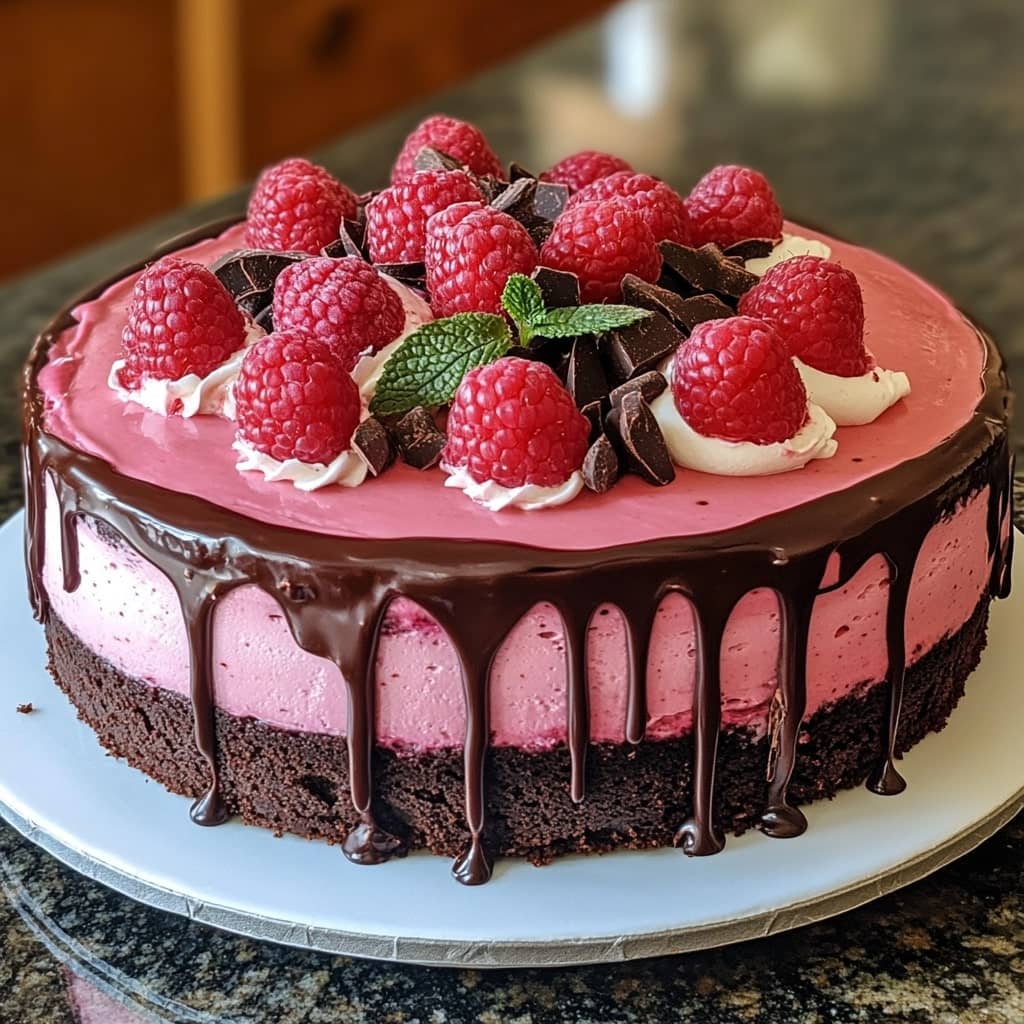
- Decorate and serve: Once the mousse has set, remove the cake from the pan and garnish it with fresh raspberries and grated chocolate. Serve chilled for the best taste.
Tips for the Perfect Heavenly Raspberry Chocolate Mousse Cake
To achieve the best texture for both mousses, ensure that your cream is whipped to stiff peaks, but be careful not to overwhip it. This prevents a grainy texture in the mousse. If you’re short on time, consider using store-bought raspberry puree, but fresh raspberries will provide a richer flavor. For the cake base, it’s essential to allow it to cool fully before adding the mousse layers; otherwise, the mousse may begin to melt. Use a serrated knife to slice the cake base into even layers for a neat appearance. When assembling, be sure to allow each layer of mousse to set before adding the next, as this ensures a clean, layered look. For extra indulgence, drizzle chocolate ganache over the top or dust with powdered sugar for a refined touch.
Variations and Customizations
For a gluten-free version of this cake, simply substitute the flour in the cake base with a gluten-free flour blend. If you’re a fan of white chocolate, you can swap the dark chocolate mousse with a white chocolate mousse instead. For an even more robust raspberry flavor, you can infuse the cream with fresh raspberries by gently heating the cream with a few raspberries, straining it, and then cooling it before whipping it. For added texture, you could add a crunchy layer of crushed biscuits or nuts between the mousse layers. If you’re not a fan of mousse, you could create a similar dessert using a raspberry chocolate ganache to fill the cake, which provides a smooth yet more solid filling.
Health Considerations and Nutritional Value
While this Heavenly Raspberry Chocolate Mousse Cake is undoubtedly a decadent treat, it does offer some nutritional benefits. Dark chocolate is rich in antioxidants, which can help support heart health and protect against free radicals. Raspberries are low in calories but high in fiber, vitamin C, and other antioxidants, making them a healthy addition to the dessert. However, due to the rich ingredients such as cream, sugar, and chocolate, this cake should be enjoyed in moderation. If you are looking to make it slightly healthier, you could experiment with reducing sugar content or using lighter alternatives for the mousse layers. Additionally, opting for dairy-free or plant-based substitutes for the cream and chocolate would make this cake suitable for those with dietary restrictions, such as vegans or lactose-intolerant individuals.
FAQ
- Can I make this cake ahead of time?
Yes, this cake can be made a day or two in advance. In fact, it benefits from sitting overnight in the refrigerator, as it allows the flavors to meld and the mousse to fully set. - Can I freeze this cake?
While it’s best served fresh, you can freeze the cake for up to a month. Be sure to wrap it well in plastic wrap and then foil to prevent freezer burn. When ready to serve, let it thaw overnight in the refrigerator. - Can I substitute other berries for raspberries?
Yes! This recipe can be customized with different berries such as strawberries, blackberries, or blueberries. However, you may need to adjust the sweetness depending on the berry you choose. - How do I know when the mousse is fully set?
The mousse should hold its shape and feel firm to the touch when set. You can check by gently pressing the top of the mousse with your finger; if it leaves an imprint but doesn’t collapse, it’s ready. - Can I use pre-made cake mix instead of making the cake from scratch?
Yes, using a pre-made chocolate cake mix is a quicker alternative. Just be sure to follow the instructions on the box and allow the cake to cool before adding the mousse layers.

Heavenly Raspberry Chocolate Mousse Cake
Ingredients
Chocolate Sponge
- 3 large eggs at room temperature
- 55 g light brown sugar
- 65 g granulated sugar
- 1 teaspoon vanilla extract
- 65 g all-purpose flour
- 15 g cocoa powder
- 1 teaspoon baking powder
- ½ teaspoon espresso powder
- ¼ teaspoon salt
- 75 g dark chocolate 75%, melted
Raspberry Mousse
- 2¼ teaspoons powdered gelatin
- 45 ml fresh lemon juice
- 400 g fresh raspberries frozen raspberries can be used as a substitute; see note
- 100 g granulated sugar
- 480 ml cold double cream heavy cream
Decoration
- 125 g fresh raspberries
- 50 g dark chocolate shavings
Instructions
Chocolate Sponge
- Start by preparing your pan and preheating the oven. Grease and line the base and sides of a 23cm (9-inch) springform pan. Preheat the oven to 180°C (350°F).
- Whisk the eggs and sugars. In a medium-sized bowl, combine the eggs, light brown sugar, granulated sugar, and vanilla extract. Using a hand-held electric whisk, beat on medium-high speed for about 4 minutes, until the mixture becomes light and creamy. When lifting the whisk, the mixture should leave trails for a few seconds.
- Add the dry ingredients and fold in. Sift the flour, cocoa powder, baking powder, and espresso powder into the egg mixture, then add the salt. Mix on low speed until just a few streaks of flour remain.
- Incorporate the melted chocolate. Add the melted dark chocolate into the batter and fold gently with a rubber spatula. Be sure to scrape the bottom of the bowl as you fold to ensure the ingredients are fully combined and smooth.
- Bake the batter. Pour the batter into the prepared springform pan. Tap the pan firmly on the work surface a few times to remove any air bubbles, and use an offset spatula if necessary to smooth the surface.
- Bake for 15-20 minutes, or until the center springs back when lightly touched.
- Cool the sponge. Remove from the oven and set the pan on a wire rack to cool to room temperature. The top of the sponge will likely appear wrinkled. To flatten it, press the top down gently with a flat-bottomed glass or the base of a measuring cup. Once flat, cover and refrigerate until you are ready to proceed with the next step.
Raspberry Mousse
- Bloom the gelatin. Pour the lemon juice into a small bowl and sprinkle the powdered gelatin over the surface. Mix with a fork and let it sit for a few minutes to allow the gelatin to soften.
- Prepare the raspberry puree. Place the fresh raspberries into a blender or food processor and blend until smooth.
- Strain the puree. Pass the blended raspberries through a fine-mesh sieve set over a saucepan, using the back of a spoon to push the puree through. Scrape the underside of the sieve to collect any remaining puree. Discard the seeds. You should end up with approximately 300 ml (1¼ cups) of raspberry pulp.
- Cook the raspberry puree. Put the saucepan with the raspberry puree over medium-low heat on the stove. Add the granulated sugar and bring to a simmer, stirring frequently.
- Add the gelatin. Stir in the gelatin mixture and continue to heat gently, without boiling, while stirring until the gelatin dissolves completely. You may need to press the gelatin against the side of the pan to help it dissolve.
- Strain again. Remove the saucepan from the heat and pass the raspberry puree through a sieve set over a bowl to remove any remaining lumps of gelatin (this step is optional if you’re confident that the gelatin has fully dissolved). Allow the raspberry puree to cool to room temperature, which should take about 20 minutes.
- Whip the cream and combine with the raspberry puree. In a separate bowl, whip the cold cream using an electric hand mixer or stand mixer on medium-high speed until soft peaks form. Gradually fold in the cooled raspberry puree in three parts, mixing until fully combined.
- Set the mousse. Pour the raspberry mousse over the chocolate sponge in the prepared springform pan. Use an offset spatula to smooth the top and level the mousse. Cover and refrigerate for at least 3 hours, or preferably overnight, to set the mousse.
Notes
Update: The chocolate sponge recipe was updated in July 2022 with a simplified method and adjusted ingredient quantities for ease.
To Store: The Raspberry Chocolate Mousse Cake can be kept in the refrigerator for up to 5 days, provided it’s covered. It’s essential to keep the cake cold to maintain the smooth texture of the mousse. You can store it in the springform pan, covered, in the fridge until you’re ready to serve. The raspberry fruit puree can be stored in an airtight container in the fridge for up to two days.
To Freeze: Yes, this Raspberry Chocolate Mousse Cake can definitely be frozen! Wrap it tightly in plastic wrap, then add two layers of aluminum foil. Freeze it for up to two months. When you’re ready to enjoy it, simply thaw it in the refrigerator overnight—do not attempt to heat it.
Raspberries: This recipe is all about showcasing raspberries, but when they’re out of season, they can become quite expensive. For both the raspberry mousse and coulis, frozen raspberries work perfectly as a substitute. Just thaw them in a colander and let any excess moisture drain off.
TIP 1: Use the best quality ingredients you can find. Since raspberries are the star of this recipe, they need to stand out. Choose the juiciest, freshest berries you can get your hands on.
TIP 2: Whip the yolks and sugar long enough to achieve the right consistency. When you lift the whisk out of the mixture, look for a “ribboning” effect on the surface. This indicates it’s ready.
TIP 3: Be sure to scrape down the base and sides of the bowl. Melted chocolate tends to settle at the bottom, so it’s important to scrape the bowl halfway through mixing to ensure it’s fully incorporated.
TIP 4: When folding the raspberry puree into the cream, do so gently. The goal is to preserve the air in the whipped cream so it maintains its shape even after the raspberry puree is added.
TIP 5: Don’t rush the refrigeration process. The 3 hours I recommend is the bare minimum for the mousse cake to set, but I strongly suggest leaving it overnight to achieve the best results.