
Introduction
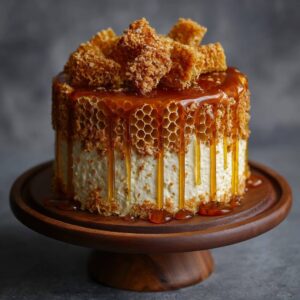
Golden Honeycomb Cake is a stunning, flavorful dessert that combines the rustic charm of caramelized sugar with the smooth texture of a sponge or butter cake. Featuring golden honeycomb pieces embedded within a soft, buttery base or scattered over the top as decoration, this cake is equal parts visual delight and flavor bomb. With every bite, the airy crunch of honeycomb toffee contrasts beautifully with the moist cake, creating a rich, melt-in-your-mouth experience. The cake gets its name from the golden hue of the honeycomb and the natural, warm color of the cake itself, often achieved with honey or brown sugar. Whether you bake it as a loaf, a layered treat, or a single-pan showstopper, the Golden Honeycomb Cake captures the golden sweetness of honey and caramel, making it perfect for celebrations, tea time, or indulgent moments shared with loved ones. Its rising popularity among home bakers and dessert influencers comes not just from its taste but also from the photogenic presentation—topped with glossy caramel drizzle, crumbled honeycomb, or a cloud of whipped cream, it’s a dessert that dazzles.
The History of the Golden Honeycomb Cake
While the Golden Honeycomb Cake doesn’t have centuries of tradition behind it, it draws inspiration from a blend of classic techniques and nostalgic sweets. Honeycomb toffee, also known as cinder toffee or sponge candy, has long been a beloved treat in many parts of the world—popular in the UK, the US, and across Asia under names like “hokey pokey” or “dalgona.” The integration of this crunchy candy into baked goods started with modern baking trends where texture became as important as flavor. The cake itself shares DNA with buttery sponge cakes and honey cakes found in European and Middle Eastern traditions. As creative home bakers began incorporating shards of honeycomb candy into or onto their cakes, the Golden Honeycomb Cake was born—combining modern presentation with old-school sweetness. It gained popularity in the 2010s and 2020s through social media platforms where the crackle of honeycomb and the rich golden tones made it both a visual and culinary success.
Ingredients Breakdown
For the Cake:
- 1 cup (226 g) unsalted butter, at room temperature
- 1 1/2 cups (300 g) light brown sugar or granulated sugar
- 4 large eggs, room temperature
- 1 tsp vanilla extract
- 1/4 cup (85 g) honey
- 2 1/2 cups (300 g) all-purpose flour
- 2 tsp baking powder
- 1/2 tsp baking soda
- 1/2 tsp salt
- 1 cup (240 ml) buttermilk or whole milk
For the Honeycomb Toffee:
- 1 cup (200 g) granulated sugar
- 1/4 cup (60 ml) golden syrup or corn syrup
- 2 tbsp water
- 1 1/2 tsp baking soda
Optional Toppings:
- Extra honeycomb pieces
- Whipped cream or mascarpone
- Caramel sauce drizzle
- Sea salt flakes
Step-by-Step Recipe
- Make the Honeycomb: Line a baking tray with parchment paper and lightly oil it. In a heavy saucepan, add sugar, golden syrup, and water. Heat over medium without stirring until the sugar melts and turns a deep amber color. Remove from heat and quickly whisk in the baking soda. The mixture will foam up dramatically—pour it immediately into the prepared tray. Let it cool completely before breaking into shards.
- Preheat and Prepare Pans: Preheat the oven to 325°F (165°C). Grease and line the bottom of an 8- or 9-inch cake pan or loaf tin.
- Cream the Butter and Sugar: In a stand mixer or large bowl, beat the butter and sugar on medium-high speed for 3–5 minutes until pale and fluffy.
- Add Eggs and Flavoring: Add the eggs one at a time, mixing well between each addition. Stir in the vanilla and honey until incorporated.
- Mix Dry Ingredients: In a separate bowl, sift together the flour, baking powder, baking soda, and salt.
- Combine Wet and Dry: With the mixer on low, alternate adding the dry ingredients and buttermilk to the butter mixture, starting and ending with dry ingredients. Mix until just combined—don’t overmix.
- Fold in Honeycomb (optional): Gently fold in some crushed honeycomb pieces into the batter for caramelized pockets inside the cake.
- Bake: Pour the batter into the prepared pan and smooth the top. Bake for 40–50 minutes or until a toothpick inserted into the center comes out clean or with a few moist crumbs.
- Cool and Decorate: Let the cake cool in the pan for 10 minutes, then turn out onto a wire rack to cool completely. Top with more crushed honeycomb, drizzle caramel, or dollops of whipped cream before serving.
Tips for the Perfect Golden Honeycomb Cake
Use high-quality honey and butter for the richest flavor. Make sure your honeycomb is fully cooled before breaking it up or adding it to the batter. Only fold honeycomb into the cake batter if you want a chewy, caramelized surprise inside—otherwise, reserve it for topping. Be careful not to overmix the batter after adding the dry ingredients to keep the cake tender. For maximum height and lightness, bring all ingredients to room temperature before starting. Use a serrated knife to cut honeycomb to prevent it from shattering unpredictably. Store honeycomb in an airtight container away from humidity to maintain its crunch.
Variations and Customizations
Swap the honey for maple syrup or molasses for a different flavor note. Add a pinch of cinnamon, cardamom, or nutmeg to the batter for warmth and spice. Create a layered version with whipped mascarpone and crushed honeycomb between layers. Use browned butter for a nuttier, deeper cake base. Try a gluten-free flour blend to make the recipe suitable for gluten-free diets. Decorate with edible gold leaf or crystallized ginger for a festive finish. For a saltier-sweet version, sprinkle sea salt over the honeycomb topping.
Health Considerations and Nutritional Value
Golden Honeycomb Cake is rich and indulgent, best enjoyed in moderation. The honey and honeycomb offer trace minerals and antioxidants, but the cake is still high in sugar and saturated fats. Each slice may range from 350 to 500 calories depending on size and toppings. To lighten it, use Greek yogurt in place of some butter, reduce the sugar slightly, or opt for whole wheat flour for added fiber. It’s not suitable for vegans or those with egg allergies in its base form, though substitutions with flax eggs and plant-based milk and butter can be experimented with. Avoid adding honeycomb inside the batter if you want to reduce sugar crystallization and stick to just topping.
FAQ
Can I make this cake ahead of time? Yes, the cake can be made a day or two in advance and stored in an airtight container. Add the honeycomb just before serving for the best crunch.
Does honeycomb melt in the cake? Yes, when folded into batter, honeycomb melts and creates caramelized pockets. If you want crisp texture, only use it as a topping.
How should I store leftover cake? Keep the cake in an airtight container at room temperature for up to 3 days. If topped with cream or soft fillings, refrigerate.
Can I freeze it? You can freeze the plain cake (without toppings) for up to 2 months. Wrap tightly and thaw overnight in the refrigerator before serving.
What type of honey works best? Mild varieties like clover, acacia, or wildflower honey complement the cake’s flavor without overpowering it.
Can I use store-bought honeycomb? Absolutely. If you don’t want to make your own, high-quality store-bought honeycomb or sponge toffee will work just as well.
Golden Honeycomb Cake
Ingredients
Coconut Milk Mixture
- 250 ml coconut cream
- 140 g granulated sugar
- 20 kaffir lime leaves
- 1 stalk lemongrass bruised and cut
- 1 pandan leaf
- 3/4 teaspoon ground turmeric
Yeast Mixture
- 1 teaspoon dry instant yeast
- 1 tablespoon flour
- 1/2 tablespoon sugar
- 50 ml warm water approximately 40°C
Cake Batter
- 4 eggs about 180 g, without shells
- 90 g tapioca flour approximately 2/3 cup
- 1/2 teaspoon sea salt
Instructions
Coconut Milk Mixture
- Combine all the ingredients for the coconut milk mixture in a pot and cook over low heat until it begins to simmer. Let it simmer gently for 5 minutes, stirring constantly, making sure it never boils to prevent curdling. Remove from heat, strain to remove the spices, and set aside to cool.
Yeast Mixture
- In a bowl, mix all the yeast mixture ingredients thoroughly, stirring well to dissolve the flour completely and avoid lumps. Set aside for about 15 to 20 minutes to allow the yeast to bloom and become frothy.
Cake Batter
- Crack the eggs into a mixing bowl and gently whisk with a fork or whisk just until combined—avoid incorporating air or thickening the mixture. Gradually add the tapioca flour mixed with 1/2 teaspoon of salt in two additions, alternating with the slightly warm coconut milk mixture after it has cooled. Switch to a spatula and fold carefully until the batter is smooth and lump-free. Finally, fold in the yeast mixture until just combined. Pass the batter through a sieve to remove any lumps, then cover and leave it in a warm place (such as inside an oven) to ferment for 3 hours.
Baking Process
- Before baking, gently stir the Ambon batter to reincorporate any flour that has settled at the bottom. Let it rest for 5 minutes to settle again. Line your baking tin with parchment paper. Pour the batter through a sieve into the prepared tin.
- Prepare a hot plate by covering it with foil to evenly temper the bottom heat. Place the baking tin on the hot plate over medium heat (about 180°C) and bake for 90 minutes. In the first 10 to 15 minutes, you should see bubbles forming through the batter—if not, increase the heat slightly. Continue baking until the edges are crisp and golden and the top, while still slightly moist, stops bubbling.
- Transfer the baking tin to a preheated oven and bake for an additional 2 to 3 minutes at 180°C until the top becomes spongy and develops a golden color.
- Remove the cake from the oven, take off the parchment paper, and let it cool completely. Once cooled, slice and enjoy.