Gingerbread House (Edible) – A Festive, Delicious Holiday Tradition
Introduction
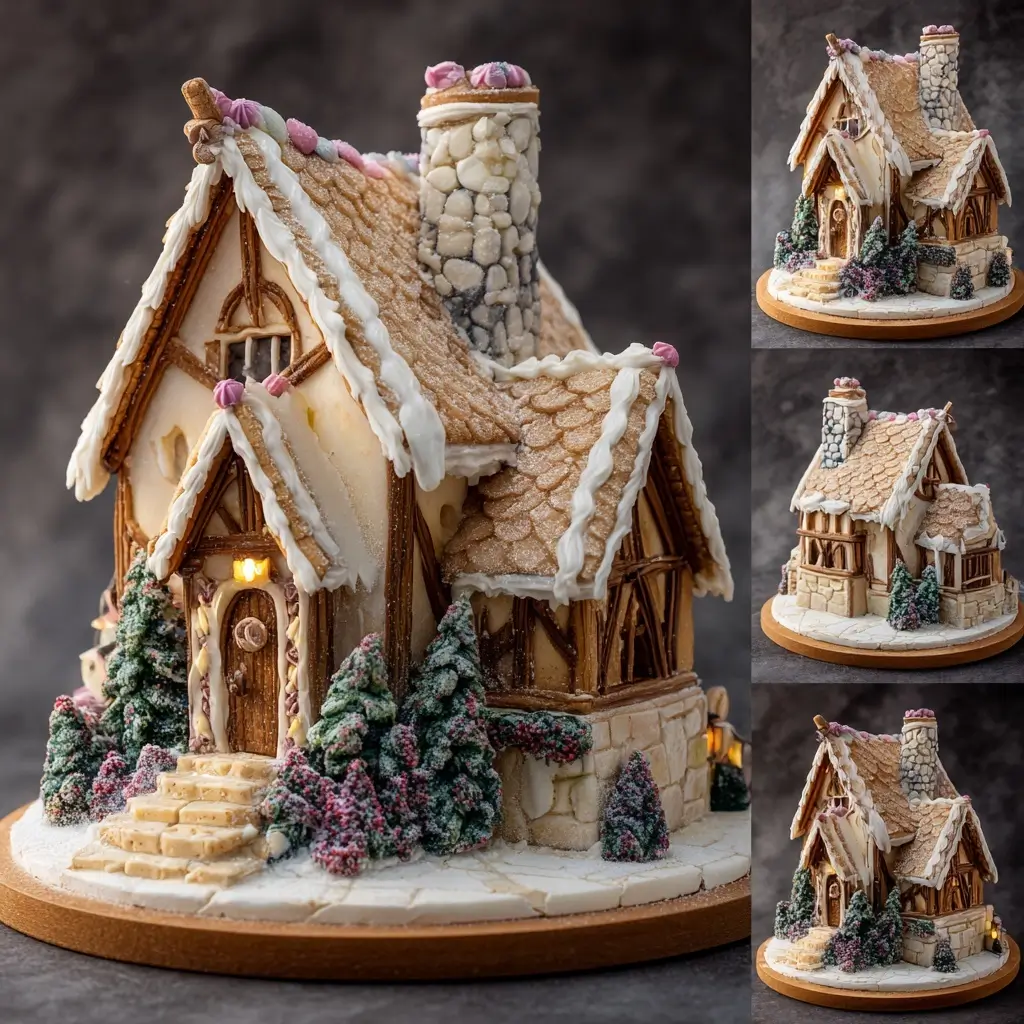
The gingerbread house is more than just a sweet treat—it’s a beloved holiday tradition that brings joy, creativity, and warmth to homes around the world. Originating from European folklore and popularized by tales like Hansel and Gretel, edible gingerbread houses have become a staple of Christmas celebrations. Crafting your own gingerbread house allows you to combine baking artistry with festive decoration, creating an edible masterpiece that’s as delightful to look at as it is to eat. Whether you’re making one with family, hosting a holiday party, or simply indulging in seasonal baking, this comprehensive guide will walk you through every step of creating a stunning, delicious, and completely edible gingerbread house.
The History
The roots of the gingerbread house trace back to 16th-century Germany, where gingerbread itself had been a popular confection since the Middle Ages. The use of spices like ginger, cinnamon, cloves, and nutmeg—imported at great expense—made gingerbread a luxury item often reserved for special occasions. The concept of shaping gingerbread into houses gained widespread popularity after the Brothers Grimm published the fairy tale Hansel and Gretel in 1812. In the story, a witch lures children with a house made entirely of sweets, sparking imaginations across Europe.
By the 19th century, German bakers began crafting elaborate gingerbread houses as decorative centerpieces, especially during Christmas markets. These early versions were not always meant to be eaten but served as artistic displays. Over time, the idea spread throughout Europe and North America, evolving into a family-friendly activity. Today, making edible gingerbread houses is a cherished holiday ritual, celebrated in homes, schools, and even competitive baking events worldwide.
Ingredients Breakdown
Crafting a successful edible gingerbread house requires precision in both ingredients and technique. Each component plays a vital role in flavor, structure, and stability. Below is a detailed breakdown of what goes into the perfect gingerbread house:
- Flour (All-Purpose): Provides the structural foundation. It must be measured accurately to avoid dough that’s too crumbly or too sticky.
- Ground Ginger: The star spice, giving the gingerbread its signature warm, zesty flavor and aroma.
- Cinnamon: Adds sweetness and depth, complementing the ginger beautifully.
- Cloves and Allspice: Used sparingly, these spices contribute to the complex spiced profile associated with traditional gingerbread.
- Baking Soda: Acts as a leavening agent, helping the dough rise slightly and achieve a tender yet sturdy texture.
- Salt: Balances the sweetness and enhances all the other flavors.
- Butter (Unsalted): Adds richness and helps create a smooth, pliable dough. Must be softened properly for even mixing.
- Brown Sugar (Dark): Contributes moisture and deep molasses flavor, essential for authentic taste and color.
- Molasses: Not just a sweetener—this thick syrup gives gingerbread its dark hue, chewy texture, and distinctive tangy-sweet flavor.
- Egg: Binds the ingredients together and adds structure to the dough.
- Water or Milk: Adjusts dough consistency; a small amount ensures the dough isn’t too dry.
- Meringue Powder (for Royal Icing): When mixed with water and powdered sugar, creates a strong, fast-drying adhesive perfect for assembling and decorating.
- Powdered Sugar (Confectioners’ Sugar): Forms the base of royal icing, providing sweetness and firmness when dried.
- Decorative Candies: Gumdrops, peppermints, chocolate chips, licorice, jelly beans, candy canes, and sprinkles transform the house into a whimsical dessert.
Step-by-Step Recipe
Part 1: Making the Gingerbread Dough
- Mix Dry Ingredients: In a large bowl, whisk together 4 cups all-purpose flour, 1 tsp baking soda, ½ tsp salt, 2 tsp ground ginger, 2 tsp ground cinnamon, ½ tsp ground cloves, and ¼ tsp ground allspice. Set aside.
- Cream Butter and Sugars: In a stand mixer fitted with a paddle attachment, beat ¾ cup (1.5 sticks) unsalted butter (softened) with ¾ cup packed dark brown sugar until light and fluffy, about 2–3 minutes.
- Add Wet Ingredients: Mix in ⅔ cup molasses, 1 large egg, and ½ cup cold water. Blend until smooth and well combined.
- Incorporate Dry Mixture: Gradually add the dry ingredients to the wet mixture on low speed until a stiff dough forms. You may need to finish mixing by hand.
- Divide and Chill: Divide the dough into two equal portions, flatten into discs, wrap in plastic wrap, and refrigerate for at least 2 hours (or up to 3 days). Chilling prevents spreading during baking and makes rolling easier.
Part 2: Rolling, Cutting, and Baking
- Preheat Oven: Set oven to 350°F (175°C). Line baking sheets with parchment paper or silicone mats.
- Roll Out Dough: On a floured surface, roll one disc of dough to ¼-inch thickness. Use even pressure to maintain uniform thickness.
- Cut Shapes: Use a gingerbread house template (cardboard or printed) to cut out walls, roof panels, door, and windows. Carefully transfer pieces to baking sheets using a spatula.
- Bake: Bake for 10–14 minutes, or until edges are firm and lightly browned. Let cool on the pan for 5 minutes, then transfer to wire racks to cool completely.
- Repeat: Re-roll scraps and repeat with second dough disc. Ensure all pieces are fully cooled before assembly.
Part 3: Prepare Royal Icing
- Mix Icing: In a clean bowl of a stand mixer, combine 3 tbsp meringue powder and 6 tbsp water. Beat on high until foamy (about 1 minute).
- Add Sugar: Gradually add 4 cups powdered sugar, one cup at a time, beating on low initially, then increasing to high. Continue until thick, glossy, and stiff peaks form (about 5–7 minutes).
- Adjust Consistency: For “glue” icing (thicker), keep as-is. For “decorative” piping (thinner), add ½ tsp water at a time until desired flow.
- Store Properly: Cover with a damp cloth or plastic wrap touching the surface to prevent drying while working.
Part 4: Assemble the House
- Prepare Base: Place a large cardboard or cake board (covered with foil or parchment) as your building surface.
- Attach Front and Back Walls: Pipe a thick line of royal icing along the bottom edge of a front wall piece and attach it upright to the base. Support with cans or books. Repeat with back wall.
- Add Side Walls: Pipe icing on side edges of front/back walls and attach side walls. Hold in place for 1–2 minutes until stable.
- Let Set: Allow walls to harden for at least 30 minutes before adding the roof.
- Attach Roof Panels: Pipe icing along top edges of walls. Carefully place first roof panel, hold, then attach second, overlapping at the peak. Reinforce inside corners with extra icing.
- Support Roof: Use cans or a box to prop up roof panels until fully set (1–2 hours).
Part 5: Decorate Creatively
- Pipe Details: Use thinner royal icing to outline windows, doors, and roof shingles. Let dry between layers if needed.
- Add Candy: Attach gumdrops (as roof tiles), peppermints (windows), licorice (downspouts), chocolate bars (chimney), and jelly beans (pathway stones).
- Use Sprinkles: Create snow effects with white nonpareils or sanding sugar. Add icicles with piped icing hanging from eaves.
- Personalize: Write names, add flags, or include miniature figures for storytelling flair.
Tips
- Chill Dough Thoroughly: Cold dough holds shape better and spreads less during baking.
- Roll Evenly: Use rolling pin guides or dowels to maintain consistent thickness for uniform baking.
- Bake One Sheet at a Time: Ensures even heat distribution and prevents under/over-baking.
- Don’t Rush Assembly: Work methodically. Let each section set before moving on.
- Use Supports: Books, cans, or boxes help stabilize walls and roofs during construction.
- Keep Icing Covered: Prevents drying out and clogging of piping bags.
- Work in a Dry Environment: Humidity can weaken royal icing and cause decorations to sag.
- Label Piping Bags: If using multiple icing consistencies, label them to avoid confusion.
- Make Extra Pieces: Bake spare walls or roof panels in case of breakage.
- Have Fun!: Imperfections add charm. Embrace the handmade look.
Variations and Customizations
Your gingerbread house doesn’t have to follow tradition! Here are creative ways to personalize your creation:
- Colorful Icing: Tint royal icing with food gel to match holiday themes, school colors, or favorite palettes.
- Gluten-Free Version: Substitute gluten-free all-purpose flour blend (ensure it contains xanthan gum for binding).
- Vegan Option: Replace butter with vegan margarine, egg with flax egg (1 tbsp ground flax + 3 tbsp water), and use aquafaba-based royal icing (chickpea brine instead of meringue powder).
- Mini Houses: Make tiny versions using smaller templates for tree ornaments or party favors.
- Themed Houses: Design a pirate ship, castle, winter cottage, or space station using alternate templates.
- Edible Paint: Mix food coloring with vodka or lemon extract to paint details on dried icing.
- Cookie Cutter Shapes: Use shapes like trees, stars, or snowmen as additional decorations.
- Chocolate-Dipped Elements: Dip roof edges or doors in melted chocolate for elegance.
- Fondant Accents: Use small amounts of rolled fondant for snow drifts, flowers, or figures (ensure it’s food-safe and labeled edible).
- Scented Houses: Add orange zest or vanilla to dough for a fragrant twist.
Health Considerations and Nutritional Value
While the gingerbread house is a festive indulgence, it’s important to enjoy it mindfully. Here’s a nutritional overview per average serving (estimated 1/8 of house, including candy):
- Calories: ~350–500 kcal (varies widely based on size and candy used)
- Total Fat: 10–15g (mostly from butter)
- Saturated Fat: 6–8g
- Carbohydrates: 80–100g (high due to sugar and flour)
- Sugars: 50–70g (molasses, brown sugar, royal icing, candies)
- Protein: 3–5g
- Sodium: 200–300mg (from baking soda, salt, processed candies)
Health Notes:
- High Sugar Content: The combination of molasses, brown sugar, royal icing, and candies makes this a high-sugar treat. Best enjoyed in moderation, especially for those managing diabetes or blood sugar levels.
- Allergens: Contains wheat, eggs, dairy, and potentially tree nuts (if using certain candies). Always check labels on store-bought items.
- Spice Benefits: Ginger has natural anti-inflammatory and digestive properties, though present in modest amounts here.
- Dental Health: Sticky candies and prolonged sugar exposure can affect teeth. Encourage brushing after consumption.
- Kid-Friendly but Supervise: Small candies pose choking hazards for young children. Use larger decorations or omit small pieces for kids under 4.
Ingredients
For the Gingerbread:
- 4 cups (500g) all-purpose flour, plus extra for dusting
- 2 tsp ground ginger
- 2 tsp ground cinnamon
- ½ tsp ground cloves
- ¼ tsp ground allspice
- 1 tsp baking soda
- ½ tsp salt
- ¾ cup (1.5 sticks / 170g) unsalted butter, softened
- ¾ cup (165g) packed dark brown sugar
- ⅔ cup (160ml) unsulfured molasses
- 1 large egg
- ½ cup (120ml) cold water
For the Royal Icing:
- 3 tbsp meringue powder
- 6 tbsp warm water
- 4 cups (480g) powdered sugar, sifted
For Decoration:
- Assorted candies (gumdrops, peppermints, candy canes, jelly beans, etc.)
- Licorice strips
- Chocolate chips or bars
- Sprinkles, sanding sugar, nonpareils
- Fondant (optional)
- Foil-wrapped cake board or tray (base)
- Parchment paper or silicone mats
Directions
- In a medium bowl, whisk together flour, baking soda, salt, ginger, cinnamon, cloves, and allspice. Set aside.
- In a stand mixer, cream butter and brown sugar on medium speed until fluffy (2–3 minutes).
- Beat in molasses, egg, and water until smooth.
- Gradually mix in dry ingredients on low until a firm dough forms.
- Divide into two discs, wrap in plastic, and chill for at least 2 hours.
- Preheat oven to 350°F (175°C). Line baking sheets with parchment.
- Roll one disc to ¼-inch thickness. Cut house pieces using a template.
- Transfer to baking sheets, prick dough with a fork to prevent puffing, and bake 10–14 minutes.
- Cool completely on wire racks. Repeat with second disc.
- Make royal icing: Beat meringue powder and water until foamy. Add powdered sugar gradually and whip 5–7 minutes until stiff peaks form.
- Transfer half to a piping bag with a small round tip (#3 or #5). Keep rest covered.
- Assemble on a foil-covered board: Attach front and back walls with icing, support with cans, then add side walls.
- Let set 30 minutes. Attach roof panels with thick icing, support until firm (1–2 hours).
- Pipe decorative icing on roof, windows, and doors.
- Press on candies and sprinkles while icing is wet.
- Allow to dry completely (4–6 hours or overnight) before moving or serving.
- Enjoy as a centerpiece, then break apart and serve with milk or tea!
FAQ
Q: Can I make the gingerbread ahead of time?
A: Yes! Bake and cool the pieces up to 2 weeks in advance. Store in an airtight container at room temperature. Assemble 1–2 days before display for best freshness.
Q: How long does a gingerbread house last?
A: Properly stored (covered, in a cool dry place), it can last 2–3 weeks. However, for optimal taste and texture, consume within 7–10 days.
Q: Why did my walls collapse?
A: Common causes: dough too thin, underbaked, icing too runny, or not allowing enough drying time between steps. Use supports and ensure icing is thick enough to hold weight.
Q: Can I freeze gingerbread pieces?
A: Yes. Freeze unbaked or baked pieces in a single layer, then transfer to freezer bags. Thaw before assembling.
Q: Is royal icing safe to eat?
A: Yes, when made with meringue powder (pasteurized). Avoid raw egg versions if concerned about salmonella.
Q: Can kids help?
A: Absolutely! Kids can roll dough, place candies, and pipe icing (with supervision). Assign age-appropriate tasks to keep it fun and safe.
Q: What if my house cracks?
A: Repair with royal icing “glue.” Smooth over and decorate. Cracks can be disguised with candy or snow details.
Q: Can I make a no-bake version?
A: While possible with graham crackers or marshmallows, it won’t have the same flavor or authenticity. This recipe focuses on traditional baked gingerbread.
Summary
Create a magical, edible gingerbread house with this detailed, foolproof recipe that blends rich spiced gingerbread, sturdy royal icing, and endless candy decorations. Perfect for holidays, family baking, or festive gifting, this classic treat delights both eyes and taste buds.