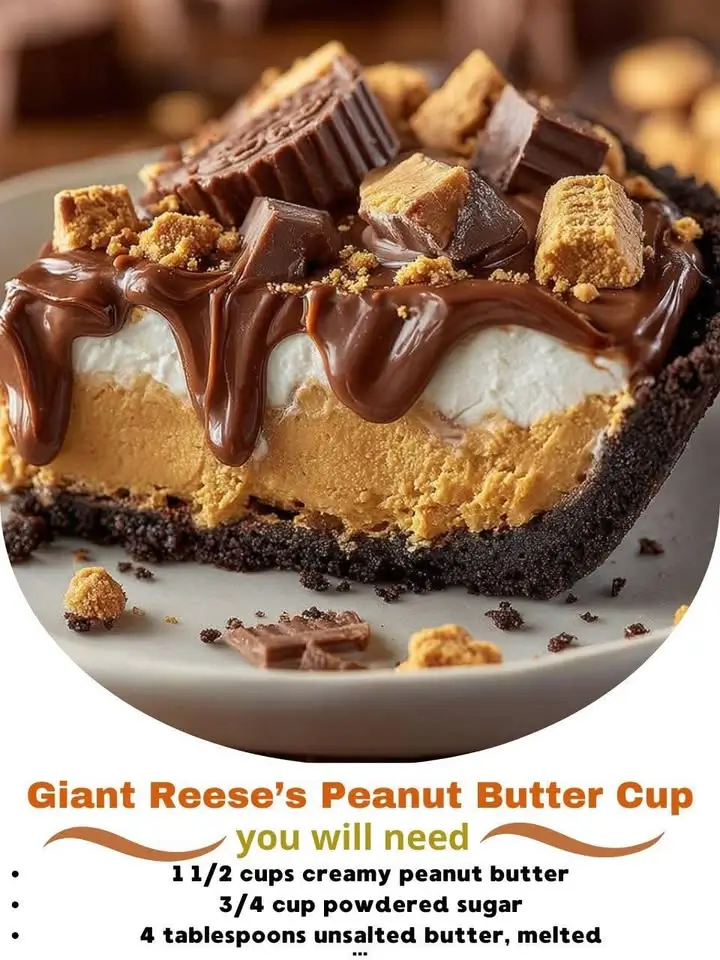
Giant Reese’s Peanut Butter Cup: A Decadent Homemade Delight
Introduction
The Giant Reese’s Peanut Butter Cup is more than just a candy—it’s an indulgent, larger-than-life version of the classic American favorite that has delighted taste buds for generations. Known for its perfect balance of rich milk chocolate and creamy peanut butter filling, this oversized treat takes everything you love about the original and magnifies it into a shareable (or not-so-shareable) dessert experience. Whether you’re making it for a special occasion, as a gift, or simply to satisfy your sweet tooth, crafting a giant version at home allows you to customize flavors, control ingredients, and enjoy a fresher, richer version than anything store-bought. In this comprehensive guide, we’ll walk you through every aspect of creating your very own Giant Reese’s Peanut Butter Cup—from its fascinating history to detailed instructions, expert tips, health considerations, and creative variations.
The History
The story of the Reese’s Peanut Butter Cup begins in the early 20th century with Harry Burnett Reese, a former dairy farmer and shipping foreman for The Hershey Company. Inspired by Milton S. Hershey’s success and his access to Hershey’s chocolate, Reese began experimenting with confections in his basement during the 1920s. He eventually developed the now-iconic combination of sweet milk chocolate and smooth peanut butter, shaping them into small cup-like candies. These treats quickly gained popularity, and by 1923, Reese had established the H.B. Reese Candy Company.
The brand grew steadily over the decades, surviving the Great Depression and expanding its distribution across the United States. In 1963, the company was acquired by The Hershey Company, which helped propel Reese’s Peanut Butter Cups into national and eventually global stardom. Over time, seasonal shapes, limited editions, and oversized versions like the Giant Reese’s Peanut Butter Cup emerged, catering to fans who wanted more of the beloved flavor combo. Today, Reese’s is one of the best-selling candy brands in America, and homemade giant versions have become a popular DIY project among dessert enthusiasts eager to recreate that nostalgic taste with a personal twist.
Ingredients Breakdown
To make a truly authentic and delicious Giant Reese’s Peanut Butter Cup, selecting high-quality ingredients is crucial. Each component plays a vital role in achieving the signature texture and flavor profile. Below is a detailed breakdown:
- Milk Chocolate: High-quality milk chocolate bars or chips are essential. Look for real cocoa butter content rather than vegetable fats for a smoother melt and richer taste. Brands like Ghirardelli, Lindt, or Callebaut work exceptionally well.
- Peanut Butter: Use creamy, unsweetened peanut butter without added oils or sugars for the most authentic Reese’s flavor. Natural peanut butter can be used, but ensure it’s well-stirred and not too runny. For convenience and consistency, processed brands like Jif or Skippy are ideal.
- Powdered Sugar: Acts as a thickening agent for the peanut butter center, giving it structure and sweetness. Sift before use to avoid lumps.
- Butter (Unsalted): Adds richness and helps bind the peanut butter mixture together. It also enhances mouthfeel and contributes to a smooth finish.
- Salt: A pinch of salt balances the sweetness and enhances all the flavors—especially important when using unsalted peanut butter.
- Vanilla Extract (optional): A splash adds depth and warmth to the peanut butter layer, rounding out the overall flavor.
- Coconut Oil (optional): Sometimes added to the chocolate to improve shine and help with setting, especially in warmer climates.
Step-by-Step Recipe
Follow these detailed steps to create a flawless Giant Reese’s Peanut Butter Cup at home. This recipe yields one large cup, approximately 8–10 inches in diameter, serving 8–12 people depending on slicing.
Ingredients
- 2 cups (350g) milk chocolate chips or chopped milk chocolate
- 1/4 cup (60ml) coconut oil (optional, for smoother chocolate)
- 1 cup (250g) creamy peanut butter (no sugar added preferred)
- 1 cup (120g) powdered sugar, sifted
- 2 tablespoons (30g) unsalted butter, softened
- 1/4 teaspoon salt
- 1/2 teaspoon vanilla extract (optional)
Directions
- Prepare Your Mold: Choose a deep-dish pie plate, cake pan, or silicone mold (round works best). Line it with parchment paper or plastic wrap, ensuring there’s enough overhang to lift the finished cup out easily.
- Melt the First Chocolate Layer: In a double boiler or microwave-safe bowl, melt 1 cup of milk chocolate with 2 tablespoons of coconut oil (if using). Stir frequently until smooth and glossy. Avoid overheating.
- Form the Base: Pour the melted chocolate into the bottom of the prepared mold. Tilt and rotate the pan to spread evenly. Tap gently on the counter to remove air bubbles. Freeze for 15–20 minutes or until completely solid.
- Make the Peanut Butter Filling: In a mixing bowl, combine peanut butter, powdered sugar, softened butter, salt, and vanilla. Beat with a hand mixer or spatula until smooth, creamy, and well-blended. The mixture should hold its shape without being crumbly.
- Add the Peanut Butter Layer: Remove the mold from the freezer. Spread the peanut butter mixture evenly over the hardened chocolate base, pressing down gently to eliminate air pockets. Smooth the top with a spatula. Return to the freezer for another 15 minutes.
- Seal with Top Chocolate Layer: Melt the remaining 1 cup of chocolate with another 2 tablespoons of coconut oil. Carefully pour over the frozen peanut butter layer, covering it completely. Use a spatula to smooth the surface and tap the mold to release trapped air.
- Final Chill: Place the mold back in the freezer for at least 1 hour, or until fully firm. For best results, let it set overnight.
- Unmold and Serve: After freezing, use the parchment overhang to gently lift the giant cup out. Transfer to a cutting board. Let sit at room temperature for 5–10 minutes before slicing with a warm, sharp knife for clean edges.
- Garnish (Optional): Drizzle with extra melted chocolate or crushed peanuts for presentation.
Tips
- Use Real Chocolate: Avoid candy melts or chocolate substitutes if possible—they don’t offer the same richness or snap as real chocolate with cocoa butter.
- Temper for Shine (Optional): For a professional-looking glossy finish and crisp snap, consider tempering your chocolate instead of just melting it.
- Room Temperature Ingredients: Ensure butter and peanut butter aren’t cold when mixing; otherwise, the filling may seize or become grainy.
- Avoid Moisture: Never let water get into melted chocolate—it will seize and become unusable. Dry all utensils thoroughly.
- Freeze in Stages: Allowing each layer to freeze completely prevents mixing and ensures clean separation between layers.
- Warm Knife Trick: Dip your knife in hot water and dry it before each cut for neat slices through both chocolate and peanut butter.
- Storage Tip: Keep refrigerated or frozen due to the softness of the peanut butter center. Bring to room temperature briefly before serving for optimal texture.
Variations and Customizations
One of the joys of making a homemade Giant Reese’s Peanut Butter Cup is the ability to personalize it. Here are some creative twists to elevate your candy:
- Dark Chocolate Version: Swap milk chocolate for dark chocolate (60–70%) for a less sweet, more sophisticated flavor that pairs beautifully with peanut butter.
- White Chocolate Coating: Use white chocolate for a sweeter, creamier shell. Add a few drops of orange extract for a unique contrast.
- Crunchy Center: Mix chopped roasted peanuts, pretzel pieces, or crushed wafers into the peanut butter filling for added texture.
- Double Layered Fillings: Create a truffle-style center by adding a thin layer of ganache or caramel beneath the peanut butter.
- Flavored Peanut Butter: Try honey-roasted, cinnamon, or spicy chili-infused peanut butter for a bold twist.
- Dietary Adaptations: Use sugar-free chocolate and powdered erythritol for a keto-friendly version. Gluten-free and nut-free options (using sunflower seed butter) are also possible.
- Mini Versions: Use muffin tins or cupcake molds to make individual-sized giant cups—perfect for parties or gifts.
- Festive Themes: Color the top chocolate layer with edible dyes for holidays—orange and black for Halloween, red and green for Christmas, pastels for Easter.
Health Considerations and Nutritional Value
While undeniably delicious, the Giant Reese’s Peanut Butter Cup is a high-calorie treat best enjoyed in moderation. Below is an approximate nutritional breakdown per serving (based on 10 servings):
- Calories: ~320–380 kcal
- Fat: 22–28g (including saturated fat from chocolate and butter)
- Carbohydrates: 25–30g (mostly from sugar and powdered sugar)
- Protein: 6–8g (from peanut butter)
- Sodium: 120–180mg
- Sugars: 18–22g
Health Notes:
- Peanut butter provides healthy monounsaturated fats, protein, and vitamin E, but added sugars and hydrogenated oils in commercial varieties can reduce benefits.
- Milk chocolate contains antioxidants from cocoa, but also significant sugar and fat content.
- This dessert is not suitable for individuals with peanut allergies unless substituted with safe alternatives.
- For heart-health-conscious individuals, consider reducing butter and using low-sugar or dark chocolate options.
- Due to its high-fat content, this treat is relatively satiating, so smaller portions may suffice.
FAQ
Q: Can I make this without a freezer?
A: While technically possible using a refrigerator, the freezer is essential for quick setting and maintaining distinct layers. Without it, the chocolate may not harden properly, especially in warm environments.
Q: Why did my chocolate crack?
A: Cracking usually occurs due to rapid temperature changes or moisture. Allow the candy to thaw slightly before cutting, and avoid placing warm mixtures on cold surfaces.
Q: Can I use almond butter or other nut butters?
A: Yes! Almond butter, cashew butter, or sunflower seed butter work well, though flavor and texture will vary. Sunflower seed butter is ideal for nut-free diets.
Q: How long does it last?
A: Stored in an airtight container in the refrigerator, it lasts up to 2 weeks. In the freezer, it can keep for up to 2 months. Wrap tightly to prevent odor absorption.
Q: Can I bake this instead of freezing?
A: No—this is a no-bake recipe. Baking would melt the peanut butter and ruin the layered structure.
Q: Is this gluten-free?
A: Yes, provided all ingredients used are certified gluten-free. Always check labels, especially on chocolate and peanut butter, to avoid cross-contamination.
Q: Can I make it vegan?
A: Absolutely! Use dairy-free chocolate, plant-based butter, and ensure your peanut butter contains no honey or dairy. Coconut oil helps with texture.
Summary
The Giant Reese’s Peanut Butter Cup is a show-stopping homemade dessert that captures the iconic flavor of the original candy in a luxurious, shareable size. With rich milk chocolate, a creamy peanut butter core, and endless customization options, it’s a fun and rewarding project for any chocolate lover.