Fruity Pebbles Cheesecake Tacos Recipe
If you’re looking for a fun, colorful, and outrageously delicious dessert that combines childhood nostalgia with gourmet flair, look no further than the Fruity Pebbles Cheesecake Tacos. This whimsical treat blends the creamy richness of cheesecake with the crunchy, vibrant pop of Fruity Pebbles cereal, all wrapped in a crispy taco shell. Perfect for parties, kids’ birthdays, or just because you want to indulge in something truly unique, these edible works of art are as photogenic as they are tasty. Let’s dive into the history, ingredients, methods, and everything you need to know to make this unforgettable dessert at home.
The History
The concept of “dessert tacos” has been gaining popularity over the last few years, especially in the realm of social media food trends. Inspired by the playful fusion of sweet and savory formats, creative bakers began experimenting with using taco shells as edible vessels for desserts like cookie butter, ice cream, and fruit fillings. The Fruity Pebbles Cheesecake Taco is a modern twist on this idea, combining two beloved American treats: the iconic Fruity Pebbles cereal from Post Consumer Brands and classic New York-style cheesecake.
Fruity Pebbles, first introduced in 1971, quickly became a favorite among children and adults alike for its bright colors, fruity flavor, and satisfying crunch. Meanwhile, cheesecake has roots stretching back to ancient Greece but reached mainstream fame in the U.S. during the 20th century. Merging these two staples into a portable, hand-held dessert format was inevitable — and absolutely brilliant. These cheesecake tacos embody the spirit of culinary innovation: fun, bold, and unapologetically sweet.
Ingredients Breakdown
The magic of Fruity Pebbles Cheesecake Tacos lies in their layered textures and flavors. Each component brings something special to the table:
- Cream Cheese: The base of the filling, providing a rich, creamy texture and tangy flavor essential to any great cheesecake.
- Heavy Cream or Whipped Cream: Adds lightness and fluffiness to the cheesecake mixture, ensuring a smooth melt-in-your-mouth experience.
- Sugar (Powdered or Granulated): Sweetens the filling and helps stabilize the whipped texture.
- Vanilla Extract: Enhances the overall flavor profile with warm, aromatic notes.
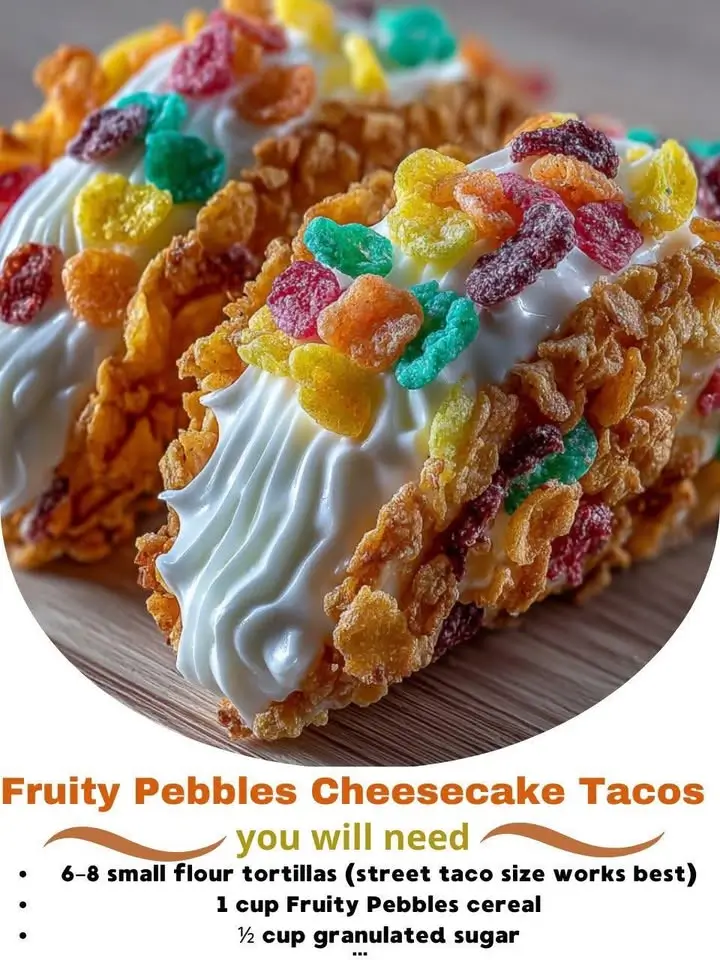
- Fruity Pebbles Cereal: Used both in the filling and as a coating, it adds crunch, color, and that signature fruity taste.
- Taco Shells (Mini or Regular Tortillas): Can be either store-bought mini hard taco shells or homemade soft tortilla shells shaped and baked until crisp.
- Butter (for shaping): Helps seal and crisp up the taco shells when baking.
- Optional Add-ins: Food coloring, sprinkles, colored sugar, chocolate drizzle, or fruit compote for extra flair.
Step-by-Step Recipe
- Prepare the Taco Shells: If using pre-made hard taco shells, skip to step 2. For homemade shells, lightly brush small flour tortillas with melted butter, drape them over the bars of an upside-down muffin tin, and bake at 350°F (175°C) for 8–10 minutes until golden and crisp. Let cool completely.
- Make the Cheesecake Filling: In a large mixing bowl, beat 16 oz (2 blocks) of softened cream cheese with ½ cup powdered sugar and 1 tsp vanilla extract until smooth and creamy. Gradually fold in 1 cup of freshly whipped heavy cream (or use canned whipped cream for convenience) until light and fluffy.
- Incorporate Fruity Pebbles: Gently stir in ¾ cup of crushed Fruity Pebbles into the cheesecake mixture. Be careful not to overmix to preserve the crunch and color.
- Chill the Filling: Cover and refrigerate the mixture for at least 30 minutes to firm up slightly, making it easier to pipe or spoon into the shells.
- Assemble the Tacos: Using a piping bag or a spoon, carefully fill each taco shell with the cheesecake mixture. Aim for a generous mound without overflowing.
- Decorate: Press additional whole or crushed Fruity Pebbles around the edges of the filling for a colorful rim. Drizzle with white chocolate, colored icing, or rainbow sprinkles for added visual appeal.
- Serve Immediately or Chill: For best texture, serve within 1–2 hours. Alternatively, chill assembled tacos for 15–20 minutes before serving to set the filling further.
Tips
- Use Full-Fat Cream Cheese: Low-fat versions can result in a watery or less creamy texture.
- Don’t Over-Crush the Cereal: Keep some larger pieces for texture contrast.
- Work Quickly: Warm hands can soften the filling; keep it chilled between steps.
- Prevent Sogginess: Assemble close to serving time if possible, especially if storing in humid environments.
- Piping Perfection: Use a star tip for a bakery-style swirl that showcases the colorful bits beautifully.
- Baking Hack: Spray tortillas lightly with cooking spray and season with cinnamon-sugar before baking for a sweet, crisp shell.
Variations and Customizations
The beauty of this recipe is its adaptability. Here are some fun spins to try:
- Chocolate Shell Version: Dip cooled taco shells in melted chocolate and let harden for a richer base.
- Frozen Cheesecake Tacos: Freeze filled shells for 2+ hours for an ice cream taco effect.
- Gluten-Free Option: Use gluten-free taco shells or corn-based mini cups, and ensure Fruity Pebbles are certified GF (some batches may contain cross-contamination).
- Vegan Twist: Substitute cream cheese with vegan cream cheese (like Kite Hill), use coconut whipped cream, and dairy-free shells.
- Fruit-Infused: Layer in strawberry puree, mango compote, or blueberry jam beneath the cheesecake for a fruity punch.
- Seasonal Themes: Use holiday-colored cereals (e.g., red/green for Christmas, pastels for Easter) or themed sprinkles.
- Mini Bites: Make bite-sized versions using wonton wrappers baked into cups — perfect for parties!
Health Considerations and Nutritional Value
While undeniably indulgent, it’s worth noting the nutritional aspects of this dessert. A single Fruity Pebbles Cheesecake Taco contains approximately:
- Calories: ~280–350 kcal
- Fat: 18–22g (mostly saturated from cream cheese and butter)
- Carbohydrates: 30–38g (including 18–22g of sugar)
- Protein: 4–6g
- Fiber: 1–2g
Due to high sugar content from both the cereal and added sweeteners, these are best enjoyed in moderation. For a slightly healthier version, consider using reduced-sugar cream cheese, natural sweeteners like monk fruit or stevia, and increasing protein with Greek yogurt blended into the filling. Also, portion control is key—stick to one taco per serving, especially at gatherings.
Ingredients
- 16 oz (2 packages) full-fat cream cheese, softened
- ½ cup powdered sugar
- 1 tsp pure vanilla extract
- 1 cup heavy whipping cream, whipped to stiff peaks (or 1 cup ready-made whipped topping)
- 1 ½ cups Fruity Pebbles cereal, divided (¾ cup crushed, ¾ cup whole)
- 12 mini hard taco shells or 12 small flour tortillas
- 2 tbsp unsalted butter, melted (if making homemade shells)
- Optional: ¼ cup white chocolate chips, melted (for drizzling)
- Optional: Rainbow sprinkles, edible glitter, or colored sugar for decoration
Directions
- Preheat oven to 350°F (175°C). If making homemade taco shells, brush both sides of each small flour tortilla lightly with melted butter. Drape over the top of inverted muffin tin cups so they form a U-shape. Bake for 8–10 minutes until golden and crisp. Remove and let cool completely.
- In a large bowl, beat softened cream cheese, powdered sugar, and vanilla extract using a hand mixer until smooth and creamy, about 2 minutes.
- In a separate bowl, whip the heavy cream to stiff peaks. Gently fold into the cream cheese mixture until fully combined and airy.
- Fold in ¾ cup of crushed Fruity Pebbles until evenly distributed. Taste and adjust sweetness if needed.
- Cover and refrigerate the filling for 30 minutes to firm up.
- Fill each taco shell generously with the cheesecake mixture, creating a rounded peak in the center.
- Press whole Fruity Pebbles gently into the outer edges of the filling for a colorful border. Drizzle with melted white chocolate and sprinkle with additional cereal or rainbow decorations.
- Serve immediately or chill for 15–20 minutes before serving for a firmer texture. Store leftovers in the refrigerator for up to 2 days (though shells may soften over time).
<6>Once chilled, transfer the filling to a piping bag fitted with a star tip. Alternatively, use a spoon for simpler assembly.
FAQ
Can I make these ahead of time?
Yes, but for best texture, assemble no more than 2 hours in advance. Store components separately: keep shells in an airtight container and filling chilled. Assemble just before serving.
Why did my shells get soggy?
Moisture from the filling can soften the shell over time. To prevent this, you can create a barrier by lightly brushing the inside of the shell with melted chocolate and letting it set before adding the filling.
Can I freeze Fruity Pebbles Cheesecake Tacos?
Yes! Freeze unfilled shells and filling separately. When ready, thaw filling slightly, refill, and decorate. Note: freezing may alter the crunch of the cereal slightly.
Are Fruity Pebbles gluten-free?
No, traditional Fruity Pebbles contain rice flour and other ingredients processed in facilities with wheat. For a gluten-free option, seek out certified GF fruity cereals like Schär’s or Nature’s Path varieties.
Can I use other cereals?
Absolutely! Try Cocoa Pebbles for a chocolate version, Lucky Charms for marshmallow magic, or even Cap’n Crunch for extra crunch.
How many tacos does this recipe make?
Approximately 12 mini cheesecake tacos, depending on shell size and filling amount.
Summary
Fruity Pebbles Cheesecake Tacos are a vibrant, creamy, and crunchy fusion dessert that brings joy to any occasion. With simple ingredients and endless customization options, they’re as fun to make as they are to eat.