Introduction
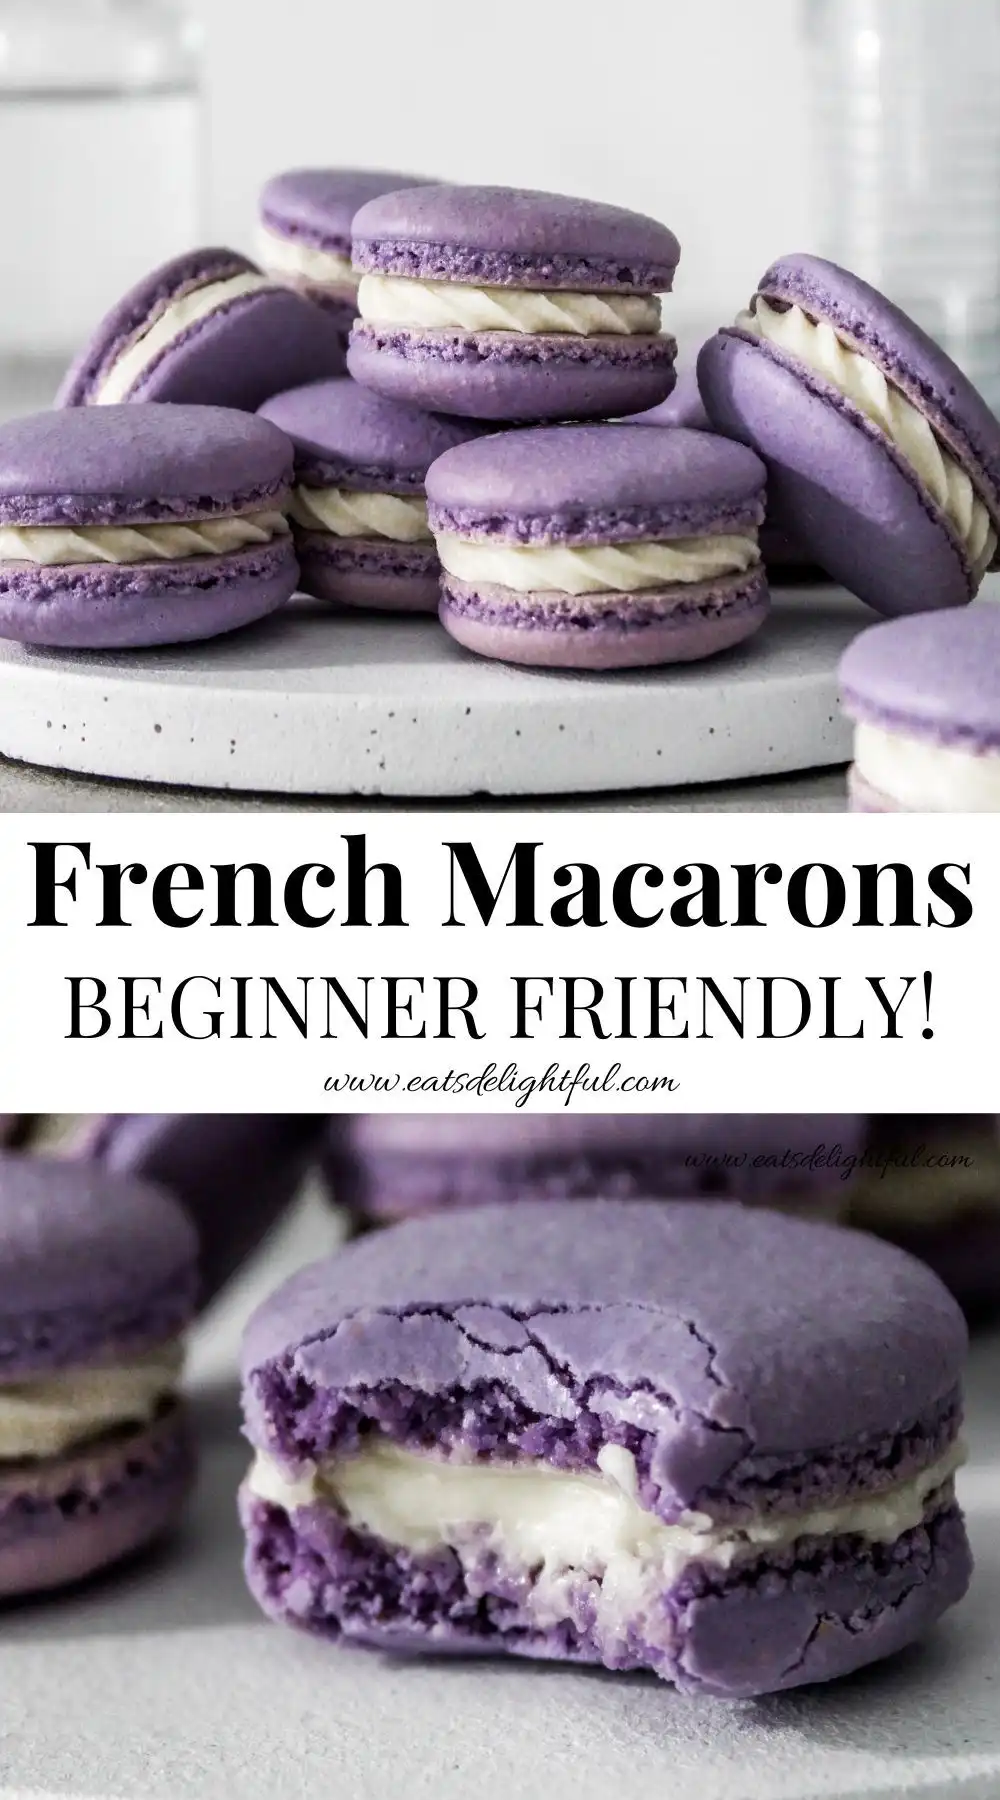
Welcome to the enchanting world of French macarons — delicate, colorful, and utterly irresistible! Often mistaken for simple cookies, these elegant meringue-based confections are a true hallmark of French patisserie. With their smooth, glossy shells, crisp outer layer, tender chewy interior, and luscious fillings, macarons are equal parts art and science. While they carry a reputation for being finicky or intimidating, this beginner-friendly guide is designed to demystify every step — from understanding why your batter might be too runny to how to achieve that coveted “foot” (the ruffled base). Whether you’re baking for a special occasion, practicing your pastry skills, or simply craving something beautifully sweet, this comprehensive resource will walk you through everything you need to know — patiently, clearly, and without shortcuts.
The History
French macarons have a rich and surprisingly layered history that stretches back centuries — and contrary to popular belief, they are not originally French! Their earliest known ancestor traces to 8th-century Persia, where almond-based sweets made with ground nuts, sugar, and rose water were enjoyed across the Middle East and Mediterranean. These treats traveled westward via trade routes and the Crusades, arriving in Italy by the Renaissance. Italian chefs refined them into what we now recognize as the “maccherone” — a soft, chewy almond cookie. When Catherine de’ Medici married the future King Henry II of France in 1533, she brought her Florentine pastry chefs (and their almond confections) to the French court — introducing the delicacy to France.
Over time, French bakers adapted the recipe: replacing rose water with vanilla, adding egg whites for lift, and refining texture. The modern “Parisian” macaron — two delicate shells sandwiched with buttercream, ganache, or jam — emerged in the early 20th century, largely credited to Pierre Desfontaines of the legendary Parisian maison Ladurée around 1900. He is said to have had the brilliant idea of sandwiching two shells together with a flavored filling — transforming a humble cookie into an iconic, multi-sensory experience. Today, macarons symbolize French elegance, craftsmanship, and culinary precision — yet remain deeply approachable with practice, patience, and the right guidance.
Ingredients Breakdown
Macarons rely on just a few high-quality, precisely measured ingredients — but each plays a critical role. Understanding *why* each ingredient matters helps troubleshoot issues before they arise:
- Almond Flour (Blanched & Super-Fine): Provides structure, tenderness, and nutty flavor. Must be *blanched* (skins removed) and *super-fine* — coarse flour causes graininess and cracks. Sift at least twice — it’s non-negotiable!
- Powdered Sugar (Confectioners’ Sugar): Adds sweetness, stabilizes the meringue, and contributes to shell smoothness and shine. Always use *sifted* powdered sugar — lumps cause uneven batter and pitting.
- Egg Whites (Aged, at Room Temperature): The backbone of the meringue. Aging (24–48 hours uncovered in the fridge, then brought to room temp) reduces moisture and strengthens protein bonds, leading to more stable, glossy meringue. Never use pasteurized or liquid egg whites — freshness and viscosity matter.
- Granulated Sugar (for Meringue): Added gradually to egg whites while whipping, it stabilizes the foam, increases volume, and prevents collapse during baking. Fine granulated works best; avoid superfine unless specified.
- Food Coloring (Gel or Powder-Based): Liquid food coloring adds unwanted moisture — a major culprit behind hollows or spreading. Gel or powdered colorants deliver vibrant hues without compromising texture. Add *after* meringue is fully formed, during macaronage.
- Salt (Pinch, optional but recommended): Enhances flavor balance and subtly strengthens egg white proteins. Use fine sea salt or kosher — never iodized table salt, which can impart bitterness.
✅ Pro Tip: Weigh *every* ingredient in grams using a precise digital scale (0.1g accuracy). Volume measurements (cups, spoons) introduce too much variability for macarons — even 2 grams of extra almond flour can throw off the entire batch.
Step-by-Step Recipe
This detailed, fail-safe method follows the classic “French meringue” technique — ideal for beginners because it requires no cooking and offers clear visual cues at each stage. Plan for ~3 hours total (including resting), and don’t rush any step — especially drying!
Step 1: Prep & Weigh Everything
Line two large baking sheets with parchment paper or silicone mats (preferably with macaron templates underneath for consistent sizing). Set aside. Weigh all dry ingredients (almond flour + powdered sugar) into a large bowl. Sift *together*, twice — discard any large bits left in the sifter. In a separate clean, grease-free bowl, measure aged, room-temperature egg whites. Have granulated sugar ready in a small ramekin. Preheat oven to 300°F (150°C) — but *do not insert trays yet*. Calibrate your oven thermometer; many ovens run hot or cold.
Step 2: Whip the Meringue to Stiff Peaks
Using a stand mixer with whisk attachment (or hand mixer with strong motor), begin whipping egg whites on medium speed until foamy (~1 min). Add a pinch of salt. Increase to medium-high and gradually add granulated sugar, 1 tablespoon at a time, waiting 10–15 seconds between additions. Continue whipping until you reach *stiff, glossy peaks*: when the whisk is lifted, the peak stands straight up, curls slightly at the tip, and doesn’t droop. The meringue should cling firmly to the bowl — no sliding. This usually takes 4–6 minutes. Do *not* overbeat — grainy, dry, or curdled meringue = cracked shells.
Step 3: Macaronage — Folding the Dry Mix into Meringue
This is the most crucial — and often misunderstood — step. Using a flexible silicone spatula, gently fold one-third of the sifted dry mixture into the meringue to lighten it. Then, add the remaining dry mix in two additions, folding with slow, deliberate strokes: cut down the center, sweep across the bottom, and fold up and over. Rotate the bowl as you go. Stop folding when the batter reaches the perfect consistency: it should fall off the spatula in a thick, slow ribbon that melts back into itself within ~10 seconds (the “figure-8” test: lift spatula and draw a figure-8 with the batter — if it holds its shape briefly then seamlessly blends back in, it’s ready). Undermixed batter is thick, grainy, and won’t spread; overmixed batter is runny, shiny, and spreads too thin — causing foot loss or cracking. If using food coloring, add it in the last minute of macaronage and fold *just until uniform*.
Step 4: Pipe & Rest
Transfer batter to a piping bag fitted with a ½-inch (1.2 cm) round tip. Hold vertically ½ inch above the mat and pipe 1.5-inch (3.8 cm) rounds, keeping consistent pressure and releasing cleanly. Tap each tray *firmly* on the counter 3–4 times to release air bubbles. Immediately inspect and pop any visible bubbles with a toothpick. Let piped macarons rest at room temperature, uncovered, for 30–60 minutes — until a skin forms. Test by gently touching the surface: it should feel dry and not sticky — like a marshmallow. This “skin” is essential for foot development and preventing cracks. Humidity affects drying time — in humid climates, use a fan on low (no heat) or extend rest up to 90 minutes.
Step 5: Bake with Precision
Place one tray in the *center rack* of your preheated oven. Set timer for 12 minutes. Do *not* open the oven door for at least 10 minutes — sudden temperature drops cause collapse. At 12 minutes, gently wiggle the tray — shells should be set and lift easily without wobbling. If still jiggly, bake 1–2 minutes more. Rotate tray halfway through only if your oven has hot spots (check first with an oven thermometer map). Remove tray, let shells cool *completely* on the mat (15–20 mins) before attempting to lift. They must release effortlessly — if they stick, they’re underbaked or not cooled enough.
Step 6: Fill & Mature
Pair shells by size and color. Pipe or spread 1 tsp of filling onto the flat side of half the shells. Gently press matching shells together — avoid squeezing out filling. Place filled macarons in an airtight container and refrigerate for *at least 24 hours* before serving. This “maturing” allows the shells to soften slightly and absorb moisture from the filling, achieving the perfect tender-chewy texture and harmonized flavor. Store refrigerated for up to 5 days, or freeze unfilled shells for up to 3 months.
Tips
- Room Temperature is Key: Egg whites must be truly at room temp (68–72°F / 20–22°C) — cold whites won’t whip properly. Take them out of the fridge 1–2 hours before starting.
- Zero Fat, Zero Moisture: Even trace amounts of yolk, oil, or water in your mixing bowl or whisk will prevent meringue from forming. Wipe bowls and tools with vinegar or lemon juice before use.
- Sift Like Your Macarons Depend On It (They Do): Sifting almond flour and powdered sugar together breaks up clumps *and* aerates — critical for smooth shells. Don’t skip the second sifting!
- Humidity Matters — Adjust Accordingly: High humidity? Extend drying time, use AC/fan, reduce powdered sugar by 5g, or add 1g cornstarch to dry mix. Low humidity? Reduce drying to 30 mins max — over-drying causes brittle shells.
- Oven Thermometer is Non-Negotiable: Most built-in oven thermostats are inaccurate by ±25°F. A $10 oven thermometer pays for itself in saved batches.
- Practice Piping Consistency: Use a template or draw circles on parchment. Keep your hand steady, apply even pressure, and stop piping *before* lifting — this prevents peaks.
- First Batch is a Learning Tool: Don’t aim for perfection — aim for observation. Note timing, texture, oven behavior. Your second batch will be exponentially better.
- Cooling Is Part of Baking: Never rush cooling. Warm shells are fragile and will crack or tear when handled. Patience here prevents heartbreak later.
Variations and Customizations
Once you master the classic vanilla or chocolate shell, the flavor possibilities are endless — limited only by your creativity and quality ingredients. Here’s how to adapt confidently:
Flavoring the Shells
- Natural Extracts: Add ¼ tsp pure vanilla, almond, or orange extract *during macaronage* (after color, before final fold). Avoid imitation — it contains alcohol/water that destabilizes batter.
- Cocoa Powder: Replace 15g of almond flour with unsweetened Dutch-process cocoa. Sift *with* dry ingredients. Expect slightly drier batter — may need ½ tsp extra egg white.
- Matcha Green Tea: Sift 1–2 tsp ceremonial-grade matcha with dry ingredients. Start with 1 tsp — too much imparts bitterness.
- Fruit Powders: Freeze-dried raspberry, strawberry, or mango powder (1–2 tsp) adds intense flavor and color. Sift thoroughly to avoid specks.
Fillings That Wow
- Classic Buttercream: American (powdered sugar + butter + cream + flavor) or Swiss meringue (more stable, less sweet). Add freeze-dried fruit powder or citrus zest for brightness.
- Chocolate Ganache: Heat heavy cream, pour over chopped chocolate (60–70% cacao), stir until smooth, cool to pipeable consistency. Infuse cream with herbs (lavender, mint), spices (cardamom, cinnamon), or espresso.
- Fruit Curds: Lemon, lime, or passionfruit curd adds bright acidity. Ensure it’s thickened well and chilled — runny curd soaks shells.
- White Chocolate–Coconut: Melt white chocolate with toasted coconut flakes and a splash of coconut milk for tropical flair.
- Earl Grey Infusion: Steep tea leaves in warm cream for ganache or buttercream — strain thoroughly.
Textural & Visual Twists
- Crunchy Inclusions: Press a single roasted pistachio, edible flower petal, or gold leaf onto shells *immediately after piping*, before resting.
- Marbled Effect: Divide batter into portions, color separately, then swirl lightly in the piping bag with a skewer.
- Mini or Giant Macarons: Adjust piping size (¾” for mini, 2″ for giant) and baking time (minis: 10–11 mins; giants: 14–16 mins). Rotate trays more frequently.
- Gluten-Free & Vegan Options: Traditional macarons are naturally gluten-free! For vegan versions, aquafaba (chickpea brine) can replace egg whites — but requires advanced technique and pH balancing (cream of tartar + lemon juice). Not recommended for first-timers.
Health Considerations and Nutritional Value
While French macarons are undeniably indulgent, they offer some surprising nutritional notes — and mindful modifications can make them more balanced without sacrificing charm.
What’s in a Typical Macaron (1 shell, ~30g)?
- Calories: ~80–100 kcal (varies by filling — buttercream is higher than fruit curd)
- Carbohydrates: 9–12g (mostly from sugars — minimal fiber)
- Fat: 4–6g (mostly unsaturated from almonds; saturated from butter/chocolate)
- Protein: 1.5–2g (from almonds and egg whites)
- Key Micronutrients: Vitamin E (antioxidant), magnesium, calcium, and healthy monounsaturated fats from almonds
Health-Conscious Swaps & Tips
- Reduce Sugar Smartly: You can safely lower granulated sugar in meringue by 5–10g and powdered sugar in dry mix by 10g — but go gradual. Too little sugar weakens structure and risks hollows.
- Boost Nutrition: Add 1 tsp ground flaxseed or chia seeds to dry mix (sift well). Increases omega-3s and fiber — subtle nutty note complements almond.
- Lighter Fillings: Opt for lemon curd (lower fat), dark chocolate ganache (higher cocoa = more antioxidants, less sugar), or mascarpone whipped with honey and vanilla.
- Allergen Notes: Naturally nut-based — not suitable for tree nut allergies. Almond flour can be substituted with finely ground sunflower seed flour for nut-free versions (texture differs slightly).
- Mindful Enjoyment: Macarons are portion-controlled by design — one is satisfying. Pair with herbal tea or black coffee to enhance flavor without added sugar.
💡 Important Reminder: Macarons are a treat — not a health food. But their relatively small size, lack of gluten, and whole-food base (almonds, eggs) make them a more thoughtful dessert choice than many highly processed alternatives — especially when made with real ingredients and shared with love.
Ingredients
Makes approximately 20–22 macarons (40 shells)
- 100 g blanched super-fine almond flour (sifted, weighed after sifting)
- 200 g powdered sugar (confectioners’ sugar), sifted
- 100 g aged egg whites (about 3 large whites — aged 24–48 hrs uncovered in fridge, then brought to room temp)
- 100 g granulated sugar (fine)
- ⅛ tsp fine sea salt
- Gel or powdered food coloring (optional — ¼ tsp or as needed)
Filling Suggestions (choose one):
- Vanilla Swiss Meringue Buttercream: 120 g unsalted butter (room temp), 240 g powdered sugar (sifted), 60 g pasteurized egg whites, 1 tsp pure vanilla extract, pinch salt
- Dark Chocolate Ganache: 120 g 65% dark chocolate (finely chopped), 120 g heavy cream, 1 tbsp light corn syrup (for shine and stability)
- Lemon Curd: 120 g homemade or high-quality store-bought (ensure thick, not runny)
Directions
- Prepare Equipment: Line two baking sheets with parchment or silicone mats. If using, place macaron circle templates (1.5″) underneath. Weigh and sift almond flour and powdered sugar together into a large bowl — sift again into the same bowl. Discard any large particles.
- Age & Warm Egg Whites: Separate eggs 1–2 days ahead. Store whites uncovered in a covered container in the fridge. Bring to room temperature (68–72°F) 1–2 hours before starting.
- Whip Meringue: In a spotlessly clean, dry bowl, combine egg whites and salt. Whip on medium until foamy (~1 min). Gradually add granulated sugar, 1 Tbsp at a time, waiting 10–15 sec between. Whip on medium-high until stiff, glossy peaks form (4–6 min). Do not overbeat.
- Macaronage: Add ⅓ of dry mix to meringue; fold gently to lighten. Add remaining dry mix in two parts, folding slowly and deliberately with a silicone spatula. Fold until batter flows like thick lava — ribbon falls off spatula and melts back in ~10 sec. Add food coloring in final minute and fold until uniform.
- Pipe & Rest: Transfer to piping bag with ½” round tip. Pipe 1.5″ rounds onto prepared sheets. Tap trays firmly 4x. Pop bubbles with toothpick. Rest uncovered 30–60 min until surface is dry to touch.
- Bake: Preheat oven to 300°F (150°C) with oven thermometer. Bake one tray at a time on center rack for 12–14 min. Do not open door before 10 min. Shells are done when feet are set and tops don’t jiggle. Cool completely on mat (15–20 min) before removing.
- Fill & Mature: Pair shells by size. Fill half with 1 tsp filling. Gently sandwich. Place in airtight container and refrigerate 24–48 hours before serving for optimal texture and flavor.
FAQ
- Q: Why did my macarons crack?
- A: Most commonly due to under-drying (no skin formed), too-high oven temp, or trapped air bubbles not popped before baking. Also check for overmixed batter — it spreads too thin and cracks as it rises.
- Q: Why no feet? Or tiny feet?
- A: Feet form from expansion during initial heat surge. Causes include: under-dried shells (no skin), oven too cool, batter too stiff (undermixed), or opening oven too soon. Try increasing rest time or raising oven temp by 5°F.
- Q: Why hollow shells?
- A: Usually from overmixed batter (too runny → spreads thin → air pocket forms), underbaked centers, or meringue overbeaten (weak structure collapses). Also possible if oven temp spikes mid-bake.
- Q: Why lopsided or skewed feet?
- A: Uneven piping (angled tip), inconsistent oven heat (hot spots), or trays placed off-center. Rotate tray halfway through if needed — and always use center rack.
- Q: Can I make macarons without a scale?
- A: Technically yes — but success rate drops dramatically. Volume measures vary up to 20% for almond flour and powdered sugar. A $20 digital scale is the single best investment for macaron success.
- Q: How do I fix runny batter?
- A: Unfortunately, once overmixed, you cannot salvage it. However, for next time: stop folding earlier, perform the figure-8 test frequently, and chill batter 10 min before piping if it feels warm or loose.
- Q: Can I use liquid food coloring?
- A: Not recommended. Even 1 drop adds excess moisture, leading to spreading, hollows, or failure to develop feet. Stick to gel or powdered colors.
- Q: Why do my macarons stick to the parchment?
- A: They’re underbaked or not cooled enough. They must lift cleanly. If stuck, return to oven for 1–2 extra minutes, then cool fully. Also ensure you’re using *bleached* parchment — unbleached can be stickier.
- Q: Can I freeze macarons?
- A: Yes! Unfilled shells freeze beautifully for 3 months. Thaw at room temp 30 min before filling. Filled macarons can be frozen for up to 2 weeks — thaw overnight in fridge, then bring to room temp before serving.
- Q: What’s the best way to store them?
- A: Refrigerated in an airtight container for up to 5 days. Bring to room temperature 20–30 minutes before eating for best texture and flavor. Do not store at room temp longer than 1 day — fillings spoil.
Summary
French macarons are a joyful fusion of precision and poetry — demanding attention to detail yet rewarding patience with ethereal texture and endless creative expression. With this beginner-friendly guide, you now hold not just a recipe, but a roadmap: from historical roots and scientific insight to troubleshooting wisdom and inspired variations.
Remember — every cracked shell, every shy foot, every imperfect circle is not failure, but data. Bake with curiosity, weigh with care, rest with intention, and savor the process as deeply as the finished, jewel-toned bite.