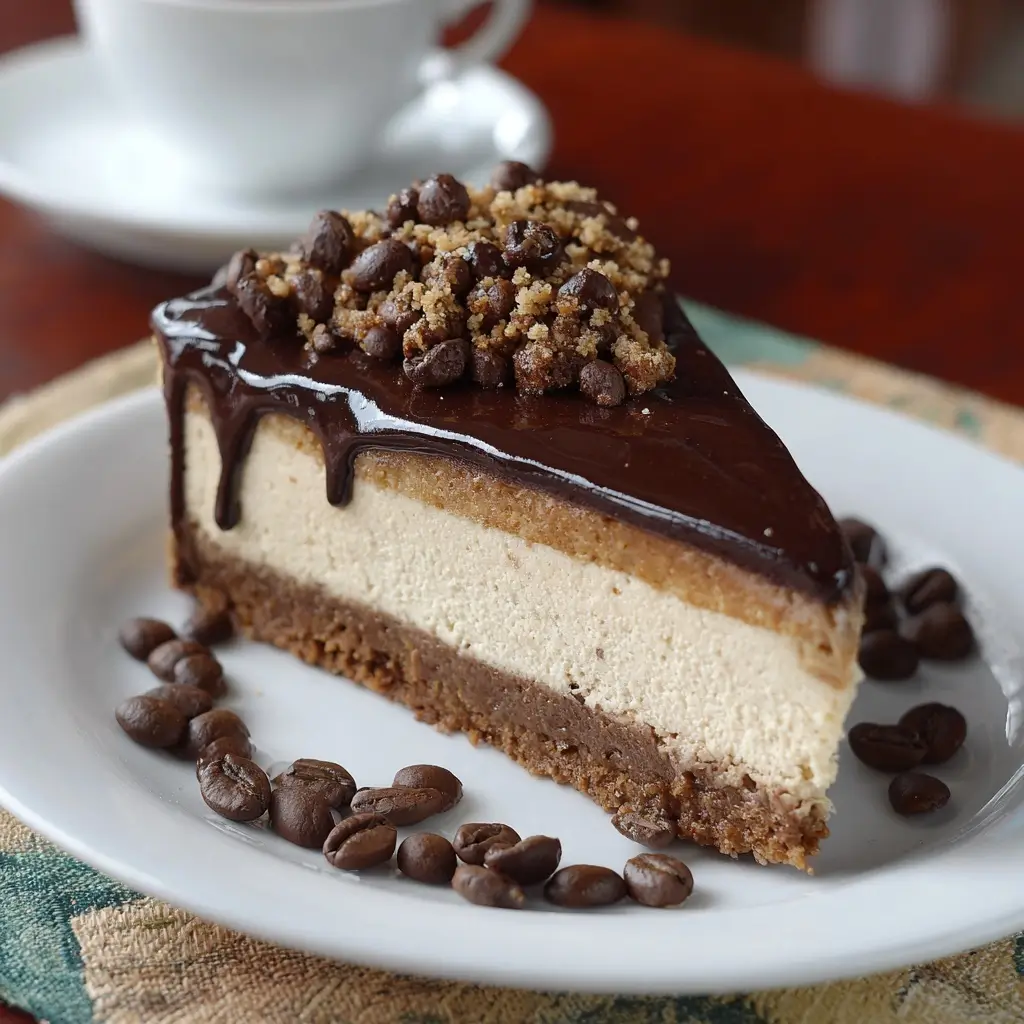
Espresso Cheesecake: A Decadent Fusion of Coffee and Cream
The espresso cheesecake is a luxurious dessert that marries the rich, velvety texture of traditional New York-style cheesecake with the bold, aromatic depth of freshly brewed espresso. This indulgent treat has become a favorite among coffee lovers and dessert enthusiasts alike, offering a perfect balance between sweet creaminess and bitter intensity. Whether served at a dinner party, a brunch gathering, or enjoyed in solitude with a warm cup of coffee, this dessert elevates any moment into a gourmet experience.
The History of Espresso Cheesecake
Cheesecake itself dates back to ancient Greece, where it was served to athletes during the first Olympic Games as a source of energy. Over centuries, the dessert evolved across Europe—especially in Italy and Germany—before becoming popularized in America through the iconic New York-style version in the early 20th century. The addition of espresso to cheesecake, however, is a more modern innovation, emerging during the late 20th century as specialty coffee culture began to flourish.
With the rise of Italian espresso bars and the growing popularity of café lattes, cappuccinos, and mochas, bakers sought to infuse coffee flavor into desserts beyond tiramisu and affogato. Espresso cheesecake emerged as a natural progression—a way to capture the essence of strong, dark coffee within the creamy structure of a baked custard. It quickly gained acclaim for its sophisticated taste profile and elegant presentation, often appearing on menus in upscale restaurants and boutique bakeries worldwide.
Ingredients Breakdown
The magic of espresso cheesecake lies not just in its flavor but in the careful selection and balance of ingredients. Each component plays a crucial role in creating the final masterpiece:
- Cream Cheese: Full-fat, brick-style cream cheese (such as Philadelphia) ensures a smooth, dense, and rich base. It should be softened to room temperature before use to prevent lumps.
- Granulated Sugar: Provides sweetness while helping to stabilize the egg-based custard. Adjustments can be made for less-sweet versions.
- Eggs: Large eggs act as a binder and contribute to the creamy texture. They must be added one at a time and gently mixed to avoid incorporating too much air, which can cause cracking.
- Sour Cream: Adds tanginess, moisture, and silkiness. It also helps create a smoother mouthfeel and prevents dryness.
- Vanilla Extract: Enhances overall flavor complexity with its floral, sweet notes, balancing the bitterness of espresso.
- Espresso Powder or Strong Brewed Espresso: Instant espresso powder (like Medaglia D’Oro) intensifies the coffee flavor without adding excess liquid. Alternatively, cooled concentrated espresso can deepen the aroma and authenticity.
- Graham Cracker Crust: A buttery, slightly sweet foundation made from crushed graham crackers, melted butter, and a touch of sugar. Digestive biscuits or chocolate wafers offer tasty alternatives.
- Heavy Cream: Often used in the filling or drizzle topping to enhance richness and facilitate blending.
- Chocolate Shavings or Cocoa Powder (optional): For garnish and added depth, especially when serving with a mocha twist.
Step-by-Step Recipe
Preparation Time:
30 minutes | Baking Time: 60–75 minutes | Chilling Time: At least 6 hours (preferably overnight)
Makes:
One 9-inch cheesecake (serves 12–16)
Ingredients
For the Crust:
- 1 ½ cups (150g) graham cracker crumbs
- ¼ cup (50g) granulated sugar
- 6 tablespoons (85g) unsalted butter, melted
- Pinch of salt
For the Filling:
- 4 (8-ounce) packages full-fat cream cheese, softened
- 1 ½ cups (300g) granulated sugar
- 1 cup (240g) sour cream
- 3 tablespoons all-purpose flour
- 1 tablespoon vanilla extract
- 4 large eggs, plus 2 egg yolks
- 2 teaspoons instant espresso powder (or ¼ cup strong brewed espresso, cooled)
- 1 tablespoon Kahlúa or coffee liqueur (optional, for enhanced flavor)
- 1 teaspoon lemon juice (to brighten flavors and cut richness)
For the Topping (Optional):
- ½ cup (120ml) heavy cream
- 1 tablespoon powdered sugar
- 1 teaspoon instant espresso dissolved in 1 tsp hot water
- Chocolate curls or cocoa powder for garnish
Directions
- Prepare the Crust: Preheat oven to 325°F (163°C). In a medium bowl, combine graham cracker crumbs, sugar, melted butter, and salt. Mix until the crumbs are evenly moistened. Press the mixture firmly into the bottom and slightly up the sides of a 9-inch springform pan using the back of a spoon or flat glass. Bake for 10 minutes, then remove and let cool while preparing the filling.
- Make the Filling: In a large mixing bowl, beat the softened cream cheese on medium speed until smooth and creamy (about 2 minutes). Gradually add sugar and continue beating until fully incorporated and fluffy.
- Add sour cream, vanilla extract, espresso powder (or cooled espresso), Kahlúa (if using), and lemon juice. Beat on low speed until combined.
- In a separate small bowl, whisk together flour and a pinch of salt. Sift into the cream cheese mixture and mix just until blended.
- Add eggs one at a time, mixing on low after each addition just until the yolk disappears. Do not overmix—this prevents air bubbles and cracks. Add the extra two yolks last for extra richness and silkiness.
- Pour the batter carefully over the cooled crust. Smooth the top with a spatula. Tap the pan gently on the counter to release trapped air bubbles.
- Bake the Cheesecake: Place the springform pan on a large sheet of aluminum foil and wrap tightly around the sides to create a waterproof seal. This prevents water from seeping in during the water bath.
- Place the wrapped pan inside a larger roasting pan. Fill the outer pan with hot water until it reaches halfway up the sides of the springform (this is the water bath, or “bain-marie”). Carefully transfer to the preheated oven.
- Bake for 60–75 minutes. The cheesecake is done when the edges are set but the center still jiggles slightly like jelly when gently shaken. The internal temperature should read about 150°F (65°C) on an instant-read thermometer.
- Turn off the oven, crack the door open slightly with a wooden spoon, and let the cheesecake cool slowly inside for 1 hour. This gradual cooling reduces thermal shock and minimizes cracking.
- Remove from oven and water bath. Run a thin knife around the edge to loosen (but do not remove the ring yet). Cool completely at room temperature, then refrigerate uncovered for at least 6 hours, preferably overnight.
- Prepare the Topping (Optional): Just before serving, whip heavy cream, powdered sugar, and dissolved espresso to soft peaks. Pipe or spread over the chilled cheesecake. Garnish with chocolate shavings or a dusting of cocoa powder.
Tips for the Perfect Espresso Cheesecake
- Room Temperature Ingredients: Ensure all dairy ingredients (cream cheese, eggs, sour cream) are at room temperature for a lump-free, silky batter.
- Don’t Overmix: Once eggs are added, mix only until just incorporated. Overbeating introduces air, leading to cracks and a soufflé-like texture.
- Use a Water Bath: Essential for even baking and preventing surface cracks. Aluminum foil wrapping must be tight and double-layered if needed.
- Avoid Rapid Temperature Changes: Let the cheesecake cool gradually in the oven to prevent collapse or cracking.
- Chill Overnight: Patience pays off—longer chilling results in a firmer slice and allows flavors to meld beautifully.
- Prevent Sticking: Line the bottom of the springform pan with parchment paper for easy removal.
- Sharp Knife Technique: Dip a long, thin knife in hot water and wipe clean between each slice for clean cuts.
Variations and Customizations
While classic espresso cheesecake is divine on its own, there are endless ways to customize it to suit different tastes and occasions:
- Mocha Cheesecake: Swirl in ¼ cup of melted dark chocolate or add 2 tablespoons of cocoa powder to the batter for a chocolate-coffee fusion.
- Chocolate Crust: Replace graham crackers with chocolate wafer cookies for a deeper, richer base.
- Caramel Drizzle: Top with salted caramel sauce before serving for a sweet-savory contrast.
- Almond or Hazelnut Accent: Add 1 teaspoon of almond extract or hazelnut liqueur (like Frangelico) to complement the coffee notes.
- Decaf Version: Use decaffeinated espresso powder for those sensitive to caffeine.
- Dairy-Free/Vegan Option: Substitute cream cheese with cashew-based vegan cream cheese, use coconut cream instead of sour cream, and flax eggs for binding. Opt for a nut-date crust.
- Individual Mini Cheesecakes: Bake in muffin tins for personal-sized treats—adjust baking time to 25–30 minutes.
- Spiced Espresso: Add a pinch of cinnamon, nutmeg, or cardamom to the filling for a warm, aromatic twist.
Health Considerations and Nutritional Value
Espresso cheesecake is undeniably rich and calorie-dense, but understanding its nutritional components can help you enjoy it mindfully:
- Calories: Approximately 450–550 per slice (1/12 of cake), depending on size and additions.
- Fat: High in saturated fat due to cream cheese, butter, and eggs. One slice may contain 30–40g total fat.
- Sugar: Around 40–50g per slice; consider reducing sugar by ¼ cup or using monk fruit sweetener for lower glycemic impact.
- Protein: Moderate protein content (~8–10g per slice) from eggs and dairy.
- Caffeine: Contains about 40–60mg of caffeine per slice (equivalent to half a cup of coffee), thanks to espresso. Sensitive individuals should consume cautiously, especially in the evening.
- Lactose: High lactose content; lactose-intolerant individuals may need substitutes.
- Portion Control: Serve smaller slices with fresh berries to balance richness.
- Occasional Treat: Best enjoyed in moderation as part of a balanced diet. Not recommended for frequent consumption due to high fat and sugar levels.
Frequently Asked Questions (FAQ)
Can I make espresso cheesecake without a water bath?
While possible, skipping the water bath increases the risk of cracking, uneven baking, and curdling. For best results, always use a water bath.
Why did my cheesecake crack?
Cracking is usually caused by overmixing, rapid cooling, or too much air in the batter. Using a water bath and slow cooling helps prevent this.
Can I freeze espresso cheesecake?
Yes! Wrap tightly in plastic and foil, then freeze for up to 2 months. Thaw overnight in the refrigerator before serving.
How long does it last in the fridge?
Up to 5 days when stored covered in the refrigerator.
Can I use regular coffee instead of espresso powder?
Yes, but use strongly brewed coffee (cooled) and reduce other liquids slightly. Espresso powder gives a more intense flavor without diluting the batter.
Is this recipe gluten-free?
Not by default due to graham crackers and flour. Use gluten-free cookies and cornstarch or arrowroot instead of flour to make it safe for gluten-sensitive diets.
Can I bake it in a regular cake pan?
A springform pan is ideal for easy release. If using a regular pan, line thoroughly with parchment and expect difficulty removing cleanly.
Can I make it ahead of time?
Absolutely! Cheesecake tastes better after 24 hours of chilling. Prepare it 1–2 days in advance for stress-free entertaining.
Summary
Espresso cheesecake combines the creamy luxury of classic cheesecake with the bold, invigorating essence of espresso for a dessert that’s both comforting and sophisticated. With careful preparation and attention to detail, this show-stopping treat delivers a harmonious blend of sweet, tangy, and caffeinated flavors in every bite.