Introduction
Cookies and Cream Cookies are the ultimate nostalgic indulgence—a buttery, soft-baked cookie studded with generous chunks of crunchy Oreo® cookies and rich pockets of white chocolate or vanilla-flavored morsels. More than just a dessert, they’re a beloved cultural icon that bridges childhood memories with modern baking sophistication. Whether enjoyed warm from the oven with a glass of cold milk, packed into lunchboxes, or gifted in festive tins, these cookies deliver an irresistible contrast of textures and flavors: tender crumb meets crisp cookie shards, sweet creaminess against deep cocoa notes, and just the right hint of salt to balance it all. Their widespread popularity across bakeries, cafes, and home kitchens speaks to their universal appeal—and their surprising versatility, serving as both a comforting classic and a canvas for creative reinvention.
The History
The origin of Cookies and Cream Cookies is deeply intertwined with the rise of the iconic Oreo® cookie, first introduced by Nabisco in 1912. However, the “Cookies and Cream” flavor concept didn’t emerge until decades later—most credibly traced to the early 1970s, when dairy innovators at South Dakota State University (SDSU) and later Talenti Gelato & Sorbetto independently developed the now-ubiquitous ice cream flavor by blending crushed Oreos into sweet cream base. By the mid-1980s, this flavor had exploded across grocery freezers and premium dessert menus alike. Bakers soon followed suit, translating the beloved pairing into baked goods—and by the late 1990s, Cookies and Cream Cookies began appearing in regional bakery catalogs, food magazines like Bon Appétit and Martha Stewart Living, and early internet recipe archives. The trend accelerated in the 2010s with the rise of Instagram-friendly baking and viral food challenges, cementing its status as a staple in American cookie culture. Today, countless variations exist—from gluten-free and vegan adaptations to gourmet versions featuring house-made chocolate wafers and Madagascar vanilla bean paste—yet the foundational magic remains unchanged: the joyful marriage of creamy sweetness and crisp, cocoa-rich crunch.
Ingredients Breakdown
Every exceptional Cookies and Cream Cookie begins with intentional, high-quality components—each playing a distinct structural, textural, or flavor role:
- Unsalted Butter (room temperature): Provides richness, tenderness, and flakiness; room temperature ensures optimal creaming with sugar for proper aeration and lift.
- Granulated Sugar & Brown Sugar (light or dark): Granulated sugar promotes spread and crisp edges; brown sugar adds moisture, chew, and molasses depth—dark brown intensifies caramel notes, while light offers subtler warmth.
- Large Eggs (room temperature): Bind ingredients, add structure and moisture, and contribute to leavening via steam during baking.
- Pure Vanilla Extract (or vanilla bean paste): Enhances aromatic complexity and rounds out sweetness without overpowering the cream-and-cocoa profile.
- All-Purpose Flour (spooned & leveled): Forms the cookie’s gluten network—too much leads to toughness; precise measuring is essential. For added tenderness, many bakers substitute up to 25% with cake flour.
- Leavening Agents (baking soda + optional baking powder): Baking soda reacts with acidic brown sugar for lift and browning; a small amount of baking powder can provide additional height and uniform spread control.
- Fine Sea Salt: Not merely for seasoning—it intensifies sweetness, balances fat, and enhances overall flavor perception. Kosher salt is acceptable, but fine sea salt dissolves more evenly in dough.
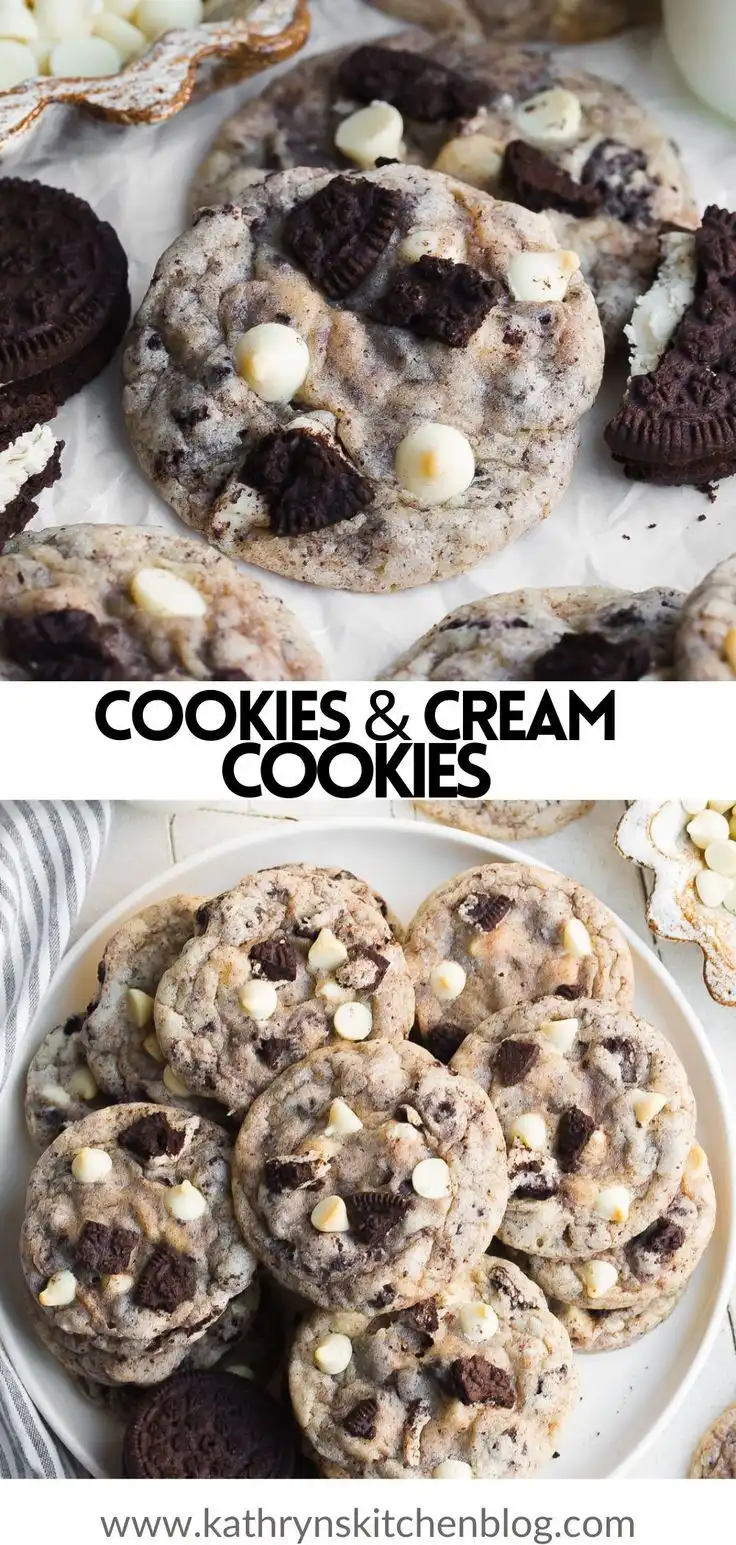
- Oreo® Cookies (original, full-size or mini): The star ingredient. Crushed into varying sizes—coarse for crunch, medium for texture, and fine for subtle speckling. For best results, use cookies with intact creme filling (avoid stale or overly dry ones). Vegan or gluten-free Oreos work seamlessly in adapted versions.
- White Chocolate Chips or Chunks (high-cacao, real-vanilla variety preferred): Adds creamy sweetness, melt-in-your-mouth richness, and visual appeal. Avoid “white baking chips” with hydrogenated oils—they lack flavor and don’t melt properly. Couverture-grade white chocolate or chopped high-quality bars yield superior taste and mouthfeel.
- Optional Additions: A pinch of espresso powder (enhances cocoa notes), a splash of heavy cream (for extra chew), or a dusting of freeze-dried vanilla powder (for aromatic intensity).
Step-by-Step Recipe
- Prep Work (15 minutes): Line two large baking sheets with parchment paper or silicone baking mats. Position oven racks in upper and lower thirds. Preheat oven to 350°F (175°C). Measure all ingredients precisely. Crush Oreos using a food processor (pulse for coarse chunks) or place in a zip-top bag and crush with a rolling pin—aim for a mix of pea-sized pieces and smaller crumbs. Chop white chocolate if using bars; set both near your work surface.
- Cream Butter & Sugars (3–4 minutes): In the bowl of a stand mixer fitted with paddle attachment (or large mixing bowl with hand mixer), beat unsalted butter, granulated sugar, and brown sugar on medium-high speed until light, fluffy, and pale—scraping bowl frequently. This step incorporates air critical for texture and rise.
- Add Wet Ingredients (2 minutes): Beat in eggs one at a time, ensuring each is fully incorporated before adding the next. Mix in vanilla extract until smooth and homogenous. Do not overmix—once combined is sufficient.
- Combine Dry Ingredients (1 minute): In a separate bowl, whisk together flour, baking soda, optional baking powder, and salt until thoroughly blended and aerated.
- Incorporate Dry Mixture (1–2 minutes): With mixer on low speed, gradually add dry ingredients to wet mixture in three additions, mixing only until no streaks of flour remain—do not overmix. Overworking develops excess gluten, resulting in tough cookies.
- Fold in Mix-Ins (1 minute): Using a sturdy silicone spatula, gently fold in crushed Oreos and white chocolate chips/chunks just until evenly distributed. Reserve ~2 tbsp of larger Oreo pieces to press onto tops of portioned dough balls for bakery-style visual appeal.
- Portion & Chill (30 minutes minimum, ideally 1–2 hours or overnight): Use a 2-tablespoon cookie scoop to portion dough into 1.5-inch balls. Place on prepared sheets, spacing 3 inches apart. Cover loosely with plastic wrap and refrigerate. Chilling solidifies butter, prevents overspreading, improves flavor development (sugars hydrate flour), and yields thicker, more structured cookies with defined edges.
- Bake (11–13 minutes per batch): Bake chilled dough balls one sheet at a time (middle rack preferred) for 11–13 minutes—until edges are lightly golden and set, centers appear soft and slightly puffed but not raw. Rotate sheet halfway through for even baking. Cookies will continue to set as they cool.
- Cool & Set (15–20 minutes): Let cookies cool on baking sheets for 5 minutes—this allows internal structure to firm. Then transfer carefully to wire racks to cool completely. Resist eating warm—they’re fragile and under-set. For optimal chew, enjoy within 24 hours; for maximum crispness, wait until fully cooled.
Tips
- Chill is non-negotiable: Skipping refrigeration guarantees flat, greasy, or misshapen cookies. For even better flavor and texture, chill dough overnight—or freeze unbaked balls for up to 3 months (bake frozen, adding 1–2 minutes to bake time).
- Crush Oreos strategically: Pulse in short bursts—not continuously—to avoid turning them into dust. Aim for 60% coarse (¼–½ inch), 30% medium (pea-sized), and 10% fine. Too much fine crumb creates a muddy gray color and dulls contrast.
- Measure flour correctly: Spoon flour into measuring cup and level with straight edge—never scoop directly from bag (compacts flour, adding up to 25% extra). Better yet, weigh it: 240g (2 cups) AP flour is ideal.
- Use European-style butter (82–84% fat): Higher fat content yields richer flavor and better browning—look for brands like Kerrygold, Plugrá, or Challenge.
- Rotate pans and swap racks: Home ovens have hot spots. Rotating halfway ensures even browning; swapping top/bottom sheets between batches evens out heat exposure.
- Underbake slightly: Remove cookies when centers still look soft and glossy—they’ll firm up beautifully as they cool. Overbaked cookies lose chew and become brittle.
- Store smartly: Keep in airtight container at room temperature for up to 5 days. Add a slice of plain white bread to maintain softness (it releases moisture); replace every 2 days. For longer storage, freeze baked cookies for up to 3 months—thaw at room temp or reheat in 325°F oven for 3–4 minutes.
- Scale with confidence: This recipe doubles reliably. Triple only if using professional-grade mixer; otherwise, mix in batches to avoid overloading motor or undermixing.
Variations and Customizations
Cookies and Cream Cookies invite endless creativity—whether you’re accommodating dietary needs, elevating flavor, or simply experimenting with seasonal twists:
- Gluten-Free Version: Substitute 1:1 gluten-free all-purpose flour blend (e.g., King Arthur Measure for Measure or Bob’s Red Mill 1-to-1) + ¼ tsp xanthan gum (if not included in blend). Use certified GF Oreos and white chocolate. Slightly increase chill time (up to 2.5 hours) for improved dough integrity.
- Vegan Adaptation: Replace butter with vegan butter (Miyoko’s or Earth Balance), eggs with flax eggs (1 tbsp ground flax + 2.5 tbsp water per egg), and use dairy-free white chocolate (Enjoy Life or Pascha). Ensure Oreos are vegan-certified (U.S. original Oreos are, but always verify region-specific formulations).
- Protein-Packed: Add 2–3 tbsp unflavored or vanilla whey or plant-based protein powder—reduce flour by equal amount. Increase liquid slightly (1–2 tsp almond milk) if dough feels too dry.
- Double Chocolate Cookies and Cream: Add 2 tbsp unsweetened cocoa powder to dry ingredients and reduce flour by same amount. Optional: Fold in ¼ cup mini semi-sweet chocolate chips alongside Oreos and white chocolate.
- Espresso-Infused: Stir 1 tsp instant espresso powder into dry ingredients—deepens cocoa notes and adds sophisticated bitterness that complements sweetness.
- Miniature Batch: Use a 1-teaspoon scoop for bite-sized cookies—bake 7–9 minutes at 350°F. Perfect for parties, cookie platters, or portion control.
- Gourmet Upgrade: Swap store-bought Oreos for homemade chocolate wafer cookies (made with Dutch-process cocoa and brown butter) and fill with Madagascar bourbon vanilla-infused creme. Use Valrhona Ivoire or Callebaut Finest White chocolate.
- Seasonal Twists: Add ½ tsp pumpkin spice (fall), 1 tbsp finely grated orange zest + 1 tsp orange extract (winter citrus), or 2 tbsp freeze-dried strawberry powder (spring/summer). Adjust salt downward slightly if adding tart elements.
- Savory-Sweet Fusion: Sprinkle tops with flaky sea salt *and* a light dusting of smoked paprika or black sesame seeds before baking—unexpected but harmonious.
Health Considerations and Nutritional Value
While Cookies and Cream Cookies are inherently indulgent, mindful preparation and informed choices can align them with balanced eating patterns:
- Caloric Profile (per standard 3-inch cookie, approx. 45g): ~210–240 calories; 11–13g total fat (7–8g saturated), 28–32g carbohydrates (18–21g sugars), 2–3g protein, and <1g fiber. Values vary based on size, butter content, and mix-in ratios.
- Sugar Awareness: Traditional versions rely on refined sugars. Reduce granulated sugar by 1–2 tbsp without sacrificing structure; substitute up to half brown sugar with coconut sugar (adds minerals, lowers glycemic impact—but may darken color and alter flavor).
- Fat Quality Matters: Prioritize grass-fed, organic, or cultured butter for higher CLA (conjugated linoleic acid) and omega-3s. Vegan versions benefit from avocado oil-based butters or cashew butter blends rich in monounsaturated fats.
- Flour Alternatives: Whole wheat pastry flour (up to 50% substitution) adds B vitamins and fiber without heaviness. Almond or oat flour blends introduce protein and healthy fats—but require binder adjustments (extra egg or chia gel).
- Functional Add-Ins: Stir in 1 tbsp ground chia or flaxseed for omega-3s and fiber; add ¼ tsp cinnamon to support blood sugar regulation; include 1 tsp matcha powder for antioxidants and gentle caffeine.
- Portion Mindfulness: Baking smaller cookies (1.5-inch) reduces per-serving calories by ~35% and encourages slower consumption—enhancing satiety signals.
- Dietary Restrictions: Naturally nut-free and soy-free (check Oreo and chocolate labels for facility warnings). Easily adapted for kosher, halal, and low-FODMAP diets (use lactose-free white chocolate and certified low-FODMAP Oreos).
- Mindful Enjoyment: Pair with unsweetened green tea or tart cherry juice for antioxidant synergy. Savor slowly—research shows deliberate eating increases satisfaction and decreases likelihood of overconsumption.
Ingredients
- 1 cup (227g) unsalted butter, room temperature
- ¾ cup (150g) granulated sugar
- 1 cup (200g) packed light brown sugar
- 2 large eggs, room temperature
- 2 tsp pure vanilla extract
- 3 cups (360g) all-purpose flour, spooned & leveled (or weighed)
- 1 tsp baking soda
- ½ tsp baking powder (optional, for extra lift)
- 1 tsp fine sea salt
- 24–28 original Oreo® cookies (about 210g), crushed into varied sizes
- 1 cup (175g) high-quality white chocolate chips or chopped couverture
Directions
- Preheat oven to 350°F (175°C). Line two large baking sheets with parchment paper or silicone baking mats.
- In a stand mixer fitted with paddle attachment, beat butter, granulated sugar, and brown sugar on medium-high speed for 3–4 minutes until light, fluffy, and pale yellow. Scrape bowl thoroughly.
- Add eggs one at a time, beating well after each addition (about 30 seconds per egg). Add vanilla and mix until fully incorporated.
- In a medium bowl, whisk together flour, baking soda, optional baking powder, and salt until uniform.
- With mixer on low, gradually add dry ingredients to wet mixture in three parts, mixing only until no flour streaks remain—do not overmix.
- Using a silicone spatula, gently fold in crushed Oreos and white chocolate until evenly dispersed. Reserve ~2 tbsp of larger Oreo pieces.
- Portion dough into 1.5-inch balls (about 2 tbsp each). Roll gently to smooth, then place 3 inches apart on prepared sheets. Lightly press reserved Oreo pieces onto tops.
- Refrigerate dough balls for at least 30 minutes (preferably 1–2 hours or overnight).
- Bake chilled cookies one sheet at a time on center rack for 11–13 minutes—until edges are golden and set, centers look soft and puffed. Rotate sheet halfway through.
- Cool cookies on baking sheet for 5 minutes, then transfer to wire racks to cool completely—approximately 15–20 minutes.
FAQ
- Can I use double-stuffed or mint Oreos?
- Absolutely! Double-stuffed add extra creaminess and sweetness—reduce brown sugar by 1–2 tbsp if desired. Mint Oreos create a refreshing “Thin Mint” variation—pair with dark chocolate chips instead of white for contrast.
- Why do my cookies spread too much?
- Most common causes: butter too warm, insufficient chilling, excess sugar, or inaccurate flour measurement. Also check expiration dates—old baking soda loses potency, causing poor structure.
- Can I make these ahead for an event?
- Yes! Portioned, unbaked dough balls freeze beautifully for up to 3 months. Bake straight from frozen—add 1–2 minutes to bake time. Baked cookies freeze well for 3 months—thaw at room temperature or refresh in oven.
- What if I don’t have white chocolate?
- You can omit it entirely—the Oreos provide ample flavor and texture. Alternatively, substitute milk chocolate chips, vanilla-flavored yogurt chips, or even toasted coconut flakes for a different dimension.
- Are there egg-free alternatives that work well?
- Yes—try “flax eggs” (1 tbsp ground flaxseed + 2.5 tbsp water per egg, rested 5 minutes), commercial egg replacers (like Bob’s Red Mill), or ¼ cup unsweetened applesauce + ½ tsp baking powder per egg (adds slight tang; best for softer cookies).
- Can I use a different cookie brand?
- Many generic or store-brand chocolate sandwich cookies work, but flavor and creme consistency vary widely. For best results, choose cookies with creamy, stable filling and neutral cocoa notes. Avoid overly sweet or artificially flavored varieties.
- How do I prevent the white chocolate from burning?
- White chocolate burns easily due to its milk solids and sugar content. Ensure oven is properly calibrated (use oven thermometer), avoid overbaking, and never broil. Chopping bars into smaller pieces also promotes even melting without scorching.
- My cookies turned out cakey—what went wrong?
- Likely causes: too much leavening (double-check measurements), overmixing after adding flour (develops gluten), or using cake flour exclusively (lacks enough protein for proper structure). Stick to AP flour unless specifically adapting for tenderness.
- Can I add nuts?
- Yes—fold in ½ cup toasted walnuts or pecans for crunch and earthy depth. Toasting enhances flavor and prevents sogginess. Reduce Oreo volume slightly to maintain balance.
- Is there a way to make these lower in sugar without compromising texture?
- Reduce granulated sugar by 2 tbsp and brown sugar by 1 tbsp—cookies will be slightly less spread and more tender. Adding 1 tbsp molasses can help retain moisture and chew if reducing significantly.
Summary
Cookies and Cream Cookies are a masterclass in joyful contrast—melding crisp chocolate wafers, velvety white chocolate, and buttery-sweet dough into a universally adored treat rooted in nostalgia and elevated by technique. With precise ingredient handling, strategic chilling, and thoughtful customization, they transform from simple pantry fare into a signature dessert worthy of celebration, adaptation, and generations of shared delight.
Whether you’re baking for comfort, creativity, or connection, these cookies remind us that the most memorable moments often begin with a perfectly balanced bite—crunchy, creamy, chewy, and utterly unforgettable.