Classic Devil’s Food Chocolate Cake: A Deep Dive into Decadence
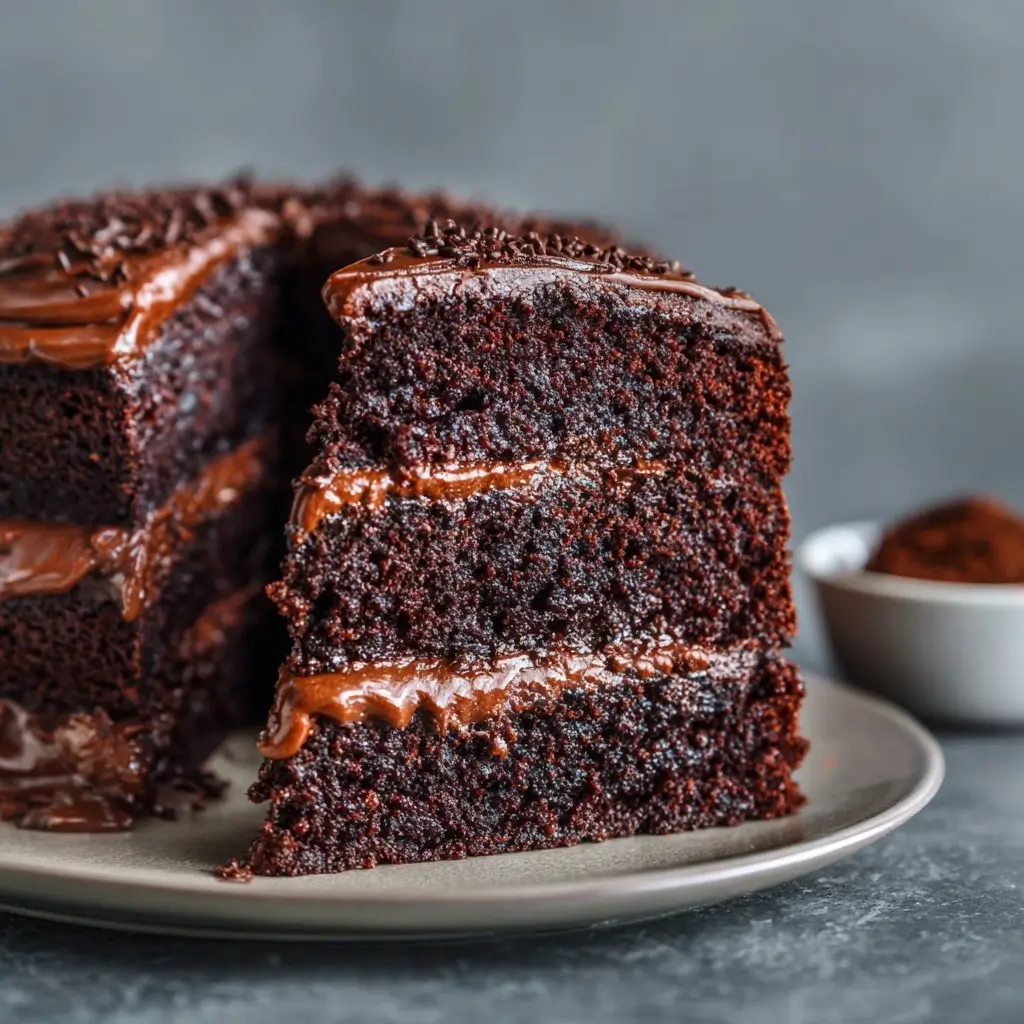
The Classic Devil’s Food Chocolate Cake is more than just a dessert—it’s an experience. Rich, moist, and deeply chocolatey, this cake has captivated taste buds for generations. With its dark crumb, velvety texture, and intense cocoa flavor, it stands apart from ordinary chocolate cakes. Revered by bakers and chocolate lovers alike, this indulgent confection strikes the perfect balance between sweetness and bitterness, making it a timeless favorite for birthdays, celebrations, or simply as a luxurious treat after dinner.
The History of Devil’s Food Chocolate Cake
The origins of Devil’s Food Cake trace back to early 20th-century America, emerging during a period when home baking was becoming increasingly popular and accessible. Unlike its milder counterpart, the “angel food” cake—light, airy, and vanilla-based—the “devil’s food” was its bold, sultry opposite. The name itself evokes temptation and decadence, suggesting something so rich and sinful it might be considered devilish.
Devil’s food cake gained popularity in the 1920s and 1930s, thanks in part to advancements in cocoa processing and the availability of baking soda and baking powder, which allowed for a deeper color and fluffier texture. It was often made with Dutch-processed cocoa, which has a darker hue and richer flavor compared to natural cocoa powder. Some historians believe the term “devil’s food” arose from the cake’s deep, almost black color, which contrasted sharply with the pale angel food cakes of the era.
Throughout the decades, the recipe evolved, but its essence remained: a dense, moist chocolate cake with a fudgy interior and an intense chocolate punch. Today, Devil’s Food Cake remains a staple in American bakeries and family kitchens, cherished for its nostalgic charm and unapologetic richness.
Ingredients Breakdown: Why Each Matters
The magic of a perfect Devil’s Food Cake lies not just in technique but in the careful selection and proportion of ingredients. Every component plays a crucial role in achieving that signature depth of flavor and melt-in-the-mouth texture.
- High-Quality Cocoa Powder: The heart of the cake. Using Dutch-processed (alkalized) cocoa gives the cake its deep, dark color and smooth, less acidic chocolate flavor. Natural cocoa can be used, but the result will be slightly lighter in color and more tangy.
- All-Purpose Flour: Provides structure. Sifting ensures a light crumb and prevents lumps.
- Granulated Sugar: Sweetens and helps tenderize the crumb. It also contributes to moisture retention and browning.
- Baking Soda and Baking Powder: Leavening agents that work together—baking soda reacts with acidic ingredients (like buttermilk and cocoa) to create lift, while baking powder provides additional rise.
- Salt: Enhances all flavors, balancing sweetness and intensifying chocolate notes.
- Eggs: Bind the ingredients, add richness, and contribute to structure and leavening.
- Vegetable Oil or Melted Butter: Fats ensure moisture and tenderness. Oil keeps the cake moister longer; butter adds a richer flavor.
- Buttermilk: Adds tanginess, tenderness, and activates the baking soda. Its acidity enhances the chocolate flavor and helps create a fine, soft crumb.
- Hot Coffee or Hot Water: Often misunderstood, hot liquid (especially coffee) doesn’t make the cake taste like coffee—it deepens the chocolate flavor, allowing cocoa to bloom and intensify. If avoiding caffeine, hot water works well too.
- Vanilla Extract: Adds complexity and rounds out the flavor profile.
Step-by-Step Recipe: Crafting the Perfect Devil’s Food Cake
Follow these detailed steps to create a flawless, bakery-quality Devil’s Food Cake at home.
- Preheat and Prepare: Preheat your oven to 350°F (175°C). Generously grease two 9-inch round cake pans with butter or non-stick spray, then line the bottoms with parchment paper. Lightly dust with cocoa powder to prevent sticking and maintain the cake’s dark appearance.
- Mix Dry Ingredients: In a large bowl, sift together 1¾ cups (220g) all-purpose flour, ¾ cup (65g) Dutch-processed cocoa powder, 2 cups (400g) granulated sugar, 1½ teaspoons baking soda, 1 teaspoon baking powder, and ½ teaspoon salt. Whisk until fully combined and aerated.
- Combine Wet Ingredients: In another bowl, whisk 2 large eggs until smooth. Add ½ cup (120ml) vegetable oil (or melted unsalted butter), 1 cup (240ml) buttermilk, 2 teaspoons vanilla extract, and 1 cup (240ml) hot brewed coffee (or hot water). Mix until well blended. The mixture may look slightly curdled—this is normal due to the buttermilk reacting to heat.
- Combine Wet and Dry: Gradually pour the wet ingredients into the dry ingredients. Use a hand mixer or whisk to blend on low speed until just combined. Scrape down the sides and mix briefly until smooth. Do not overmix—this can lead to a tough cake.
- Pour and Bake: Divide the batter evenly between the prepared pans. Smooth the tops with a spatula. Bake for 30–35 minutes, or until a toothpick inserted into the center comes out with a few moist crumbs (not wet batter).
- Cool Properly: Allow the cakes to cool in the pans for 10 minutes. Then run a knife around the edges and invert them onto wire racks. Remove parchment paper and let cool completely before frosting—about 1 to 2 hours.
Tips for Success
- Measure Flour Accurately: Spoon flour into the measuring cup and level it off. Packing the cup leads to dry, dense cake.
- Sift Cocoa and Flour: Prevents clumping and ensures even distribution for a uniform texture.
- Use Room Temperature Eggs: They incorporate better into the batter, resulting in a smoother, airier crumb.
- Don’t Overbake: Set a timer and check early. Overbaking dries out the cake, especially given its high cocoa content.
- Cool Completely Before Frosting: Warm cakes melt frosting and become messy. For extra stability, chill layers for 15–20 minutes before icing.
- Level the Layers: Use a serrated knife to trim domed tops for a flat, professional finish.
- Crumb Coat First: Apply a thin layer of frosting to seal in crumbs, then chill for 15 minutes before adding the final coat.
Variations and Customizations
The beauty of Devil’s Food Cake is its versatility. Here are some creative twists to personalize your creation:
- Spiced Version: Add ½ teaspoon cinnamon, ¼ teaspoon cayenne, or a pinch of espresso powder to intensify the chocolate flavor.
- Gluten-Free: Substitute all-purpose flour with a 1:1 gluten-free baking blend. Ensure cocoa powder is certified gluten-free.
- Dairy-Free: Replace buttermilk with a mix of 1 cup almond milk + 1 tablespoon lemon juice or vinegar. Use dairy-free chocolate and margarine in frosting.
- Vegan Option: Use flax eggs (2 tablespoons ground flaxseed + 6 tablespoons water), plant-based milk with acid, and vegan butter in both cake and frosting.
- Mini Cakes or Cupcakes: Fill lined muffin tins ⅔ full and bake for 18–22 minutes.
- Filling Ideas: Layer with raspberry jam, peanut butter ganache, salted caramel, or chocolate mousse.
- Alcohol Infusion: Brush cooled layers with Kahlua, Baileys, or cherry liqueur for a sophisticated twist.
- Decorative Touches: Top with chocolate shavings, edible gold leaf, fresh berries, or crushed nuts.
Health Considerations and Nutritional Value
While Devil’s Food Cake is undeniably indulgent, understanding its nutritional profile helps in making mindful choices.
Nutritional Snapshot (per slice, approximately 1/12 of cake without frosting):
- Calories: ~350–400
- Total Fat: 15–18g (mostly from oil or butter)
- Saturated Fat: 4–6g
- Carbohydrates: 55–60g
- Sugars: 35–40g
- Protein: 4–5g
- Fiber: 2–3g (from cocoa and flour)
- Sodium: 300–400mg
Health Notes:
- Cocoa contains antioxidants like flavonoids, which may support heart health in moderation.
- The cake is high in refined sugars and fats—best enjoyed occasionally as part of a balanced diet.
- To reduce sugar, consider using coconut sugar or a sugar substitute like erythritol, though texture may vary.
- For a lower-fat version, replace half the oil with unsweetened applesauce—but expect a denser texture.
- Those with diabetes should consume in small portions and monitor carbohydrate intake.
Ingredients
For the Cake:
- 1¾ cups (220g) all-purpose flour
- ¾ cup (65g) Dutch-processed cocoa powder, sifted
- 2 cups (400g) granulated sugar
- 1½ teaspoons baking soda
- 1 teaspoon baking powder
- ½ teaspoon salt
- 2 large eggs, room temperature
- ½ cup (120ml) vegetable oil (or melted unsalted butter)
- 1 cup (240ml) buttermilk, room temperature
- 2 teaspoons pure vanilla extract
- 1 cup (240ml) hot brewed coffee or hot water
Recommended Frosting: Classic Chocolate Buttercream
- 1 cup (230g) unsalted butter, softened
- 3½ cups (420g) powdered sugar, sifted
- ½ cup (45g) Dutch-processed cocoa powder, sifted
- ¼ teaspoon salt
- 2 teaspoons vanilla extract
- 3–4 tablespoons heavy cream or milk
- 2 ounces (60g) melted and cooled semisweet chocolate (optional, for richness)
Directions
- Preheat oven to 350°F (175°C). Grease and line two 9-inch round cake pans. Dust with cocoa powder and set aside.
- In a large bowl, sift together flour, cocoa powder, sugar, baking soda, baking powder, and salt. Whisk to combine.
- In a separate bowl, whisk eggs, oil, buttermilk, vanilla, and hot coffee until smooth.
- Pour wet ingredients into dry ingredients. Mix on low speed or by hand until just combined. Scrape bowl and mix briefly until smooth—do not overmix.
- Divide batter evenly between pans. Smooth tops. Bake 30–35 minutes until a toothpick comes out clean.
- Cool in pans 10 minutes, then transfer to wire racks to cool completely.
- While cakes cool, prepare frosting: Beat butter until creamy. Gradually add powdered sugar, cocoa, salt, and vanilla. Mix on low, then increase speed. Add cream one tablespoon at a time until desired consistency. Stir in melted chocolate if using.
- Level cake layers if needed. Place one layer on a plate or cake stand. Spread with frosting. Top with second layer. Frost top and sides smoothly.
- Decorate as desired. Slice with a warm knife for clean cuts. Serve at room temperature.
FAQ
Can I make this cake ahead of time?
Yes! Bake and cool the layers up to 2 days in advance. Wrap tightly in plastic and store at room temperature, or freeze for up to 3 months.
Can I use natural cocoa instead of Dutch-processed?
You can, but the cake will be slightly lighter in color and more acidic in flavor. For best results, stick with Dutch-processed.
Why use coffee? Will the cake taste like coffee?
No, it won’t. Coffee enhances the chocolate flavor, making it deeper and more complex without imparting a coffee taste.
How do I store the cake?
Store frosted cake covered at room temperature for up to 2 days, or refrigerate for up to 5 days. Bring to room temperature before serving for best texture.
Can I bake this as a sheet cake?
Absolutely. Pour batter into a 9×13-inch greased and lined pan. Bake for 35–40 minutes.
Why did my cake sink in the middle?
Possible causes: underbaking, opening the oven too soon, too much leavening, or overmixing. Follow the recipe precisely and avoid disturbances during baking.
Can I use milk instead of buttermilk?
Not directly. But you can make a substitute: add 1 tablespoon lemon juice or vinegar to 1 cup milk and let sit 5 minutes before using.
Summary
The Classic Devil’s Food Chocolate Cake is a rich, moist, and intensely chocolatey dessert that embodies indulgence and nostalgia. With its deep color, tender crumb, and luxurious flavor, it remains a beloved favorite across generations.