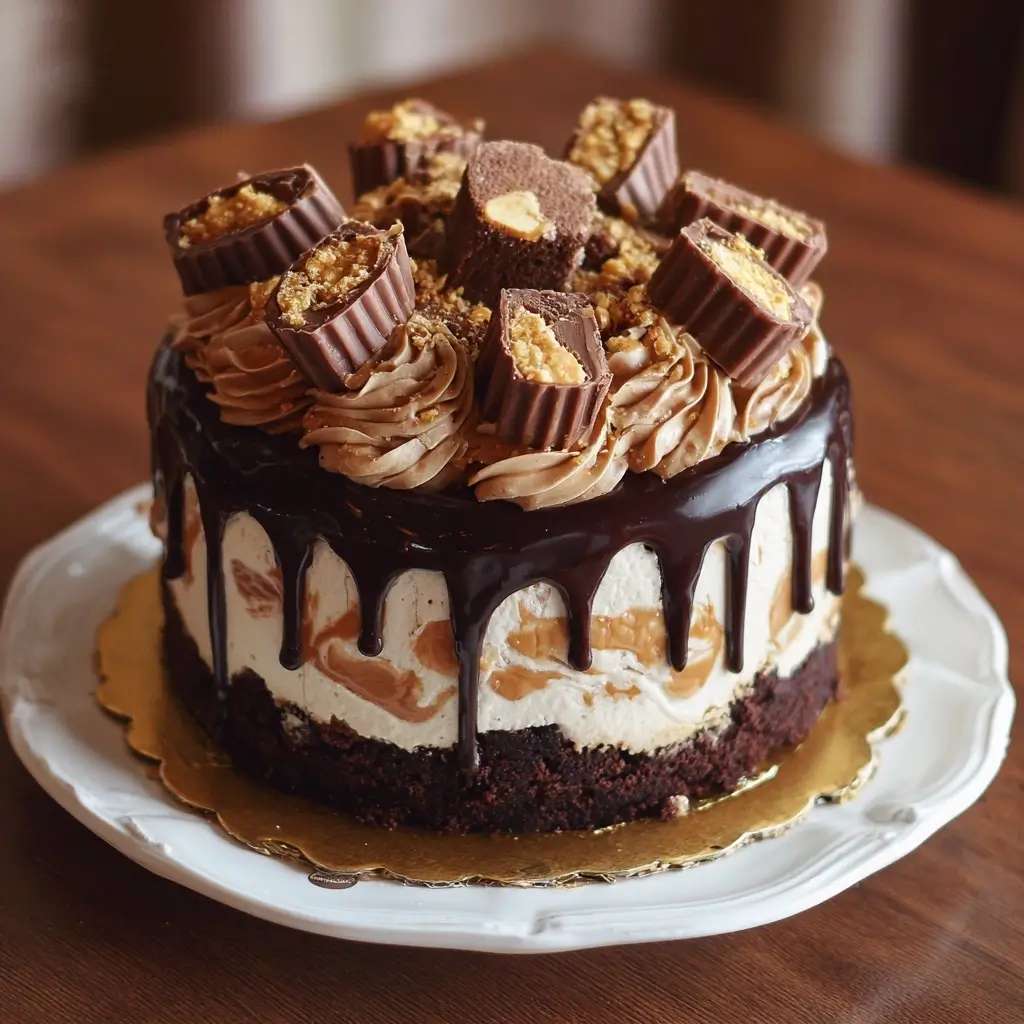
Chocolate Peanut Butter Cup Cake: A Decadent Dessert Masterpiece
The Chocolate Peanut Butter Cup Cake is more than just a dessert—it’s an indulgent symphony of rich chocolate, creamy peanut butter, and the nostalgic crunch of candy cup centers. This show-stopping cake combines the beloved flavors of Reese’s Peanut Butter Cups with the moist tenderness of a classic chocolate cake, creating a treat that satisfies every sweet tooth. Whether you’re baking for a birthday, holiday celebration, or simply because you need a little joy in your day, this cake promises to deliver unforgettable flavor in every bite.
The History Behind the Flavor Fusion
The story of chocolate and peanut butter together dates back to early 20th-century America, where innovative confectioners began experimenting with combining two iconic American tastes. The invention of the peanut butter cup by H.B. Reese—a former shipping foreman for the Hershey Company—in the 1920s revolutionized the candy world. Reese’s Peanut Butter Cups quickly became a cultural staple, loved for their perfect balance of salty-sweet peanut butter encased in smooth milk chocolate.
Baking enthusiasts soon sought ways to bring that same magic into the kitchen, leading to the evolution of desserts like cookies, brownies, and eventually cakes inspired by the peanut butter cup. The Chocolate Peanut Butter Cup Cake emerged as a natural extension of this culinary love affair, elevating the simple candy into a sophisticated layered dessert suitable for any occasion. Today, bakers around the globe continue to reinvent this classic combo, making it one of the most enduring flavor pairings in modern baking.
Ingredients Breakdown: What Makes This Cake So Irresistible?
The secret to the Chocolate Peanut Butter Cup Cake lies in its thoughtfully chosen ingredients, each contributing to texture, moisture, richness, and that unmistakable flavor harmony between cocoa and peanut butter. Let’s break down the key components:
- All-Purpose Flour: Provides structure and soft crumb—essential for a tender cake base.
- Cocoa Powder (Unsweetened, Dutch-Process): Delivers deep, intense chocolate flavor without added sweetness, ensuring a balanced profile.
- Granulated Sugar & Brown Sugar: Granulated sugar ensures sweetness and lightness; brown sugar adds moisture and a subtle caramel note.
- Butter (Unsalted): Adds richness and helps create a velvety texture while enhancing mouthfeel.
- Eggs: Bind the ingredients together and contribute to lift and stability during baking.
- Sour Cream or Buttermilk: Keeps the cake ultra-moist and tender while adding a slight tang that complements the sweetness.
- Baking Soda & Baking Powder: Work together to ensure proper rise and fluffiness.
- Hot Coffee or Boiling Water: Enhances the chocolate flavor by blooming the cocoa and opening up its aromatic compounds.
- Peanut Butter (Smooth, Natural Preferred): The star ingredient—creamy, nutty, and essential for that signature filling and swirl effect.
- Vanilla Extract: Rounds out the flavors and adds depth.
- Reese’s Peanut Butter Cups (Chopped or Whole): Used both inside the batter and as decoration, they provide bursts of familiar candy goodness.
- Heavy Cream & Powdered Sugar (for Frosting): Forms the luxurious base of the chocolate-peanut butter ganache frosting.
- Dark Chocolate & Semi-Sweet Chocolate Chips: For a complex, slightly bitter contrast to the sweet frosting.
- Salted Peanuts (Optional Garnish): Add crunch and a gourmet finishing touch.
Step-by-Step Recipe: How to Make the Ultimate Chocolate Peanut Butter Cup Cake
Follow these detailed steps to create a bakery-quality Chocolate Peanut Butter Cup Cake from scratch. With patience and attention to detail, you’ll produce a stunning dessert that tastes as incredible as it looks.
Ingredients
For the Chocolate Cake:
- 2 cups all-purpose flour
- 2 cups granulated sugar
- ¾ cup unsweetened cocoa powder (Dutch-process preferred)
- 2 tsp baking soda
- 1 tsp baking powder
- 1 tsp salt
- 1 cup buttermilk (or substitute: 1 cup milk + 1 tbsp vinegar)
- ½ cup vegetable oil or melted coconut oil
- ½ cup hot coffee (or boiling water)
- 2 large eggs, room temperature
- 2 tsp pure vanilla extract
- ½ cup smooth peanut butter (no sugar added recommended)
For the Peanut Butter Swirl Filling:
- ½ cup smooth peanut butter
- ¼ cup powdered sugar
- 1 tbsp heavy cream or milk
- 1 tsp vanilla extract
For the Chocolate Peanut Butter Ganache Frosting:
- 1 cup semi-sweet chocolate chips
- ½ cup heavy cream
- ½ cup creamy peanut butter
- 2 tbsp unsalted butter, softened
- 1 cup powdered sugar (adjust to taste)
- Pinch of salt
For Assembly & Decoration:
- 12–16 full Reese’s Peanut Butter Cups (mini or regular), chopped or halved
- Crushed peanuts (optional)
- Peanut butter drizzle (optional)
- Edible gold flakes or sprinkles (for special occasions)
Directions
- Preheat Oven & Prepare Pans: Preheat your oven to 350°F (175°C). Grease and flour two 9-inch round cake pans, line the bottoms with parchment paper, and set aside.
- Mix Dry Ingredients: In a large mixing bowl, sift together the flour, sugar, cocoa powder, baking soda, baking powder, and salt. Sifting prevents lumps and ensures even distribution of leavening agents.
- Add Wet Ingredients: In a separate bowl, whisk together the buttermilk, oil, eggs, vanilla extract, and peanut butter until smooth. Gradually pour this mixture into the dry ingredients and mix on medium speed until just combined.
- Incorporate Hot Liquid: Carefully stir in the hot coffee (or boiling water). The batter will be thin—this is normal and contributes to the cake’s moist texture.
- Distribute Batter: Divide the batter evenly between the prepared pans. Tap gently on the counter to release air bubbles.
- Bake: Bake for 30–35 minutes, or until a toothpick inserted into the center comes out clean. Avoid opening the oven door too early to prevent sinking.
- Cool Completely: Allow cakes to cool in pans for 10 minutes, then turn out onto wire racks. Remove parchment paper and let cool completely before frosting.
- Prepare Peanut Butter Swirl Filling: In a small bowl, combine ½ cup peanut butter, powdered sugar, cream, and vanilla. Mix until smooth and spreadable. Set aside.
- Make the Ganache Frosting: Place chocolate chips in a heatproof bowl. Heat heavy cream in a saucepan until steaming (do not boil), then pour over chocolate. Let sit for 2 minutes, then stir until smooth. Stir in peanut butter, butter, powdered sugar, and salt. Chill for 20–30 minutes, stirring occasionally, until thickened to a spreadable consistency.
- Assemble the Cake: Place one cake layer on a serving plate or cake stand. Spread the peanut butter swirl filling evenly over the top. Top with the second cake layer.
- Frost the Cake: Using an offset spatula or bench scraper, apply a thin crumb coat of frosting over the entire cake. Refrigerate for 15 minutes to set. Then, apply a final, smooth layer of frosting. For a professional look, use a piping bag to add decorative borders.
- Decorate: Press chopped Reese’s cups around the sides and on top. Drizzle extra melted peanut butter or chocolate over the surface. Sprinkle crushed peanuts or edible glitter for visual flair.
- Chill Before Serving: Refrigerate the cake for at least 30 minutes to allow the frosting to firm up. Serve chilled or at room temperature.
Tips for Success
- Room Temperature Ingredients: Ensure eggs, buttermilk, and butter are at room temperature for even mixing and better emulsification.
- Don’t Overmix: Once wet and dry ingredients are combined, mix only until smooth. Overmixing develops gluten, leading to a dense cake.
- Use Quality Cocoa: High-quality Dutch-process cocoa yields a richer, smoother chocolate flavor compared to natural cocoa.
- Hot Liquid Matters: The hot coffee enhances the chocolate flavor significantly. If avoiding caffeine, use decaf coffee or hot water with a splash of espresso powder.
- Level Your Cakes: If your layers have domed tops, level them with a serrated knife for a flat, professional finish.
- Chill the Frosting: Ganache needs time to thicken properly. Don’t rush this step—warm frosting will slide off the cake.
- Storage Tip: Store leftover cake covered in the refrigerator for up to 5 days. Bring to room temperature before serving for best texture.
Variations and Customizations
This recipe is incredibly versatile. Here are some creative twists to make it your own:
- Gluten-Free Version: Substitute all-purpose flour with a 1:1 gluten-free baking blend. Ensure cocoa powder and other ingredients are certified gluten-free.
- Vegan Adaptation: Use flax eggs (2 tbsp ground flaxseed + 6 tbsp water), almond milk with vinegar instead of buttermilk, vegan butter, dairy-free chocolate, and maple syrup in place of honey-based products.
- Cupcake Conversion: Bake as cupcakes for 18–22 minutes. Perfect for parties! Fill each liner halfway and top with mini peanut butter cups.
- Red Velvet PB Cup Cake: Add red food coloring and replace half the cocoa with additional flour for a red velvet twist with peanut butter cups.
- Layered Look: Add a third cake layer and alternate peanut butter filling with chocolate mousse for extra decadence.
- Boozy Twist: Brush warm cake layers with peanut butter-infused bourbon or chocolate liqueur for adult-friendly depth.
- Mini Candy Swap: Use homemade peanut butter cups or white chocolate versions for variety.
- Nut-Free Option: Replace peanut butter with sunflower seed butter and omit nuts in garnish for allergies.
Health Considerations and Nutritional Value
While undeniably indulgent, understanding the nutritional aspects can help you enjoy this cake responsibly.
Per Serving (1/12th of cake, approx.):
- Calories: ~480–520 kcal
- Total Fat: 28–32g (Saturated: 12–15g)
- Cholesterol: 60–75mg
- Sodium: 320–380mg
- Carbohydrates: 52–56g (Fiber: 3–4g, Sugars: 38–42g)
- Protein: 7–9g
- Iron: 15–18% DV
- Zinc & Magnesium: Moderate amounts from cocoa and peanuts
Considerations:
- High Sugar Content: Contains significant added sugars from frosting, fillings, and candy. Ideal for occasional treats.
- Healthy Fats: Peanut butter provides monounsaturated fats, which support heart health when consumed in moderation.
- Energy Dense: Great for active individuals needing calorie-dense snacks, but portion control is advised for weight management.
- Allergens: Contains peanuts, tree nuts (if using certain chocolates), dairy, eggs, and gluten. Always label accordingly when serving others.
- Dietary Modifications: Lower-sugar versions can use sugar substitutes like erythritol or monk fruit in frosting. Reduce butter/oil slightly and increase applesauce for moisture with fewer calories.
Frequently Asked Questions (FAQ)
Q: Can I make this cake ahead of time?
A: Absolutely! Bake the layers up to 2 days in advance, wrap tightly in plastic, and store at room temperature. Assemble and frost the day of serving for best appearance.
Q: Can I freeze the Chocolate Peanut Butter Cup Cake?
A: Yes. Wrap unfrosted layers in plastic and foil; freeze for up to 3 months. Thaw overnight before frosting. Fully assembled cake can be frozen for up to 6 weeks—wrap well and thaw slowly in the fridge.
Q: Why did my cake sink in the middle?
A: Common causes include underbaking, opening the oven too soon, excess leavening, or overmixing. Always check doneness with a toothpick and avoid drafts.
Q: Can I use natural peanut butter?
A: Yes, but ensure it’s well-stirred and runny enough to blend smoothly. Some natural brands separate and may affect texture if too oily or dry.
Q: How do I get clean cake slices?
A: Use a sharp knife dipped in hot water and wiped clean between cuts. Chilling the cake briefly makes slicing easier.
Q: Is there a way to intensify the peanut butter flavor?
A: Add 1–2 tbsp peanut butter powder to the cake batter or include a layer of peanut butter mousse between the layers.
Q: Can I bake this in a 9×13 pan?
A: Yes. Pour all batter into a greased 9×13 pan and bake for 35–40 minutes. It becomes a delicious sheet-style cake great for feeding crowds.
Summary
The Chocolate Peanut Butter Cup Cake is a luxurious fusion of moist chocolate layers, creamy peanut butter swirls, and the nostalgic crunch of real candy cups—perfect for celebrations or satisfying a serious sweet craving. With its rich flavor, elegant presentation, and endless customization options, this cake is destined to become a family favorite.