Introduction
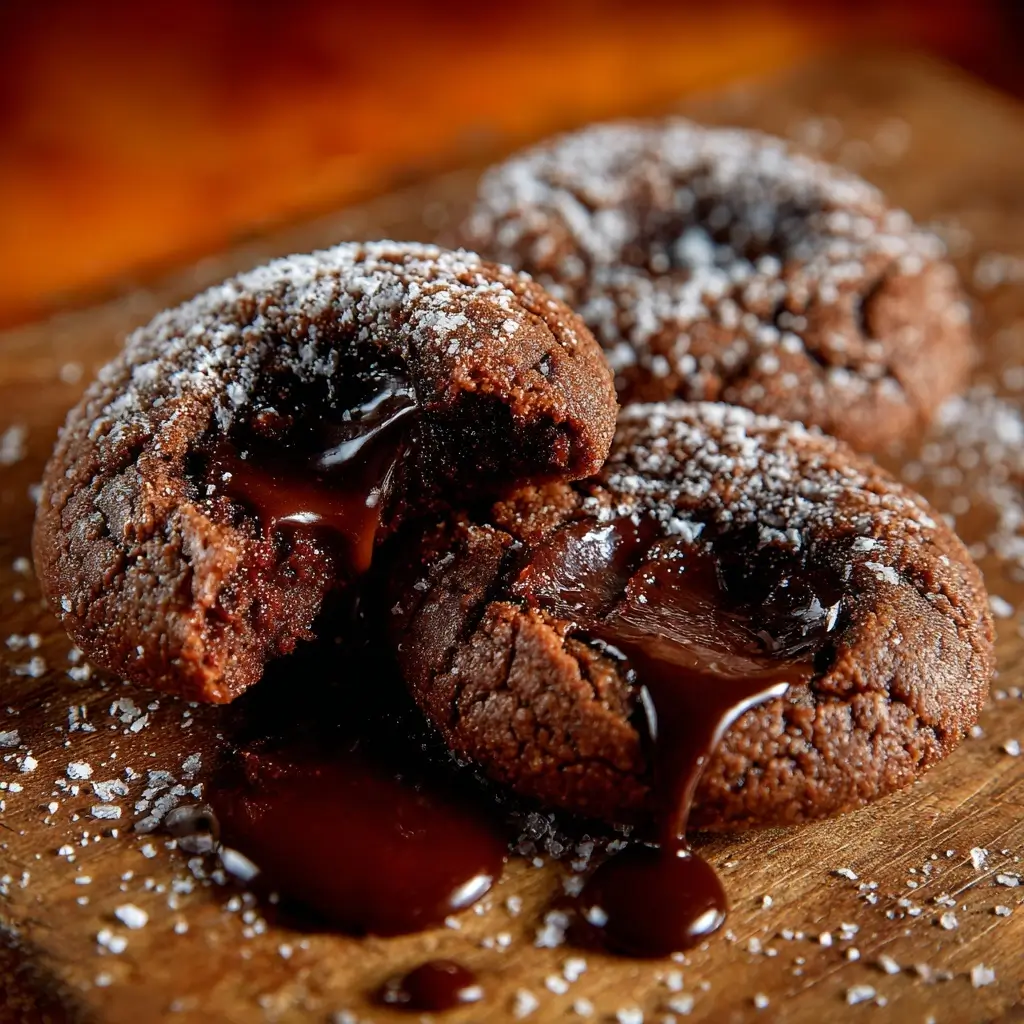
Indulge in the irresistible delight of Chocolate Lava Cookies with Gooey Centers — a dessert that combines the best of warm, freshly baked chocolate cookies with a molten, rich chocolate center that oozes out with every bite. These decadent treats are perfect for satisfying your sweet tooth, impressing guests at dinner parties, or simply treating yourself after a long day. Unlike traditional lava cakes that require individual ramekins and careful timing, these cookies offer the same luxurious experience in a more convenient, handheld format. With their crisp outer edges, soft interiors, and a surprise pocket of melted chocolate, they’re like a cross between brownies, chocolate chip cookies, and molten lava cakes — all rolled into one heavenly bite. Whether you’re a seasoned baker or a novice in the kitchen, this recipe is designed to deliver consistent results with maximum flavor and visual appeal.
The History
The concept of molten-centered desserts traces back to the late 20th century, most famously popularized by the French moelleux au chocolat (chocolate fondant) and its American counterpart, the chocolate lava cake. Invented in the 1980s and gaining global fame through chefs like Jean-Georges Vongerichten, the lava cake revolutionized fine dining desserts with its dramatic reveal of a liquid chocolate core. Over time, home bakers began experimenting with bringing that same molten magic into more accessible formats. Enter the Chocolate Lava Cookie — a hybrid innovation that marries the texture and warmth of a lava cake with the simplicity and portability of a cookie. Though not rooted in centuries-old tradition, this modern dessert has quickly become a favorite among chocolate lovers due to its ease of preparation and show-stopping effect. Today, variations can be found across food blogs, gourmet bakeries, and even high-end restaurants, proving that sometimes the best culinary creations are born from playful experimentation and a deep love for chocolate.
Ingredients Breakdown
The magic of Chocolate Lava Cookies lies not just in technique but in the quality and balance of ingredients. Each component plays a crucial role in achieving the perfect contrast between the slightly crisp exterior and the luxuriously gooey center.
- Unsalted Butter: Provides richness and moisture while contributing to a tender crumb. Using unsalted butter allows better control over the salt content.
- Dark Chocolate (70% cacao): The star ingredient. High-quality dark chocolate ensures a deep, complex chocolate flavor and forms the molten core when underbaked. Chopped into small chunks or used as truffle centers, it melts slowly during baking.
- Granulated Sugar: Adds sweetness and helps create a delicate crust on the cookie’s surface.
- Brown Sugar: Contributes moisture, chewiness, and a subtle caramel note due to its molasses content.
- Large Eggs: Bind the ingredients together and provide structure. Room temperature eggs incorporate more smoothly into the batter.
- Vanilla Extract: Enhances overall flavor and adds aromatic depth.
- All-Purpose Flour: Offers structure without making the cookies too dense. Sifted to prevent lumps and ensure even distribution.
- Cocoa Powder (unsweetened, Dutch-process preferred): Intensifies the chocolate flavor and contributes to the deep color of the cookie.
- Salt: Balances sweetness and enhances other flavors. A pinch goes a long way.
- Chocolate Truffles or Ganache Centers (optional but recommended): For an extra-lava effect, placing a chilled chocolate truffle in the center of each cookie guarantees a guaranteed flow of molten chocolate upon breaking open.
- Sea Salt Flakes (for garnish): A sprinkle on top before baking elevates the flavor profile with a touch of salinity.
Step-by-Step Recipe
- Prepare Your Workspace: Preheat your oven to 350°F (175°C). Line two large baking sheets with parchment paper or silicone baking mats. This prevents sticking and ensures even baking.
- Melt Butter and Chocolate: In a heatproof bowl set over a pot of simmering water (double boiler method), combine ½ cup (1 stick) unsalted butter and 4 ounces of chopped dark chocolate. Stir frequently until smooth and fully melted. Remove from heat and let cool slightly.
- Whisk in Sugars: Add ½ cup granulated sugar and ¼ cup packed brown sugar to the melted chocolate mixture. Whisk vigorously for about 1–2 minutes until the mixture becomes glossy and slightly thickened.
- Add Eggs and Vanilla: Crack in 1 large egg and 1 egg yolk (the extra yolk adds richness). Add 1 teaspoon pure vanilla extract. Whisk until fully incorporated and the batter is smooth and emulsified.
- Incorporate Dry Ingredients: In a separate bowl, sift together ⅓ cup all-purpose flour, ¼ cup unsweetened cocoa powder, and a pinch of salt. Gradually fold this into the wet ingredients using a spatula. Mix only until no dry streaks remain — do not overmix.
- Chill the Dough (Optional but Recommended): Cover the dough and refrigerate for 20–30 minutes. Chilling firms up the butter, which helps prevent excessive spreading and improves texture.
- Prepare Chocolate Centers: While the dough chills, prepare small chocolate truffles or ganache balls (about ¾ inch in diameter) and chill them in the freezer for 10 minutes. Alternatively, use high-quality chocolate chunks.
- Portion the Dough: Use a cookie scoop or tablespoon to portion the dough into 12 equal balls (about 2 tablespoons each). Roll them smoothly between your palms.
- Insert Molten Centers: Flatten each ball slightly in your hand. Place a cold chocolate truffle in the center, then carefully encase it with dough, rolling back into a smooth ball. Ensure the chocolate is completely sealed inside to prevent leakage during baking.
- Arrange on Baking Sheet: Place dough balls at least 2 inches apart on the prepared baking sheets. Gently press down to flatten slightly if desired. Sprinkle the tops with a pinch of flaky sea salt for added flavor.
- Bake Immediately: Bake one sheet at a time in the center rack of the preheated oven for 10–12 minutes. The edges should be set and slightly cracked, while the centers remain soft and puffy.
- Cool Briefly: Remove from the oven and let the cookies rest on the baking sheet for exactly 2–3 minutes. This allows the structure to stabilize slightly while keeping the center molten.
- Serve Warm: Transfer gently to serving plates using a spatula. Serve immediately while still warm for the full lava effect.
Tips
- Use High-Quality Chocolate: Since chocolate is the main flavor, investing in premium brands like Valrhona, Ghirardelli, or Callebaut makes a noticeable difference in taste and meltability.
- Don’t Overbake: The key to a gooey center is underbaking. Even if the centers look soft or underdone, that’s exactly what you want. They continue to cook slightly from residual heat.
- Freeze Chocolate Centers: Cold truffles stay intact longer in the oven, delaying melting and ensuring a true lava burst when broken open.
- Room Temperature Eggs: Cold eggs can cause the melted chocolate and butter to seize. Let them sit in warm water for 5 minutes if needed.
- Avoid Overmixing: Once flour is added, mix just until combined. Overmixing develops gluten, leading to tough cookies.
- Uniform Sizing: Use a cookie scoop to ensure even baking. Larger cookies may need an extra minute, smaller ones less.
- Bake One Tray at a Time: Ovens often have hot spots. Baking one tray ensures consistent results. Keep shaped dough chilled while waiting.
- Let Them Rest: Allowing cookies to cool briefly on the tray sets the exterior without solidifying the center.
- Serve with Style: Pair with vanilla ice cream, whipped cream, fresh berries, or a dusting of powdered sugar for an elegant presentation.
Variations and Customizations
While classic Chocolate Lava Cookies are divine on their own, feel free to experiment with creative twists to suit different tastes and occasions.
- White Chocolate & Raspberry: Replace dark chocolate with white chocolate and add freeze-dried raspberry pieces to the dough. Use white chocolate truffles as centers.
- Peanut Butter Swirl: Add 2 tablespoons of creamy peanut butter to the batter. Swirl in extra peanut butter before baking or insert a peanut butter cup in the center.
- Spiced Mexican Chocolate: Add ½ teaspoon ground cinnamon, a pinch of cayenne pepper, and a dash of nutmeg to the dry ingredients for a warm, spicy kick.
- Double Chocolate Chunk: Fold ¼ cup mini chocolate chips into the batter before chilling for extra melty pockets throughout.
- Gluten-Free Version: Substitute all-purpose flour with a 1:1 gluten-free baking blend. Ensure cocoa powder and chocolate are certified gluten-free.
- Vegan Option: Replace butter with vegan butter, eggs with flax eggs (1 tbsp ground flax + 3 tbsp water per egg), and use dairy-free chocolate. Results may vary slightly in texture.
- Alcohol-Infused: Add 1 tablespoon of espresso liqueur, bourbon, or Grand Marnier to enhance depth of flavor. Reduce vanilla extract slightly if using strong spirits.
- Cookie Sandwiches: Make smaller cookies and sandwich them with marshmallow fluff, Nutella, or salted caramel for a gourmet twist.
- Frozen Center Surprise: Insert a frozen espresso bean, raspberry, or salted caramel cube along with the chocolate for an unexpected burst of flavor.
- Holiday Edition: Add crushed peppermint candy, orange zest, or holiday sprinkles for festive flair.
Health Considerations and Nutritional Value
Chocolate Lava Cookies are undeniably indulgent and should be enjoyed in moderation as part of a balanced diet. However, there are ways to make them slightly healthier without sacrificing too much flavor.
Nutritional Estimate (per cookie, based on 12 servings):
- Calories: ~220–260
- Total Fat: 14–18g (mostly from butter and chocolate)
- Saturated Fat: 8–10g
- Cholesterol: 45–60mg
- Sodium: 60–90mg
- Total Carbohydrates: 25–30g
- Sugars: 18–22g
- Protein: 2–3g
- Fiber: 1–2g (higher if using whole wheat pastry flour or adding oats)
Health Notes:
- Dark chocolate contains antioxidants like flavonoids, which may support heart health in moderation.
- To reduce sugar, consider using coconut sugar or a monk fruit blend, though texture may be affected.
- Using almond flour or oat flour can lower gluten content and add protein, but may result in a crumblier texture.
- These cookies are high in saturated fat and sugar, so individuals managing diabetes, heart conditions, or weight should consume sparingly.
- Keto-friendly versions are challenging due to the flour and sugar content, but low-carb alternatives exist using erythritol, almond flour, and sugar-free chocolate.
Ingredients
- ½ cup (1 stick / 113g) unsalted butter
- 4 oz (115g) high-quality dark chocolate (70%), finely chopped
- ½ cup (100g) granulated sugar
- ¼ cup (55g) packed light brown sugar
- 1 large egg + 1 egg yolk (room temperature)
- 1 teaspoon pure vanilla extract
- ⅓ cup (40g) all-purpose flour (spooned and leveled)
- ¼ cup (20g) unsweetened cocoa powder (Dutch-process preferred)
- Pinch of salt (about ⅛ tsp)
- 12 high-quality chocolate truffles or ganache balls (¾ inch, chilled)
- Flaky sea salt (for garnish, optional)
Directions
- Preheat oven to 350°F (175°C). Line two large baking sheets with parchment paper or silicone mats.
- Melt butter and chopped dark chocolate together using a double boiler. Stir until smooth. Remove from heat and let cool slightly.
- Whisk in granulated and brown sugars until glossy, about 1–2 minutes.
- Add egg, egg yolk, and vanilla extract. Whisk until fully blended and smooth.
- Sift in flour, cocoa powder, and salt. Fold gently with a spatula until just combined.
- Cover and chill dough for 20–30 minutes.
- Roll dough into 12 equal balls. Flatten each slightly, place a cold chocolate truffle in the center, then re-roll to seal completely.
- Place dough balls on baking sheets, spaced 2 inches apart. Flatten slightly and sprinkle with sea salt.
- Bake one tray at a time for 10–12 minutes, until edges are set but centers are soft and puffed.
- Let cool on the tray for 2–3 minutes before transferring to a plate.
- Serve immediately while warm for the ultimate molten chocolate experience.
FAQ
Q: Why didn’t my cookies have a lava center?
A: This usually happens if the cookies were overbaked or the chocolate center wasn’t cold enough. Try reducing bake time by 1 minute or freezing the truffles longer.
Q: Can I make the dough ahead of time?
A: Yes! You can shape the dough balls and freeze them on a tray, then transfer to a bag. Bake straight from frozen, adding 1–2 minutes to the baking time.
Q: Can I use milk chocolate instead of dark?
A: Yes, but milk chocolate melts faster and is sweeter. Dark chocolate offers a richer, less cloying flavor and better structural integrity.
Q: How do I store leftover cookies?
A: These are best eaten fresh. Reheating in a warm oven (300°F for 3–5 minutes) can revive the gooeyness, but they will never be quite the same as freshly baked.
Q: Can I double the recipe?
A: Absolutely, but avoid overcrowding the mixing bowl. Work in batches if necessary, and don’t bake more than one tray at a time for even results.
Q: What causes cookies to spread too much?
A: Warm dough, melted butter, or a hot baking sheet can cause spreading. Always chill the dough and use cooled baking sheets between batches.
Q: Are these safe to eat with raw eggs?
A: The eggs are partially cooked during baking. If concerned, use pasteurized eggs or egg substitutes.
Q: Can I use chocolate chips as centers?
A: Yes, but they may melt too quickly. Truffles or chopped chocolate bars work better due to higher cocoa butter content.
Summary
Chocolate Lava Cookies with Gooey Centers are a luxurious, easy-to-make dessert that delivers a dramatic molten chocolate surprise in every bite. Combining rich dark chocolate, a tender crumb, and a perfectly underbaked center, they’re ideal for any chocolate lover seeking a restaurant-quality treat at home.