Introduction
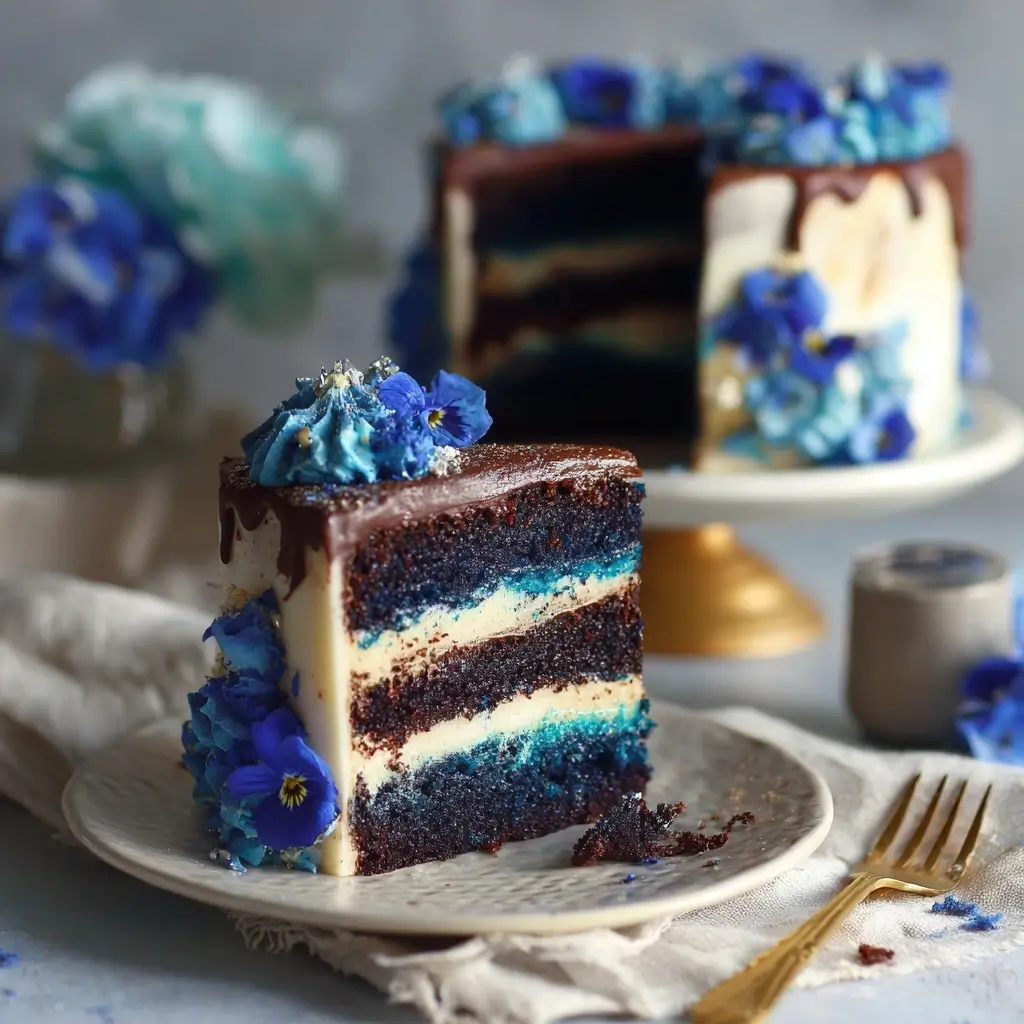
The Chocolate Blue Velvet Layer Cake is a stunning fusion of elegance, flavor, and whimsy—a decadent dessert that captivates the senses with its deep blue hue, velvety crumb, and rich chocolate essence. Often mistaken for a variation of red velvet cake, this confection stands proudly on its own with a luxurious cocoa base enhanced by vibrant color and creamy frosting. Whether you’re preparing it for a birthday, anniversary, baby shower, or simply as a show-stopping centerpiece for a weekend treat, the Chocolate Blue Velvet Layer Cake is guaranteed to impress both visually and gastronomically. With layers of moist chocolate-infused sponge and silky cream cheese buttercream, every bite delivers a harmonious balance between sweet, tangy, and deeply chocolatey notes. This guide will walk you through everything you need to know—from the origins of velvet cakes to detailed instructions, health considerations, variations, and pro tips—ensuring your baking experience is as smooth as the cake itself.
The History
The story of the “velvet cake” begins in the 19th century, long before food coloring became commonplace. Originally, “velvet cake” referred to a cake with an exceptionally fine, soft crumb texture—so delicate it resembled velvet. The earliest known recipes used ingredients like cornstarch, cocoa, and buttermilk to achieve this tender consistency. Red velvet cake, now the most famous of the velvet family, rose to prominence in the early 20th century, particularly in Southern U.S. cuisine, thanks in part to the chemical reaction between natural cocoa powder and acidic ingredients like buttermilk and vinegar, which gave the cake a reddish tint. Over time, artificial red food coloring was added to enhance this hue. As culinary creativity evolved, bakers began experimenting with different colors and flavors, leading to the birth of variations like purple velvet, pink velvet, and eventually, blue velvet. The Chocolate Blue Velvet Layer Cake emerged as a modern twist—combining the traditional moisture and richness of chocolate cake with the dramatic visual flair of bold blue coloring. Today, it’s especially popular for gender reveal parties (often symbolizing “it’s a boy”), nautical-themed events, winter holidays, or simply as a fun way to bring joy through color and taste. Its rise in social media fame has cemented it as a favorite among home bakers and professional pastry chefs alike.
Ingredients Breakdown
Understanding each ingredient’s role is essential to mastering the perfect Chocolate Blue Velvet Layer Cake. Here’s a comprehensive breakdown:
- All-Purpose Flour: Provides structure to the cake. It contains gluten-forming proteins that help give the cake its shape while maintaining tenderness when not overmixed.
- Cocoa Powder (Unsweetened, Natural): Imparts deep chocolate flavor and contributes to the cake’s moisture and color. Natural cocoa is slightly acidic, which reacts with baking soda to help the cake rise.
- Baking Soda: A leavening agent that reacts with acidic components (like buttermilk and vinegar) to create carbon dioxide bubbles, helping the cake rise and become light and fluffy.
- Baking Powder: Offers additional lift, ensuring the cake has a high rise and even crumb throughout.
- Salt: Enhances all the other flavors in the cake, balancing sweetness and bringing out the richness of the chocolate.
- Butter (Unsalted, Softened): Adds richness, moisture, and flavor. Creaming butter with sugar incorporates air into the batter, contributing to a lighter texture.
- Granulated Sugar: Sweetens the cake and helps retain moisture. When creamed with butter, it also contributes to the cake’s airy structure.
- Eggs (Large, Room Temperature): Provide structure, richness, and emulsification. They help bind the ingredients together and contribute to the cake’s rise and stability.
- Vanilla Extract: Enhances overall flavor complexity and adds warmth to the chocolate profile.
- Vegetable Oil: Keeps the cake moist and tender. Unlike butter alone, oil remains liquid at room temperature, preventing the cake from drying out.
- Buttermilk (Cold): Adds acidity, which activates the baking soda and tenderizes the gluten in the flour. It also imparts a subtle tang and improves moisture retention.
- White Vinegar: Works with baking soda to create a chemical reaction that lifts the cake. Also enhances the chocolate flavor and softens the crumb.
- Blue Food Coloring (Gel-Based Preferred): Gives the cake its signature vivid blue hue. Gel coloring is more concentrated than liquid, so less is needed, preventing excess liquid from altering the batter consistency.
- Hot Water or Coffee: Helps bloom the cocoa powder, intensifying the chocolate flavor. Coffee enhances chocolate notes without making the cake taste like coffee.
For the Cream Cheese Buttercream Frosting:
- Cream Cheese (Full-Fat, Cold): Provides tanginess that balances the sweetness of the cake. Full-fat ensures a rich, creamy texture.
- Unsalted Butter (Softened): Adds body and smoothness to the frosting. Must be softened but still cool to prevent greasiness.
- Powdered Sugar (Confectioners’ Sugar): Sweetens and thickens the frosting. Sifted to avoid lumps.
- Vanilla Extract: Complements the tangy cream cheese and rounds out the flavor.
- Salt (Pinch): Balances the sweetness and sharpness of the cream cheese.
- Heavy Cream or Milk (Optional): Used sparingly to adjust consistency if the frosting is too thick.
Step-by-Step Recipe
Now that we’ve explored the science behind the ingredients, let’s dive into how to make this spectacular Chocolate Blue Velvet Layer Cake from scratch.
Ingredients (For a 3-Layer 8-inch Cake):
- 2 ½ cups (315g) all-purpose flour
- ¾ cup (75g) unsweetened natural cocoa powder
- 1 ½ teaspoons baking soda
- 1 teaspoon baking powder
- 1 teaspoon salt
- 1 ½ cups (300g) granulated sugar
- 1 cup (226g / 2 sticks) unsalted butter, softened
- 4 large eggs, room temperature
- 2 teaspoons pure vanilla extract
- ½ cup (120ml) vegetable oil
- 1 cup (240ml) cold buttermilk
- 2 tablespoons white vinegar
- 1 tablespoon gel-based blue food coloring (adjust for intensity)
- 1 cup (240ml) hot water or cooled brewed coffee
Cream Cheese Buttercream Frosting:
- 16 oz (450g) full-fat cream cheese, cold
- 1 cup (226g / 2 sticks) unsalted butter, softened
- 6 cups (720g) powdered sugar, sifted
- 2 teaspoons vanilla extract
- ¼ teaspoon salt
- 1–2 tablespoons heavy cream (optional)
Directions:
- Preheat Oven & Prepare Pans: Preheat your oven to 350°F (175°C). Grease three 8-inch round cake pans with butter or non-stick spray, then line the bottoms with parchment paper. Dust lightly with cocoa powder to prevent sticking and maintain color.
- Mix Dry Ingredients: In a large bowl, whisk together flour, cocoa powder, baking soda, baking powder, salt, and sugar until well combined and no lumps remain.
- Cream Butter and Sugar: In a stand mixer fitted with the paddle attachment, beat softened butter on medium speed until creamy (about 1 minute). Gradually add sugar and beat on high for 3–4 minutes until light and fluffy.
- Add Eggs and Wet Ingredients: Add eggs one at a time, mixing well after each addition. Stir in vanilla and vegetable oil until fully incorporated.
- Combine Wet and Dry Mixtures: Gradually add the dry ingredients to the wet mixture in three parts, alternating with buttermilk in two parts, starting and ending with dry ingredients. Mix on low speed just until combined—do not overmix.
- Add Vinegar and Coloring: Pour in white vinegar and blue food coloring. Mix briefly until evenly distributed. The batter will thicken slightly and turn a deep blue-gray.
- Incorporate Hot Liquid: Slowly pour in the hot water or coffee while mixing on low. The batter will become thin—this is normal and ensures a moist cake.
- Divide and Bake: Divide the batter evenly among the prepared pans. Tap pans gently on the counter to release air bubbles. Bake for 25–30 minutes, or until a toothpick inserted in the center comes out clean.
- Cool Completely: Let cakes cool in pans for 10 minutes, then run a knife around the edges and invert onto wire racks. Remove parchment paper and allow to cool completely (at least 2 hours) before frosting.
- Make Frosting: In the same stand mixer, beat softened butter and cold cream cheese on medium-high until smooth and creamy (about 3 minutes). Scrape down sides. Gradually add sifted powdered sugar on low, then increase speed. Add vanilla and salt. Beat until fluffy. If too thick, add cream 1 tsp at a time.
- Frost the Cake: Level the tops of cooled cakes with a serrated knife if needed. Place first layer on a cake board or plate. Spread a generous amount of frosting. Repeat with second and third layers. Apply a thin crumb coat, chill for 20 minutes, then finish with a smooth final coat. Use an offset spatula or bench scraper for clean edges.
- Decorate (Optional): Top with chocolate shavings, fresh berries, edible glitter, piped rosettes, or blue sprinkles for extra flair.
Tips
- Room Temperature Matters: Ensure eggs and buttermilk are at room temperature to create a uniform batter and proper emulsion.
- Weigh Your Ingredients: For accuracy, use a kitchen scale—especially for flour and cocoa—to avoid dense or dry results.
- Don’t Overmix: Once flour is added, mix only until combined. Overmixing develops gluten, leading to a tough cake.
- Gel vs. Liquid Food Coloring: Use gel-based coloring for intense color without altering batter consistency.
- Chill Layers Before Frosting: If short on time, wrap cooled layers in plastic and freeze for 30 minutes. Cold cakes are easier to frost cleanly.
- Avoid Overbaking: Start checking at 25 minutes. Overbaked cakes lose moisture and may crack.
- Use Cold Cream Cheese: Adding cold cream cheese to softened butter prevents the frosting from becoming greasy or runny.
- Adjust Sweetness: Reduce powdered sugar by 1 cup if you prefer less sweet frosting, or add a splash of lemon juice for extra tang.
- Storage Tip: Store frosted cake covered in the fridge. Bring to room temperature before serving for best texture.
- Color Intensity: For deeper blue, add coloring gradually. You can also let the cake sit overnight—the color often intensifies.
Variations and Customizations
The Chocolate Blue Velvet Layer Cake is highly adaptable to suit different tastes, occasions, and dietary needs:
- Gluten-Free Version: Substitute all-purpose flour with a quality gluten-free flour blend (with xanthan gum included).
- Dairy-Free Option: Use plant-based butter and dairy-free cream cheese (e.g., Miyoko’s or Kite Hill), along with almond milk + lemon juice instead of buttermilk.
- Mini Versions: Bake as cupcakes (fill liners ⅔ full, bake 18–22 min) or use a sheet pan for a single-layer celebration cake.
- Flavor Twists: Add orange zest to the batter or frosting for a chocolate-orange version. Or swirl in raspberry jam between layers.
- Colored Layers: Create ombre effects by dividing batter and using varying amounts of blue coloring in each layer.
- Alcohol Infusion: Brush cooled layers with blueberry liqueur or chocolate-rum syrup for an adult twist.
- Vegan Adaptation: Replace eggs with flax eggs (1 tbsp ground flax + 3 tbsp water per egg), use vegan butter and cream cheese, and ensure sugar is vegan-certified.
- Fillings: Add layers of ganache, whipped chocolate mousse, crushed Oreos, or fresh fruit compote.
- Nutty Crunch: Fold chopped toasted pecans or walnuts into the batter for added texture.
- Theme Decorations: Perfect for ocean themes (use seashells and sand-colored sprinkles), winter holidays (add silver dragées), or superhero parties (pair with fondant characters).
Health Considerations and Nutritional Value
While undeniably indulgent, being mindful of ingredients can help make the Chocolate Blue Velvet Layer Cake slightly more balanced:
- Calories: One slice (1/12 of cake) contains approximately 450–550 calories, depending on frosting thickness.
- Sugar Content: High due to granulated and powdered sugars. Consider reducing sugar by ¼ cup in the cake and frosting if desired.
- Fat: Primarily from butter, oil, cream cheese, and egg yolks. Opt for lower-fat cream cheese to reduce saturated fat (though texture may suffer).
- Cocoa Benefits: Natural cocoa powder contains antioxidants and flavonoids linked to heart health—choose high-quality, minimally processed varieties.
- Portion Control: Serve smaller slices with fresh berries or mint to balance richness.
- Allergens: Contains dairy, eggs, wheat, and soy (in most commercial shortenings and oils). Always label when serving guests.
- Artificial Dyes: Some gel food colorings contain synthetic dyes (e.g., Blue 1, Blue 2). For natural options, try spirulina powder (though color will be teal-green) or butterfly pea flower extract.
- Kid-Friendly: Popular with children, but consider moderating intake due to sugar and coloring content.
- Occasional Treat: Best enjoyed in moderation as part of a balanced diet.
FAQ
Can I make this cake ahead of time?
Yes! Bake and cool the layers up to 2 days in advance. Wrap tightly in plastic and store at room temperature, or freeze for up to 1 month. Frost the day of serving.
Why did my cake sink in the middle?
This could be due to underbaking, opening the oven too early, too much leavening, or overmixing. Ensure accurate measurements and avoid disturbing the cake during baking.
Can I use Dutch-process cocoa instead of natural?
You can, but note that Dutch-process is less acidic. Since this recipe relies on the acid in natural cocoa to react with baking soda, switching may result in a denser cake. If using Dutch-process, replace baking soda with an equal amount of baking powder.
How do I get a brighter blue color?
Use high-quality gel food coloring and add incrementally. Some brands require less than others. Letting the cake sit overnight often deepens the color.
Can I bake this in a 9-inch pan?
Yes, but it will yield thinner layers. Adjust baking time to 20–25 minutes. For a taller cake, stick with 8-inch pans.
Is this cake suitable for freezing?
Absolutely. Freeze unfrosted layers wrapped in plastic and foil for up to 3 months. Thaw at room temperature before frosting. Frosted cake can also be frozen—freeze uncovered first, then wrap.
Why is my frosting too runny?
Butter may have been too warm, or cream cheese too soft. Chill the bowl and beaters, then re-whip. Add more powdered sugar ¼ cup at a time to thicken.
Can I use milk instead of buttermilk?
Not directly. But you can make a substitute: add 1 tablespoon lemon juice or vinegar to 1 cup milk and let sit 5–10 minutes before using.
How many people does this serve?
A 3-layer 8-inch cake typically serves 10–12 people with standard slices.
Can I make it chocolate-blue marbled?
Yes! Reserve some plain vanilla batter, swirl with the blue chocolate batter in the pans before baking for a stunning marbled effect.
Summary
The Chocolate Blue Velvet Layer Cake combines the rich depth of cocoa with a mesmerizing blue hue and luxuriously creamy frosting, making it a masterpiece of flavor and visual appeal. Whether for celebrations or simply satisfying a chocolate craving, this cake delivers unforgettable indulgence in every slice.