Introduction
Welcome to a delightful fusion of Tex-Mex comfort and home-cooked warmth—our Cheesy Ground Beef Quesadilla Bake. This hearty, cheesy, and savory casserole-style dish brings together the bold flavors of a classic quesadilla with the cozy satisfaction of a baked casserole. Perfect for weeknight dinners, potlucks, game-day gatherings, or meal prep, this recipe transforms simple pantry staples into a crowd-pleasing masterpiece. Whether you’re feeding a hungry family or looking for a delicious way to use leftover ground beef, this bake delivers on flavor, texture, and convenience—all in one pan!
The History
The quesadilla has deep roots in Mexican cuisine, traditionally made from a corn or flour tortilla filled with cheese and cooked on a comal until golden and melty. Over time, especially in Northern Mexico and the Southwestern United States, variations emerged—adding ingredients like meats, beans, peppers, and spices. The modern Americanized version often features flour tortillas, melted cheese, and a variety of fillings, served with sour cream, salsa, and guacamole.
The concept of a “quesadilla bake” is a contemporary twist born from the slow cooker and casserole trends, where layered ingredients are assembled in a baking dish and oven-baked for ease and consistency. This method allows home cooks to serve large groups without the hassle of individually assembling each quesadilla. Our Cheesy Ground Beef Quesadilla Bake honors these culinary evolutions by combining the essence of a traditional quesadilla with the practicality and richness of a baked casserole—a true celebration of cross-cultural comfort food.
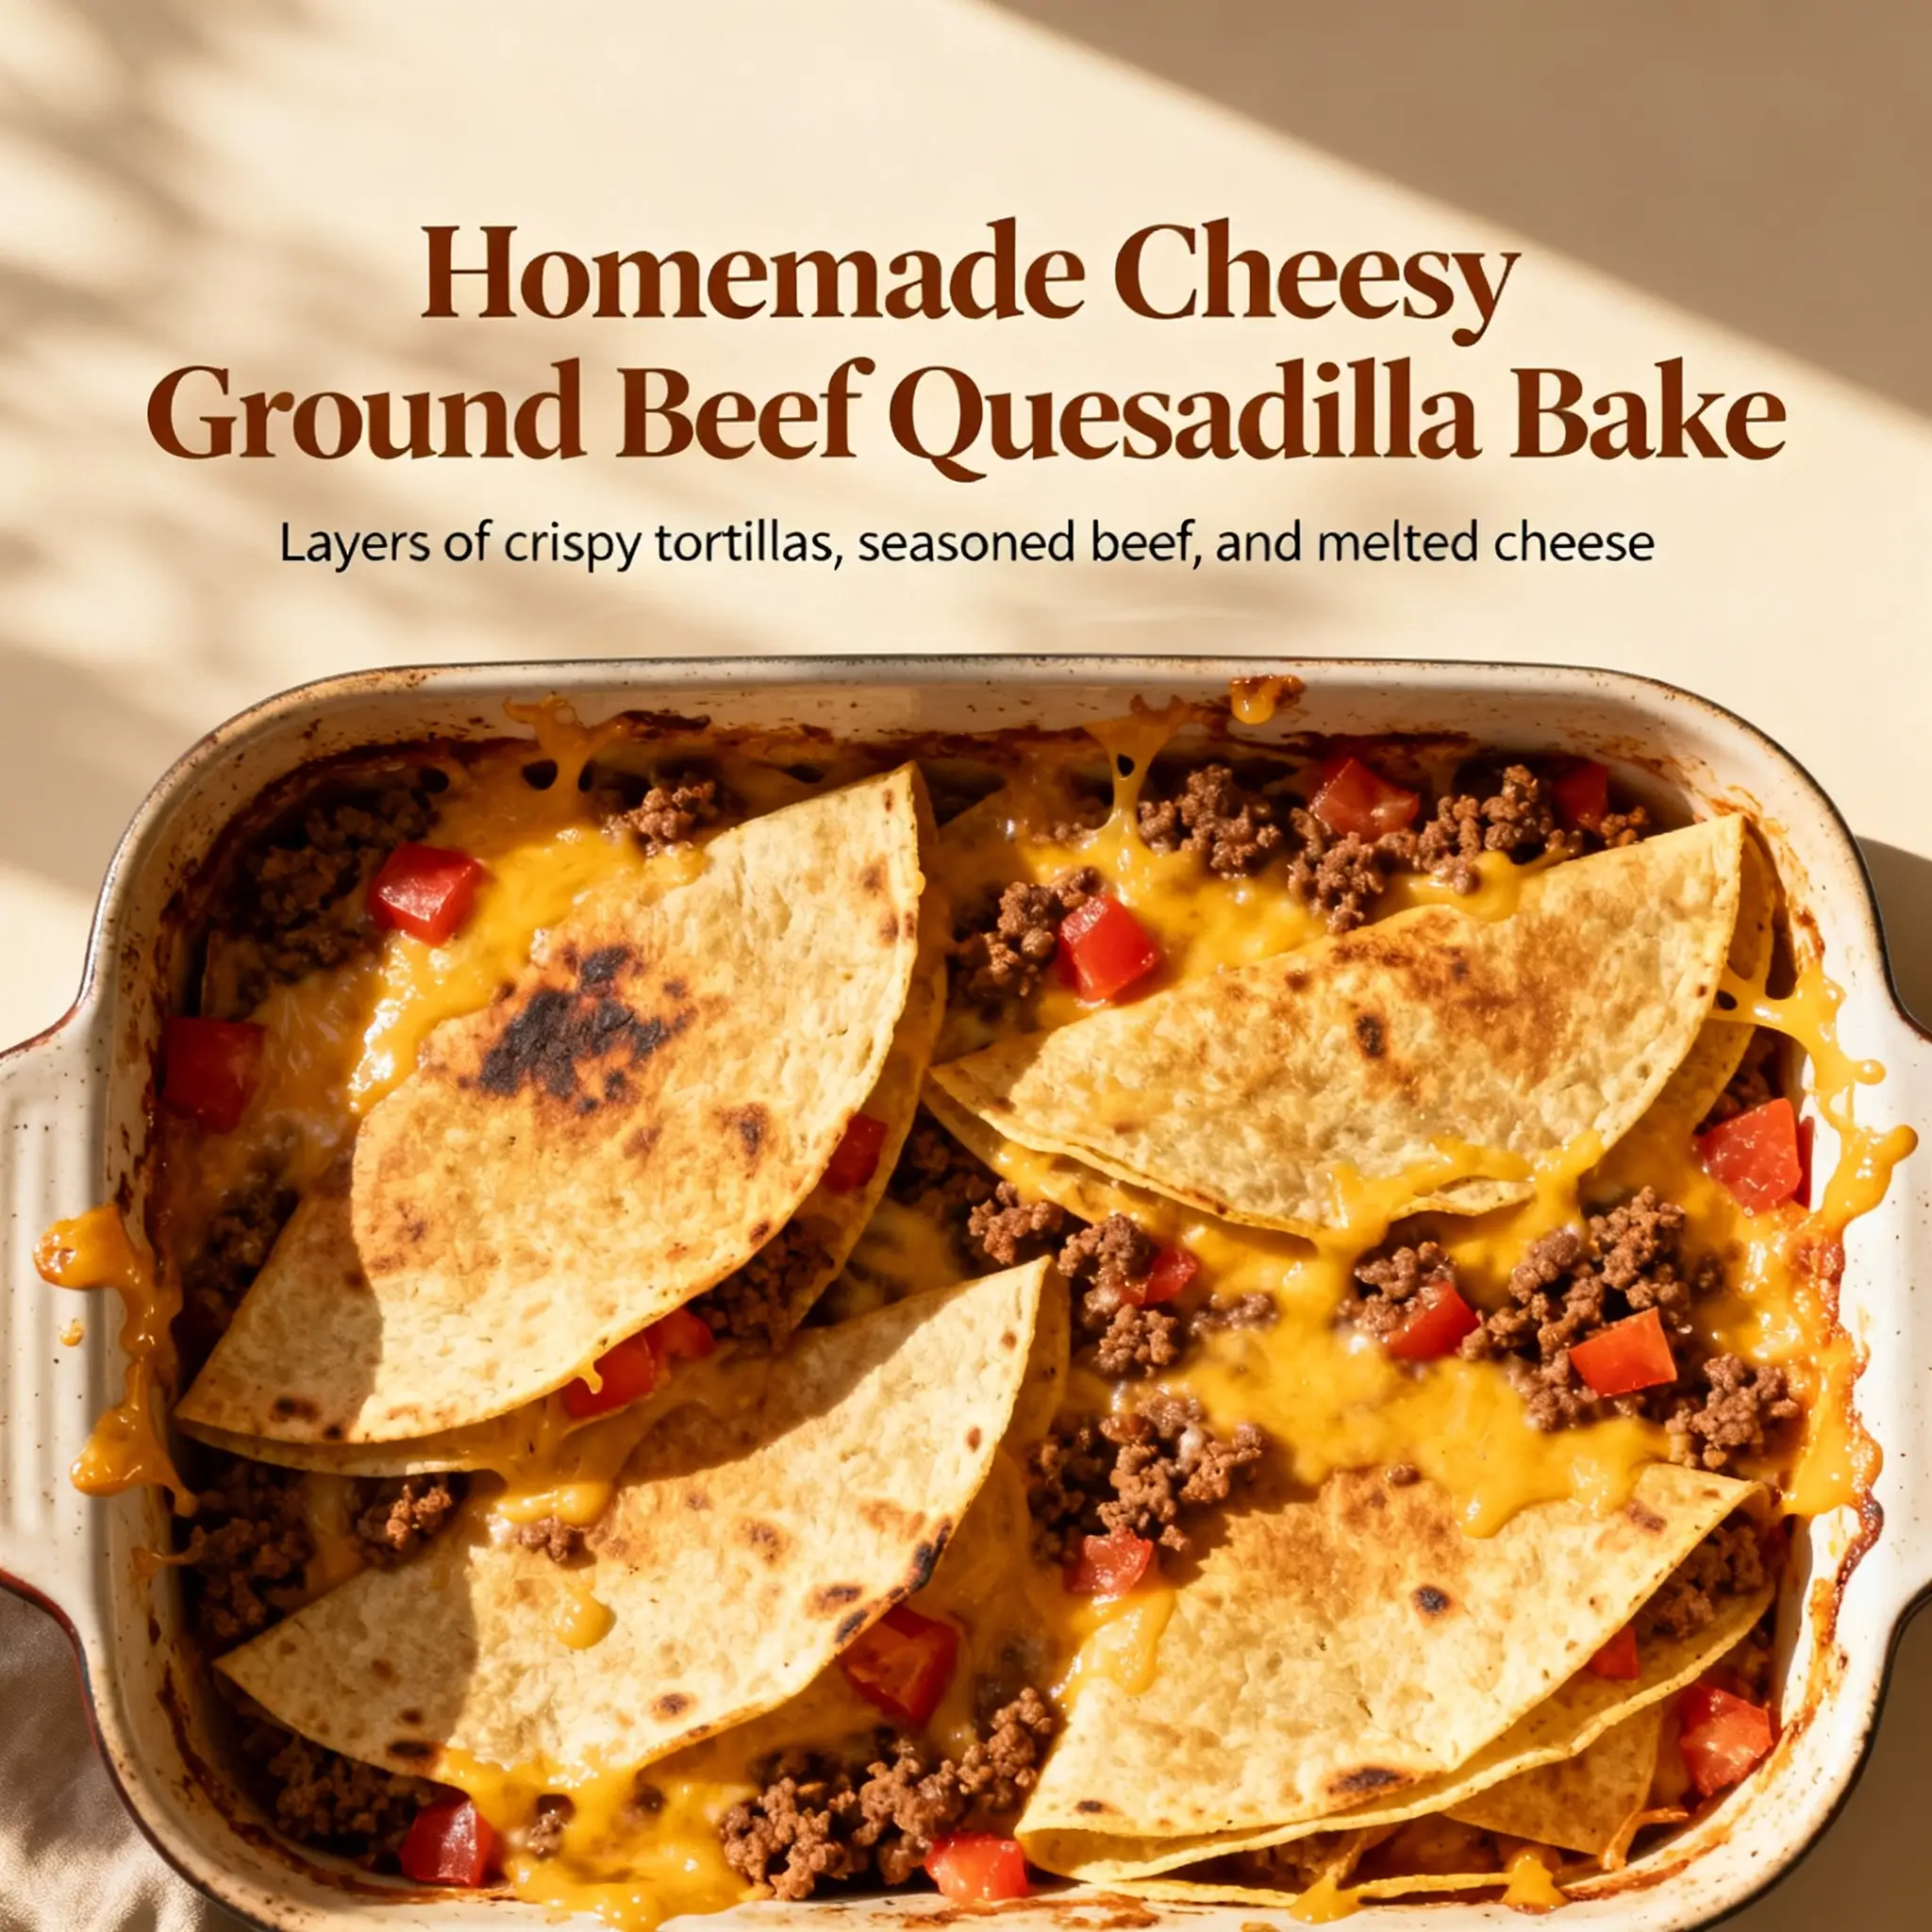
Ingredients Breakdown
To create the perfect balance of flavor, texture, and richness in this Cheesy Ground Beef Quesadilla Bake, every ingredient plays a crucial role:
- Ground Beef (1 lb): The protein base; choose 80/20 for optimal juiciness and flavor.
- Taco Seasoning (1 packet or 2–3 tbsp homemade): Infuses the beef with smoky, spicy, and slightly tangy notes. For best results, use a blend with cumin, chili powder, garlic powder, onion powder, paprika, oregano, salt, and pepper.
- Black Beans (1 can, drained and rinsed): Adds fiber, heartiness, and earthy depth while keeping the dish vegetarian-friendly in part.
- Corn Kernels (1 cup, fresh, frozen, or canned): Brings sweetness and color contrast, enhancing both taste and visual appeal.
- Diced Green Chilies (4 oz can): Offers mild heat and a signature Southwestern kick without overwhelming spice.
- Enchilada Sauce (16 oz): Provides moisture, tang, and rich red chili flavor. You can use red or green depending on preference.
- Flour Tortillas (8–10 medium): Serve as the structural layer, absorbing sauce while retaining a soft yet slightly chewy texture when baked.
- Shredded Cheese Blend (3 cups total): A mix of Monterey Jack, cheddar, and mozzarella ensures gooey meltability and bold flavor. You can also include pepper jack for extra heat.
- Sour Cream (½ cup): Adds creaminess and balances the spices. It can be mixed into the filling or used as a topping.
- Optional Toppings: Diced tomatoes, sliced black olives, avocado, cilantro, jalapeños, scallions, lime wedges, or guacamole for serving.
Each component works harmoniously to deliver a layered, satisfying experience in every bite.
Step-by-Step Recipe
- Preheat Oven: Begin by preheating your oven to 375°F (190°C). Lightly grease a 9×13-inch baking dish with non-stick spray or a thin layer of butter to prevent sticking.
- Cook the Ground Beef: In a large skillet over medium-high heat, cook the ground beef until browned and fully crumbled, about 6–8 minutes. Drain excess fat if needed.
- Season the Beef: Stir in the taco seasoning and about ¼ cup of water. Simmer for 2–3 minutes to let the flavors meld. Remove from heat.
- Mix Filling Ingredients: In a large bowl, combine the cooked beef, black beans, corn, diced green chilies, half of the shredded cheese (about 1½ cups), and sour cream. Mix well until evenly combined.
- Prepare Enchilada Sauce: Pour ½ cup of enchilada sauce into the bottom of the greased baking dish and spread it evenly to coat the surface.
- Layer the Tortillas: Place a tortilla in the dish, trimming if necessary to fit. Spoon about ¾ cup of the beef mixture over the tortilla, spreading it evenly but leaving a small border around the edges.
- Add Sauce and Cheese: Drizzle 2–3 tablespoons of enchilada sauce over the filling, then sprinkle with a handful of shredded cheese. Top with another tortilla.
- Repeat Layers: Continue layering tortillas, filling, sauce, and cheese until all ingredients are used, typically forming 3–4 layers. End with a final layer of tortillas topped generously with the remaining enchilada sauce and the rest of the shredded cheese.
- Bake: Cover the dish with aluminum foil and bake for 20 minutes. Then remove the foil and bake for an additional 10–15 minutes, or until the top is golden, bubbly, and the tortillas are slightly crisp at the edges.
- Rest and Serve: Let the bake rest for 5–10 minutes before slicing. This helps the layers set and makes cutting cleaner. Serve warm with your favorite toppings.
Tips
- Use Freshly Shredded Cheese: Pre-shredded cheese contains anti-caking agents that can affect meltability. For the creamiest texture, shred your own cheese from a block.
- Control Spice Level: Adjust heat by using mild or hot taco seasoning, omitting jalapeños, or swapping regular green chilies for hotter varieties.
- Prevent Sogginess: Don’t oversaturate the tortillas. Use just enough enchilada sauce to moisten each layer without making them soggy.
- Toast Tortillas Slightly: For added structure, lightly warm tortillas in a dry skillet before layering to make them more pliable and less likely to absorb too much moisture.
- Let It Rest: Allowing the bake to sit after coming out of the oven helps it hold its shape when cut and enhances flavor integration.
- Make Ahead: Assemble the bake up to one day in advance, cover tightly, and refrigerate. Add 5–10 minutes to baking time if starting cold.
- Freezer Friendly: This dish freezes well. Wrap unbaked or cooled baked portions tightly in foil and freeze for up to 3 months. Thaw overnight in the fridge before reheating.
Variations and Customizations
This Cheesy Ground Beef Quesadilla Bake is incredibly versatile. Here are some creative ways to personalize it:
- Protein Swaps: Replace ground beef with ground turkey, chicken, pork, plant-based crumbles, or even shredded rotisserie chicken for a lighter or vegetarian option.
- Bean Varieties: Try pinto beans, refried beans, kidney beans, or a three-bean mix for different textures and flavors.
- Veggie Boost: Add sautéed bell peppers, onions, zucchini, spinach, or mushrooms to increase nutrition and complexity.
- Gluten-Free Option: Use gluten-free tortillas to accommodate dietary restrictions. Ensure all other ingredients (like taco seasoning) are certified gluten-free.
- Dairy-Free Version: Substitute dairy-free cheese and sour cream alternatives. Nutritional yeast can add a cheesy flavor boost.
- Spice It Up: Add chopped jalapeños, chipotle in adobo, or a dash of cayenne for extra heat.
- Breakfast Twist: Turn it into a morning bake by adding scrambled eggs, breakfast sausage, and swapping taco seasoning for a Southwest spice blend.
- Individual Portions: Use a muffin tin to create mini quesadilla bake cups—perfect for parties or lunchboxes.
- Cheese Choices: Experiment with queso fresco, cotija, Colby Jack, or smoked gouda for unique flavor profiles.
Health Considerations and Nutritional Value
While undeniably indulgent, this bake can be adapted to fit various health goals:
- Nutritional Highlights (per serving, approx 1/8 of recipe):
- Calories: ~380–420
- Protein: ~22g
- Fat: ~20g (saturated fat ~8g)
- Carbohydrates: ~30g
- Fiber: ~6g
- Sodium: ~600–800mg (varies by ingredients)
- Calcium, Iron, Vitamin C, and B Vitamins from cheese, beans, and veggies.
- Heart-Healthy Tweaks: Use lean ground beef (93/7), low-sodium taco seasoning, reduced-fat cheese, and light sour cream to lower saturated fat and sodium.
- High-Fiber Option: Opt for whole wheat or high-fiber tortillas and add extra beans and vegetables.
- Portion Control: Serve with a side salad or roasted vegetables to balance the meal and reduce overall calorie density.
- Diabetic-Friendly: Monitor carb intake by reducing tortillas or using low-carb wraps, and pair with non-starchy vegetables.
With mindful substitutions, this dish can be both comforting and aligned with balanced eating patterns.
Ingredients
- 1 pound lean ground beef (80/20 or 90/10)
- 1 packet (or 2–3 tablespoons) taco seasoning
- 1 (15 oz) can black beans, drained and rinsed
- 1 cup corn kernels (frozen, canned, or fresh)
- 1 (4 oz) can diced green chilies
- 16 oz (about 2 cups) red or green enchilada sauce
- 8–10 medium flour tortillas (burrito-sized, 8–10 inches)
- 3 cups shredded cheese blend (cheddar, Monterey Jack, mozzarella, or pepper jack)
- ½ cup sour cream (plus extra for serving)
- Cooking spray or butter (for greasing pan)
- Optional toppings: Diced tomatoes, sliced avocado, chopped cilantro, sliced olives, jalapeños, scallions, lime wedges, guacamole, salsa.
Directions
- Preheat oven to 375°F (190°C). Grease a 9×13-inch baking dish with cooking spray or butter.
- In a large skillet over medium-high heat, cook ground beef until browned, breaking it apart with a spoon. Drain excess fat.
- Stir in taco seasoning and ¼ cup water. Simmer for 2–3 minutes. Remove from heat.
- In a large mixing bowl, combine the seasoned beef, black beans, corn, green chilies, 1½ cups of shredded cheese, and sour cream. Mix thoroughly.
- Pour ½ cup of enchilada sauce into the prepared baking dish and spread evenly across the bottom.
- Place one tortilla in the dish. Spoon about ¾ cup of the beef mixture over the tortilla, spreading evenly. Drizzle with 2–3 tablespoons of enchilada sauce and sprinkle with a handful of cheese. Top with another tortilla.
- Repeat layering: tortilla, filling, sauce, cheese—until all ingredients are used, ending with a layer of tortillas on top.
- Pour the remaining enchilada sauce over the final layer and sprinkle with the rest of the shredded cheese.
- Cover the dish with aluminum foil and bake for 20 minutes.
- Remove the foil and bake for another 10–15 minutes, until the cheese is bubbly and lightly golden.
- Let stand for 5–10 minutes before slicing into squares.
- Serve warm with desired toppings such as sour cream, salsa, avocado, or cilantro.
FAQ
Can I make this ahead of time?
Yes! Assemble the entire bake, cover tightly, and refrigerate for up to 24 hours before baking. Add 5–10 minutes to the baking time if starting from cold.
Can I freeze the quesadilla bake?
Absolutely. Freeze the unbaked or baked and cooled casserole tightly wrapped in foil and plastic wrap for up to 3 months. Thaw in the refrigerator overnight and reheat covered with foil at 350°F until heated through (about 30–40 minutes).
Why are my tortillas soggy?
Too much sauce or under-baking can cause sogginess. Use sauce sparingly between layers and ensure the final uncovered bake crisps the top slightly. Letting the dish rest after baking also helps.
Can I use corn tortillas?
Yes, but they may break more easily. Warm them first to prevent cracking, and consider stacking two per layer for sturdiness.
How do I reheat leftovers?
Reheat individual portions in the microwave for 1–2 minutes or in a 350°F oven for 15–20 minutes, covered with foil.
Is this recipe kid-friendly?
Definitely! Kids love the cheesy, mild flavor. Serve with mild salsa or skip the spicy ingredients to suit younger palates.
Can I make it vegetarian?
Yes! Omit the beef and replace it with plant-based ground meat, lentils, or extra beans. Use vegetable-based enchilada sauce.
Summary
The Cheesy Ground Beef Quesadilla Bake is a flavorful, easy-to-make casserole that combines seasoned beef, beans, cheese, and tortillas in a saucy, oven-baked delight. Perfect for feeding a crowd or enjoying leftovers all week, it’s comfort food at its finest—melty, satisfying, and endlessly customizable.