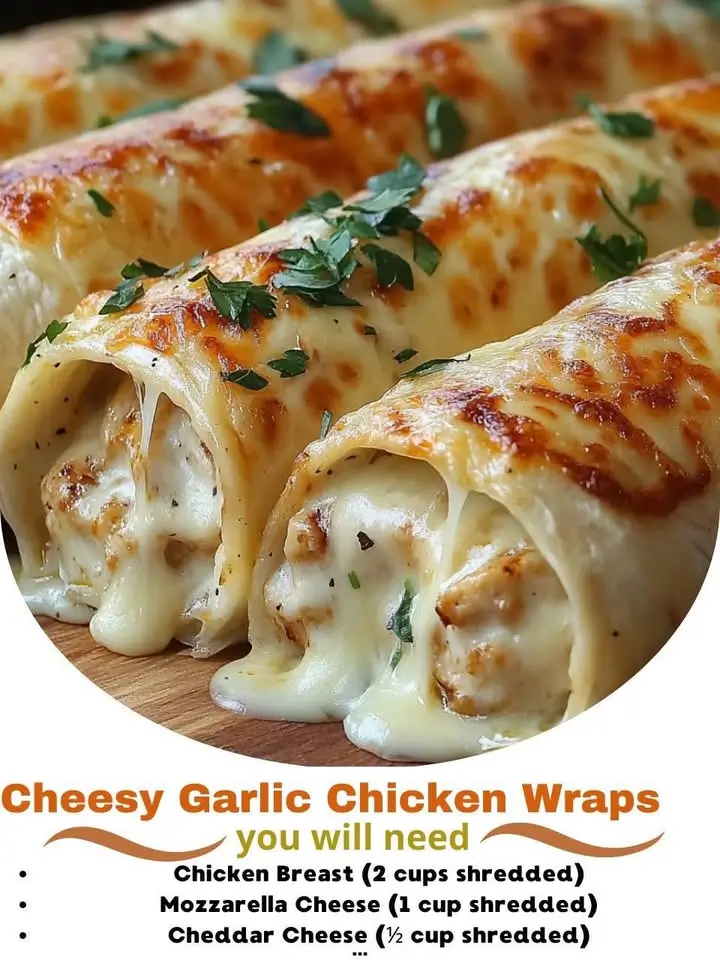
Cheesy Garlic Chicken Wraps: A Flavorful, Comforting Delight
The History of Cheesy Garlic Chicken Wraps
The origins of the Cheesy Garlic Chicken Wrap are rooted in the fusion of American fast-casual cuisine and Mediterranean-inspired flavors. While wraps themselves have ancient roots—traced back to Middle Eastern flatbreads like pita and lavash used to enclose fillings—the modern concept of the wrap gained popularity in the United States during the 1980s and 1990s as a healthier, portable alternative to sandwiches. The combination of chicken, garlic, and cheese emerged as a favorite due to its rich, savory profile that satisfies comfort food cravings without requiring a full sit-down meal.
Garlic has long been celebrated for its bold flavor and health benefits across various cuisines, from Italian to Asian. When paired with tender grilled or sautéed chicken and melted cheese, it creates a hearty, indulgent filling. Over time, home cooks and restaurant chefs alike began experimenting with this trio, adding herbs, spices, and sauces to enhance the taste. Today, Cheesy Garlic Chicken Wraps are a staple in lunch menus, meal prep routines, and family dinners, appreciated for their versatility, ease of preparation, and universal appeal. They reflect a global culinary trend toward handheld meals that balance convenience and flavor.
Ingredients Breakdown: What Makes This Wrap So Delicious?
The magic of a Cheesy Garlic Chicken Wrap lies in the harmonious blend of simple yet powerful ingredients. Each component plays a crucial role in building layers of texture and taste:
- Chicken Breast: Lean and protein-rich, boneless, skinless chicken breasts are the ideal base. They absorb seasonings well and remain tender when cooked properly.
- Garlic: Freshly minced or grated garlic delivers a pungent, aromatic punch. It’s sautéed gently to mellow its sharpness and infuse the chicken with deep flavor.
- Cheese: Typically shredded mozzarella or a Mexican blend is used for its excellent meltability and creamy texture. Some variations use cheddar, provolone, or even feta for a tangy twist.
- Flour Tortillas: Soft, medium-sized tortillas (around 8–10 inches) provide the perfect canvas. Whole wheat or spinach tortillas can be substituted for added fiber and nutrition.
- Olive Oil or Butter: Used to sauté the chicken and garlic, enhancing richness and promoting browning.
- Seasonings: Salt, black pepper, paprika, dried oregano, and sometimes onion powder or red pepper flakes elevate the overall taste profile.
- Optional Add-Ins: Sautéed bell peppers, onions, mushrooms, spinach, tomatoes, avocado, or fresh greens like arugula add freshness, color, and crunch.
- Sauces: Garlic aioli, ranch dressing, sour cream, or a light Caesar sauce tie everything together and add moisture.
These ingredients work in synergy—savory chicken, fragrant garlic, gooey cheese, and a soft tortilla—to create a satisfying bite that feels both comforting and gourmet.
Step-by-Step Recipe: How to Make Cheesy Garlic Chicken Wraps at Home
- Prepare the Chicken: Begin with 2 boneless, skinless chicken breasts. Slice them into thin strips or small cubes for quick, even cooking. Season generously with salt, black pepper, 1 teaspoon garlic powder, ½ teaspoon paprika, and ½ teaspoon dried oregano.
- Sauté the Chicken: Heat 1 tablespoon of olive oil in a large skillet over medium-high heat. Add the seasoned chicken and cook for 5–7 minutes, stirring occasionally, until golden brown and cooked through (internal temperature should reach 165°F). Remove from the pan and set aside.
- Sauté the Garlic: In the same skillet, reduce the heat to medium. Add another teaspoon of olive oil if needed, then stir in 4–5 cloves of minced garlic. Cook for about 30–60 seconds until fragrant—be careful not to burn it, as burnt garlic turns bitter.
- Combine Chicken and Garlic: Return the cooked chicken to the skillet. Toss to coat in the garlic-infused oil. For extra flavor, splash in 1 tablespoon of chicken broth or white wine and let it simmer briefly.
- Add Cheese: Sprinkle ¾ cup of shredded mozzarella (or your preferred cheese) over the chicken mixture. Stir gently and cover the pan for 1–2 minutes to allow the cheese to melt into a creamy coating.
- Warm the Tortillas: While the cheese melts, warm 4 medium flour tortillas. You can do this in a dry skillet for 20–30 seconds per side, in the microwave wrapped in a damp paper towel for 20 seconds, or directly over a low gas flame for a charred, authentic touch.
- Assemble the Wraps: Lay each tortilla flat. Spread 1 tablespoon of garlic aioli or ranch dressing in the center. Add a quarter of the cheesy garlic chicken mixture. Top with optional veggies like sliced tomatoes, spinach, or sautéed peppers.
- Roll the Wraps: Fold the sides of the tortilla inward, then roll tightly from the bottom up, burrito-style. Press gently to secure the shape.
- Serve Immediately: Serve whole or slice in half diagonally for an attractive presentation. Pair with a side salad, sweet potato fries, or fresh fruit.
Tips for the Perfect Cheesy Garlic Chicken Wrap
- Don’t Overcook the Chicken: To keep the chicken juicy, avoid cooking it beyond 165°F. Overcooked chicken becomes dry and tough, which can ruin the texture of your wrap.
- Use Fresh Garlic: Pre-minced jarred garlic lacks the bright, zesty kick of freshly minced cloves. Mince it just before cooking for maximum aroma and flavor.
- Warm Tortillas Properly: Cold tortillas crack when folded. Warming them makes them pliable and less likely to break during rolling.
- Prevent Sogginess: If prepping ahead, store components separately. Assemble just before eating to maintain the tortilla’s integrity.
- Press Gently After Rolling: Place the wrap seam-side down on a plate and lightly press to seal. This helps it hold together when eating.
- Add a Crisp Element: Include lettuce, cucumber, or pickled onions for a refreshing contrast to the rich, cheesy filling.
- Use a Grill Pan for Presentation: After rolling, place the wrap on a hot grill pan for 1–2 minutes per side to create golden sear marks and slightly crisp the exterior.
- Secure with Foil or Parchment Paper: Wrap the finished product in foil or parchment for easy handling, especially when packing for lunch or serving at gatherings.
Variations and Customizations
The beauty of Cheesy Garlic Chicken Wraps is their adaptability. Here are some creative twists to suit different tastes and dietary needs:
- Spicy Version: Add diced jalapeños, a dash of cayenne pepper, or sriracha mayo to give your wrap a fiery kick.
- Mediterranean Style: Use feta cheese, kalamata olives, sun-dried tomatoes, and spinach. Drizzle with tzatziki sauce instead of ranch.
- Bacon Lover’s Wrap: Crispy bacon strips add smoky depth. Pair with cheddar cheese and a honey mustard spread.
- Dairy-Free Option: Skip the cheese or use a plant-based alternative. Enhance creaminess with mashed avocado or cashew-based sauces.
- Keto-Friendly: Use low-carb tortillas or large lettuce leaves as a wrap substitute. Focus on high-fat cheeses and healthy oils.
- Buffalo Chicken Twist: Toss the chicken in buffalo sauce before adding cheese. Top with blue cheese crumbles and celery sticks.
- Pesto Infusion: Spread basil pesto on the tortilla before adding the chicken for an herby, nutty flavor boost.
- Breakfast Wrap: Scramble eggs with the garlic and chicken, add cheese, and serve in a tortilla for a hearty morning meal.
- Taco-Inspired: Use taco-seasoned chicken, top with salsa, corn, black beans, and Monterey Jack cheese.
Health Considerations and Nutritional Value
A typical Cheesy Garlic Chicken Wrap (using one 10-inch flour tortilla, 4 oz chicken breast, ¼ cup mozzarella, vegetables, and 1 tbsp ranch) contains approximately:
- Calories: 450–550
- Protein: 30–35g (excellent source for muscle repair and satiety)
- Fat: 18–22g (mostly from cheese and oil; choose low-fat cheese to reduce)
- Carbohydrates: 40–45g (varies based on tortilla type)
- Fiber: 3–5g (increases with whole grain tortillas and added vegetables)
- Sodium: 600–900mg (can be reduced by using low-sodium cheese and limiting added salt)
Nutritional Highlights:
- Chicken provides lean protein and essential B vitamins.
- Garlic contains allicin, known for immune-boosting and anti-inflammatory properties.
- Cheese offers calcium and vitamin D (especially in fortified varieties).
- Vegetables contribute antioxidants, fiber, and micronutrients.
For a Healthier Wrap:
- Use whole wheat or cauliflower tortillas to increase fiber and lower glycemic impact.
- Grill instead of sautéing to reduce added fats.
- Opt for Greek yogurt instead of sour cream or ranch.
- Add leafy greens like spinach or kale for iron and folate.
- Limit cheese quantity or use strongly flavored varieties (like aged cheddar) so you can use less.
Ingredients
- 2 boneless, skinless chicken breasts, sliced into strips
- 4 medium flour tortillas (8–10 inch)
- 1 cup shredded mozzarella cheese (or Mexican blend)
- 4–5 cloves fresh garlic, minced
- 2 tablespoons olive oil (divided)
- 1 teaspoon garlic powder
- ½ teaspoon smoked paprika
- ½ teaspoon dried oregano
- Salt and black pepper to taste
- ¼ cup ranch dressing or garlic aioli
- 1 cup chopped vegetables (bell peppers, spinach, tomatoes, onions – optional)
- 1 tablespoon chicken broth or white wine (optional, for deglazing)
Directions
- Season chicken strips with garlic powder, paprika, oregano, salt, and pepper.
- Heat 1 tablespoon olive oil in a large skillet over medium-high heat. Add chicken and cook for 5–7 minutes until no longer pink. Transfer to a plate.
- In the same skillet, add remaining olive oil. Sauté minced garlic for 30–60 seconds until fragrant.
- Return chicken to the skillet. Add chicken broth or wine if desired, and stir to combine.
- Reduce heat to low. Sprinkle shredded cheese over the chicken mixture, cover, and let melt for 1–2 minutes. Stir gently until creamy.
- Warm tortillas in a dry skillet or microwave until soft and pliable.
- Spread 1 tablespoon ranch or aioli on each tortilla. Add ¼ of the cheesy chicken mixture and top with vegetables.
- Fold in the sides and roll tightly into a wrap.
- Serve immediately, optionally seared in a grill pan for 1–2 minutes per side.
FAQ
Can I make Cheesy Garlic Chicken Wraps ahead of time?
Yes, but it’s best to prepare the filling and tortillas separately and assemble just before eating to prevent sogginess. The chicken mixture can be refrigerated for up to 3 days and reheated before use.
Can I freeze these wraps?
Yes, but only before assembly. Freeze the cooked chicken filling in portions. Thaw overnight in the fridge and reheat before wrapping. Fully assembled wraps don’t freeze well due to texture changes in the tortilla and vegetables.
What kind of tortilla works best?
Soft flour tortillas are traditional, but whole wheat, spinach, low-carb, or gluten-free options work well depending on dietary preferences. Ensure they’re pliable before rolling.
How do I prevent my wrap from falling apart?
Roll tightly, fold the sides in first, and use a sturdy tortilla. Serving in foil or parchment paper helps hold it together, especially for kids or on-the-go meals.
Can I use leftover rotisserie chicken?
Absolutely! Shred the chicken and sauté it with garlic and seasonings. Add cheese and proceed as usual. It’s a quick way to make this dish with minimal effort.
Are these wraps kid-friendly?
Yes! Kids love the cheesy, garlicky chicken and soft tortilla. Customize with mild flavors and familiar veggies to suit picky eaters.
What sides go well with these wraps?
Try a mixed green salad, coleslaw, sweet potato fries, fruit salad, or a bowl of tomato soup for a complete meal.
Summary
Cheesy Garlic Chicken Wraps combine tender chicken, aromatic garlic, and melted cheese in a soft tortilla for a delicious, satisfying meal that’s easy to customize and perfect for any occasion.
Whether enjoyed fresh off the stove or packed for lunch, this flavorful wrap brings comfort and convenience together in every bite.