Butterfinger Pie: A Decadent Dessert Delight
There’s something irresistibly nostalgic about Butterfinger Pie—a creamy, crunchy, sweet treat that takes you back to childhood birthday parties, school bake sales, and cozy family gatherings. This no-bake dessert combines the iconic texture and flavor of Butterfinger candy bars with a rich, velvety filling nestled in a buttery graham cracker crust. Whether you’re serving it at a holiday dinner or simply treating yourself on a quiet Sunday afternoon, Butterfinger Pie is sure to delight your taste buds and bring smiles all around.
The History of Butterfinger Pie
The origins of Butterfinger Pie are deeply rooted in American dessert culture, particularly during the mid-20th century when no-bake pies became increasingly popular due to their convenience and use of shelf-stable ingredients. The pie likely emerged as a creative spin-off from classic no-bake chocolate pies and peanut butter desserts, taking inspiration from the popularity of Butterfinger candy bars introduced by Nestlé in 1923.
Butterfingers quickly gained fame for their unique crisp, flaky taffy center coated in chocolate—a texture unlike any other candy bar at the time. As home bakers began experimenting with incorporating candies into desserts, it was only natural that someone would crush up these beloved bars and swirl them into a creamy custard base. Over time, variations spread through community cookbooks, family recipe cards, and later, online forums and food blogs, cementing Butterfinger Pie as a staple in many households across the United States.
Today, this pie stands as a testament to the ingenuity of home cooking—transforming a simple candy bar into an elegant yet accessible dessert that feels indulgent without requiring advanced baking skills.
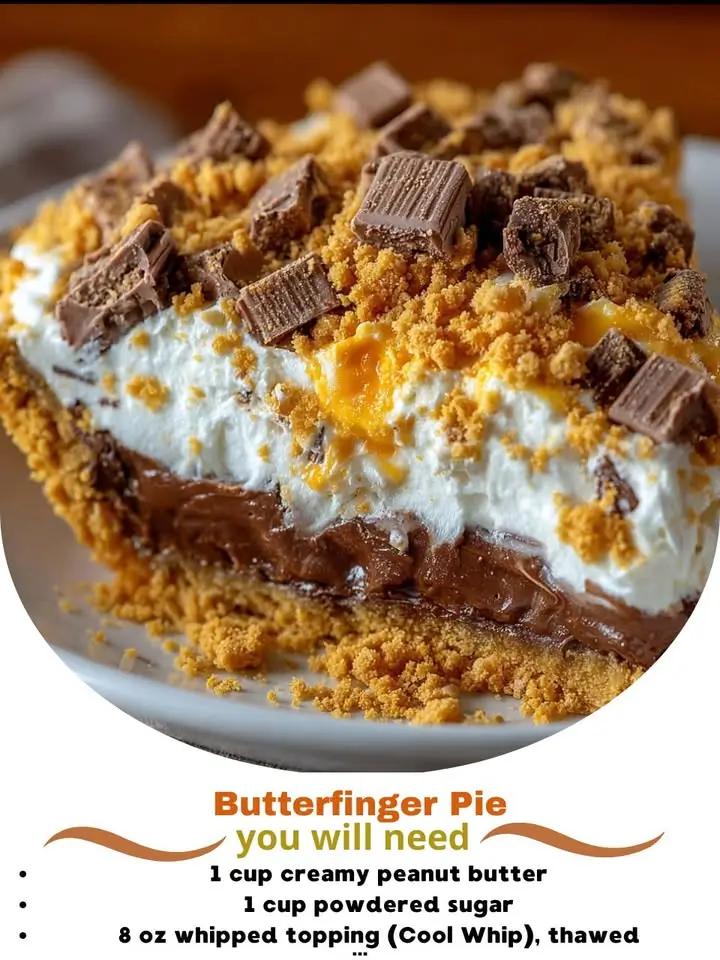
Ingredients Breakdown: What Goes Into a Perfect Butterfinger Pie?
The beauty of Butterfinger Pie lies not only in its taste but also in its simplicity. With just a few key components, each playing a crucial role in creating the perfect balance of textures and flavors, this dessert comes together easily using common pantry staples and one iconic ingredient: the Butterfinger candy bar.
- Graham Cracker Crumbs: The foundation of the crust, providing a slightly sweet, nutty base that complements the richness of the filling. You can use store-bought crumbs or make your own by crushing full sheets of graham crackers.
- Granulated Sugar (for crust): Enhances the sweetness of the crust and helps bind it when combined with melted butter.
- Melted Butter: Acts as the glue for the crust, giving it structure and a rich, buttery flavor. Unsalted butter is preferred so you can control the salt content.
- Vanilla Wafer or Chocolate Cookie Crumbs (optional): Some bakers mix in vanilla wafers or chocolate cookies for added depth and complexity in the crust.
- Cool Whip or Whipped Topping: Provides lightness and airiness to the filling. While some purists prefer homemade whipped cream, Cool Whip offers stability and convenience, especially important for no-bake pies that need to set.
- Sweetened Condensed Milk: A cornerstone ingredient that adds intense sweetness, creaminess, and body to the filling without needing to be cooked.
- Heavy Cream (if making homemade whipped cream): Used in place of Cool Whip for those seeking a more natural option; must be whipped to stiff peaks before folding into the mixture.
- Butterfinger Candy Bars: The star of the show! Typically 4–6 standard-sized bars are crushed and divided between layers. Their signature combination of honeycomb peanut-flavored center and milk chocolate coating melts slightly into the filling, offering bursts of crunch and flavor.
- Vanilla Extract: Deepens the overall flavor profile and ties the ingredients together with warmth and aroma.
- Peanut Butter (optional): Occasionally added to enhance the nuttiness and create a hybrid between peanut butter pie and Butterfinger pie—ideal for fans of both treats.
- Chocolate Shavings or Drizzle (garnish): Optional topping for visual appeal and extra cocoa flavor.
- Mini Marshmallows (rare variation): In some regional recipes, mini marshmallows are folded in to mimic the airy texture of the original candy bar.
Step-by-Step Recipe: How to Make Butterfinger Pie at Home
Creating a flawless Butterfinger Pie is easier than you might think. Follow these detailed steps to ensure success every time.
Ingredients Needed:
- 1 ½ cups graham cracker crumbs
- ⅓ cup granulated sugar
- 6 tablespoons unsalted butter, melted
- 1 teaspoon vanilla extract
- 1 (14 oz) can sweetened condensed milk
- 1 (8 oz) container frozen whipped topping (like Cool Whip), thawed
- 4–6 regular Butterfinger candy bars, chopped and crushed
- Optional: 2 tablespoons creamy peanut butter
- Optional garnishes: chocolate drizzle, additional crushed Butterfingers, whipped cream rosettes
Directions:
- Preheat and Prepare Pan: No oven preheating is required since this is a no-bake pie. Lightly grease a 9-inch pie dish or line it with parchment paper for easy removal if desired.
- Make the Crust: In a medium bowl, combine graham cracker crumbs, sugar, and melted butter. Mix until the crumbs are evenly moistened and resemble wet sand. Press the mixture firmly into the bottom and up the sides of the pie dish using the back of a spoon or a flat-bottomed glass. Chill in the refrigerator for at least 15 minutes to set.
- Prepare the Filling: In a large mixing bowl, add the sweetened condensed milk, vanilla extract, and optional peanut butter. Beat gently with a hand mixer or whisk until smooth and fully incorporated.
- Fold in Whipped Topping: Add approximately half of the thawed whipped topping to the condensed milk mixture. Gently fold together using a spatula until mostly combined. Then add the remaining whipped topping and continue folding until light, fluffy, and uniformly blended. Avoid overmixing to preserve the airy texture.
- Incorporate Crushed Butterfingers: Finely chop 3–4 Butterfinger bars using a knife or food processor. Reserve one whole bar for garnish if desired. Fold most of the crushed candy into the filling, saving some for sprinkling on top after pouring.
- Assemble the Pie: Remove the chilled crust from the fridge. Pour the filling into the crust and spread evenly with the spatula. Sprinkle the reserved crushed Butterfingers over the surface for added crunch and visual appeal.
- Chill to Set: Cover the pie loosely with plastic wrap and refrigerate for at least 4 hours, or preferably overnight. This allows the filling to firm up and develop its full flavor.
- Garnish and Serve: Before serving, drizzle with melted chocolate or chocolate syrup, add dollops of fresh whipped cream, and sprinkle with additional candy pieces for a professional finish.
Pro Tips for the Best Butterfinger Pie
- Use Full-Fat Ingredients: For maximum creaminess, always use full-fat sweetened condensed milk and real whipped cream or high-quality whipped topping.
- Don’t Skip the Chill Time: Rushing the chilling process leads to a soft, messy slice. Allow at least 4 hours, but overnight chilling yields cleaner cuts and better texture.
- Crush Candy Properly: Aim for small, even chunks—not powder. Too fine, and you lose the satisfying crunch; too large, and they may sink or overpower a bite.
- Boost Flavor with Salt: A tiny pinch of sea salt in the crust enhances sweetness and balances the richness—especially effective if using unsalted butter.
- Try a Chocolate Crust: Swap graham crackers for chocolate cookie crumbs (like Oreo without the filling) for a deeper, more decadent base that pairs perfectly with Butterfingers.
- Freeze for Firmer Texture: If serving in warm weather or transporting the pie, freeze for 30–60 minutes before slicing for cleaner edges.
- Layer for Visual Appeal: Create a layered effect by spreading a thin layer of filling, adding crushed Butterfingers, then repeating before topping with final filling layer.
- Make Ahead Friendly: This pie keeps well in the fridge for up to 5 days. Store covered with plastic wrap to prevent drying out.
Variations and Customizations
One of the greatest strengths of Butterfinger Pie is how adaptable it is. From dietary needs to flavor experimentation, there’s room for creativity while still honoring the essence of the original.
1. Gluten-Free Version
Substitute graham cracker crumbs with gluten-free cookies such as Schär Digestive Biscuits or certified gluten-free graham-style crumbs. Ensure all candy bars used are labeled gluten-free (note: traditional Butterfingers contain wheat).
2. Dairy-Free / Vegan Adaptation
Use plant-based butter for the crust, dairy-free sweetened condensed milk (available commercially or homemade with coconut milk and sugar), and vegan whipped topping like Silk or CocoWhip. Choose a vegan-friendly candy bar alternative or make a homemade version mimicking the Butterfinger texture with rice cereal and chocolate.
3. Peanut-Free Option
Though Butterfingers themselves contain peanuts, individuals with allergies should avoid this pie. However, sunflower seed butter can replace peanut butter in optional additions, and certain allergen-conscious candy bars may offer similar textures.
4. Mini Individual Pies
Portion the crust and filling into disposable aluminum tart pans or mason jar lids for adorable single-serving desserts ideal for parties or gifts.
5. Ice Cream Butterfinger Pie
For a frozen twist, blend crushed Butterfingers into softened vanilla ice cream, pour over the prepared crust, and freeze until solid. Layer with fudge ripple or peanut butter swirls for extra indulgence.
6. Mousse-Style Pie
Elevate the presentation by whipping egg whites or gelatin-stabilized cream into the filling for a lighter mousse-like consistency. Requires careful handling but delivers restaurant-quality results.
7. Boozy Butterfinger Pie (Adults Only)
Add 1–2 tablespoons of bourbon, rum, or coffee liqueur to the filling for a sophisticated edge. Pairs exceptionally well with dark chocolate accents.
8. Birthday Cake Butterfinger Fusion
Mix in rainbow sprinkles and swap part of the graham cracker crust for vanilla wafers to give it a festive “birthday pie” vibe—perfect for kids’ celebrations.
9. Nutella Swirl Butterfinger Pie
Swirl Nutella through the filling before chilling for a hazelnut-chocolate-peanut fusion that’s utterly addictive.
Health Considerations and Nutritional Value
While undeniably delicious, Butterfinger Pie is a high-calorie, sugar-dense dessert best enjoyed in moderation. Here’s a breakdown of typical nutritional values per serving (based on an 8-slice pie):
| Nutrient | Amount Per Serving |
|---|---|
| Calories | Approx. 380–420 kcal |
| Total Fat | 18–22g |
| Saturated Fat | 10–12g |
| Cholesterol | 30–40mg |
| Sodium | 200–280mg |
| Total Carbohydrates | 55–60g |
| Dietary Fiber | 1–2g |
| Sugars | 45–50g |
| Protein | 5–7g |
Key Health Notes:
- High Sugar Content: Due to sweetened condensed milk, candy bars, and added sugar in the crust, this pie exceeds daily recommended limits for added sugars. Diabetics or those managing blood sugar should consume sparingly or explore sugar substitutes.
- Saturated Fat: Primarily from butter, chocolate, and dairy products. Those monitoring heart health may consider reduced-fat alternatives or smaller portions.
- Allergens: Contains milk, wheat, peanuts, and soy—all major allergens. Always label accordingly when serving guests.
- Energy-Dense: Ideal as an occasional treat rather than a regular dessert choice, especially for individuals watching calorie intake.
- Balanced Pairings: Serve with fresh berries on the side to add fiber, antioxidants, and acidity that cuts through the sweetness.
Frequently Asked Questions (FAQ)
Q: Can I use fresh whipped cream instead of Cool Whip?
A: Absolutely! Whip 1 cup of cold heavy cream with 2 tablespoons of powdered sugar and ½ teaspoon of vanilla extract until stiff peaks form. Fold into the condensed milk mixture as directed. Note: Fresh cream doesn’t hold as long, so serve within 2–3 days.
Q: How do I keep the pie from becoming watery?
A: Ensure your whipped topping is fully thawed but not melted. Also, don’t open the freezer door frequently during chilling, as temperature fluctuations can cause condensation.
Q: Can I freeze Butterfinger Pie?
A: Yes, but texture may change slightly. Freeze uncovered for 1 hour, then wrap tightly in plastic and foil. Thaw in the refrigerator before serving. Best consumed within 2 weeks.
Q: Are there generic versions of Butterfinger that work?
A: Many stores carry “candy bar look-alikes” (e.g., Kroger’s Scooter Bar, Great Value Crunch). These can be used to save money, though flavor and crunch may vary slightly.
Q: Why did my crust turn out soggy?
A: Likely causes include insufficient pressing of the crust or adding filling before the crust has properly chilled. Pre-chill for at least 15 minutes, and press firmly with even pressure.
Q: Can I make this pie ahead of time?
A: Yes! This pie actually improves in flavor and texture after sitting overnight. Prepare up to 2 days in advance and store covered in the fridge.
Q: Is there a way to reduce the sweetness?
A: Try reducing sugar in the crust, using a less sweet whipped topping, or adding a touch of salt or espresso powder to balance flavors. However, altering sweetened condensed milk isn’t recommended as it affects texture.
Summary
Butterfinger Pie is a luscious, no-bake dessert that celebrates the iconic candy bar with a creamy filling, crisp crust, and irresistible crunch in every bite. Simple to assemble and endlessly customizable, it’s a crowd-pleasing favorite for holidays, potlucks, and sweet cravings alike.