Introduction
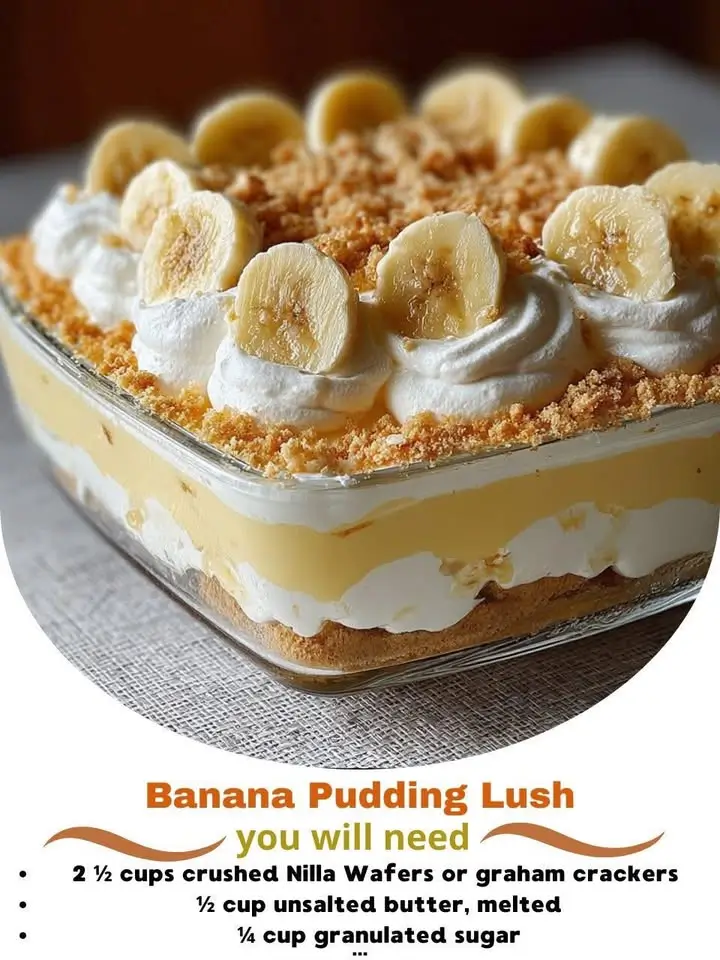
Banana Pudding Lush is a delightful, no-bake dessert that combines the creamy richness of classic banana pudding with the light, airy texture of a layered “lush” cake. This modern twist on a Southern favorite has gained immense popularity for its simplicity, crowd-pleasing flavor, and beautiful presentation. Whether you’re preparing for a family gathering, holiday celebration, or simply craving a sweet treat, Banana Pudding Lush delivers nostalgia in every bite. With layers of vanilla wafers, ripe bananas, cool whip, instant pudding, and a buttery crust, it’s a harmonious blend of textures and flavors that’s both comforting and indulgent.
The History
The roots of banana pudding trace back to the late 19th century in the American South, where it emerged as a custard-based dessert featuring layers of sliced bananas, meringue, and ladyfingers or sponge cake. As refrigeration became more common in households during the 20th century, the recipe evolved to include chilled versions using vanilla wafers and pre-made custards. The term “lush” in dessert nomenclature refers to a specific style of no-bake, layered desserts that gained traction in the 1970s and 1980s—particularly popularized by church potlucks and community cookbooks. These lush desserts typically feature a crumb crust, pudding layers, whipped toppings, and fruit. Banana Pudding Lush, as we know it today, blends these traditions, combining retro convenience ingredients like instant pudding mix and Cool Whip with fresh bananas and cookies to create a lighter, faster version of the original baked banana pudding.
Ingredients Breakdown
The magic of Banana Pudding Lush lies in its balance of simple, accessible ingredients that come together seamlessly:
- Vanilla Wafers: These crisp, sweet cookies form the base layer and add structure and crunch to each bite.
- Ripe Bananas: Freshly sliced bananas provide natural sweetness and creaminess. It’s important to use bananas that are yellow with minimal brown spots for optimal flavor and texture.
- Instant Vanilla Pudding Mix: A convenient shortcut that sets quickly and contributes rich vanilla flavor without the need for cooking.
- Whole Milk: Used to prepare the pudding mix; whole milk ensures a creamy consistency and enhances flavor.
- Cool Whip (or Whipped Cream): Provides a light, fluffy texture and stabilizes the layers. While Cool Whip offers convenience and shelf stability, homemade whipped cream can be used for a fresher, less processed option.
- Butter: Melted and mixed with crushed vanilla wafers to create a flavorful crust that holds the dessert together.
- Lemon Juice (optional): A small splash helps prevent the bananas from browning too quickly and adds a subtle brightness to balance the sweetness.
- Vanilla Extract (optional): Enhances the overall vanilla flavor, especially when using homemade whipped cream instead of pudding mix with artificial flavoring.
Step-by-Step Recipe
- Prepare the Crust: Crush about 1 cup of vanilla wafers into fine crumbs using a food processor or sealed plastic bag and rolling pin. Melt 2 tablespoons of unsalted butter and mix it thoroughly with the cookie crumbs. Press this mixture evenly into the bottom of a 9×13-inch glass dish or serving tray. Chill in the refrigerator for 15 minutes to set.
- Make the Pudding Layer: In a medium bowl, whisk together one package (3.4 oz) of instant vanilla pudding mix and 2 cups of cold whole milk. Stir vigorously for about 2 minutes until the mixture begins to thicken. Let it sit for 5 minutes to fully set.
- Whip the Topping: In a large mixing bowl, fold 1 tub (8 oz) of thawed Cool Whip into the prepared pudding. For a richer version, you can use freshly whipped heavy cream sweetened with 2 tablespoons of powdered sugar. Gently combine to maintain fluffiness.
- Layer the Bananas: Peel and slice 3–4 ripe bananas into ¼-inch thick rounds. Toss them lightly with 1 tablespoon of lemon juice to prevent oxidation and browning. Arrange half of the banana slices over the chilled crust in a single, even layer.
- Add the First Pudding Layer: Spread half of the pudding and whipped topping mixture over the bananas, using a spatula to create a smooth, even surface.
- Second Cookie Layer: Sprinkle another cup of whole vanilla wafers evenly over the pudding layer. You can leave them whole for texture contrast or crush them slightly for better integration.
- Repeat Banana and Pudding Layers: Add the remaining banana slices on top of the cookies, then spread the rest of the pudding mixture over them.
- Final Touch: Top the entire dessert with the remaining Cool Whip or whipped cream, spreading it gently to cover completely. Garnish with additional whole vanilla wafers placed around the edges or scattered on top for visual appeal.
- Chill: Cover the dish with plastic wrap and refrigerate for at least 4 hours, preferably overnight. This allows the flavors to meld and the wafers to soften into a cake-like texture while maintaining structural integrity.
- Serve: Cut into squares or scooped servings. Best served cold.
Tips
- Use Cold Ingredients: Ensure your milk and Cool Whip are well-chilled before mixing to help the pudding set faster and maintain a stable texture.
- Don’t Overmix: When folding in Cool Whip or whipped cream, stir gently to preserve airiness. Overmixing can deflate the mixture and make the dessert dense.
- Prevent Browning: Always toss banana slices in a bit of lemon juice or pineapple juice to keep them looking fresh and appealing, especially if making the dessert ahead of time.
- Uniform Slicing: Use a sharp knife or mandoline slicer to ensure even banana slices for consistent texture throughout.
- Chill the Dish: For easier slicing and cleaner presentation, chill your serving dish beforehand, especially if using a glass pan.
- Timing Matters: While Banana Pudding Lush can be made up to 2 days in advance, avoid assembling more than 48 hours ahead to prevent the bananas from becoming overly soft or the crust from turning soggy.
- Double the Recipe: This dessert is always a hit—consider doubling the ingredients for large gatherings and using two 9×13-inch pans.
Variations and Customizations
Banana Pudding Lush is incredibly versatile and welcomes creative twists. Here are some delicious variations:
- Chocolate Banana Lush: Substitute chocolate pudding mix for vanilla and use chocolate graham crackers or chocolate sandwich cookies for the crust. Top with chocolate shavings.
- Cream Cheese Version: Blend 8 oz of softened cream cheese with powdered sugar and vanilla before folding into the pudding mixture for a tangier, richer flavor profile.
- Strawberry-Banana Fusion: Add a layer of sliced strawberries between the banana layers for a fruity twist.
- Boozy Upgrade: Add 1–2 tablespoons of rum, Baileys, or banana liqueur to the pudding mixture for an adult-friendly version.
- Gluten-Free Option: Use gluten-free vanilla wafers or almond flour cookies for the crust and layers to accommodate dietary restrictions.
- Dairy-Free/Lactose-Free: Replace milk with almond, oat, or soy milk (ensure pudding mix is compatible), and use dairy-free whipped topping.
- Mini Jars: Prepare individual servings in mason jars or parfait glasses for a charming, portable dessert ideal for parties or gifts.
- Caramel Drizzle: Swirl warm caramel sauce through the layers or drizzle on top before serving for a decadent touch.
- Nutty Crunch: Add chopped pecans or walnuts between layers for added texture and flavor.
Health Considerations and Nutritional Value
While Banana Pudding Lush is undeniably delicious, it’s important to enjoy it in moderation due to its sugar and fat content. Here’s a general nutritional breakdown per serving (based on 12 servings):
- Calories: ~320–380 kcal
- Total Fat: 14–18g (mainly from butter, whipped topping, and milk)
- Saturated Fat: 7–9g
- Cholesterol: 10–15mg
- Sodium: 200–250mg
- Total Carbohydrates: 48–55g
- Sugars: 30–36g (from pudding mix, cookies, and bananas)
- Fiber: 1–2g (primarily from bananas)
- Protein: 3–5g
Health Notes:
- Bananas contribute potassium, vitamin B6, and natural fiber, supporting heart health and digestion.
- Using low-fat milk, reduced-sugar pudding mix, and homemade whipped cream with less sugar can reduce calorie and fat content.
- To lower sugar intake, consider using sugar-free instant pudding and low-sugar vanilla wafers.
- This dessert is not suitable for those with dairy allergies unless substitutions are made.
- Pregnant women and immunocompromised individuals should consume within 24–48 hours due to the use of raw eggs in some commercial pudding mixes (though most modern versions are pasteurized and safe).
Ingredients
- 1 ½ cups vanilla wafers, plus extra for garnish
- 2 tablespoons unsalted butter, melted
- 3–4 ripe bananas, thinly sliced
- 1 tablespoon lemon juice (optional)
- 1 package (3.4 oz) instant vanilla pudding mix
- 2 cups cold whole milk
- 1 tub (8 oz) frozen whipped topping (Cool Whip), thawed
- Optional: ½ teaspoon pure vanilla extract
Directions
- In a food processor or zip-top bag, crush 1 ½ cups of vanilla wafers into fine crumbs. Transfer to a bowl and mix with melted butter until combined.
- Press the mixture firmly into the bottom of a 9×13-inch glass dish. Refrigerate for 15 minutes to set.
- In a medium bowl, whisk together the instant vanilla pudding mix and cold milk for 2 minutes. Let stand for 5 minutes until thickened.
- Gently fold the thawed whipped topping into the pudding until smooth and fluffy. Add vanilla extract if desired.
- Toss the banana slices with lemon juice and arrange half of them over the chilled crust.
- Spread half of the pudding mixture over the bananas. Sprinkle 1 cup of whole vanilla wafers over this layer.
- Add the remaining banana slices, followed by the rest of the pudding mixture. Smooth the top with a spatula.
- Cover with remaining whipped topping and decorate with whole vanilla wafers.
- Cover with plastic wrap and refrigerate for at least 4 hours, or overnight.
- Before serving, let it sit at room temperature for 10 minutes for easier cutting. Enjoy chilled!
FAQ
Can I make Banana Pudding Lush ahead of time?
Yes! This dessert actually improves with time. Make it 12–24 hours in advance to allow the flavors to develop and the layers to set. Do not store longer than 48 hours.
Why are my bananas turning brown?
Bananas naturally oxidize when exposed to air. Tossing them in lemon juice or another acidic liquid slows this process significantly.
Can I use homemade whipped cream instead of Cool Whip?
Absolutely. Whip 1 ½ cups of heavy cream with 2 tablespoons of powdered sugar and ½ teaspoon of vanilla extract until stiff peaks form. Use immediately after folding into pudding.
Is this recipe freezer-friendly?
Not recommended. Freezing can cause separation, textural changes, and sogginess upon thawing. Best kept refrigerated.
Can I use regular pudding instead of instant?
No. Cook-and-serve pudding requires heating and cooling, which may interfere with the no-bake nature of the lush. Stick to instant for best results.
What can I substitute for vanilla wafers?
Graham crackers, shortbread cookies, or Nilla wafers work well. For a different flavor profile, try using coconut cookies or animal crackers.
How do I prevent a soggy bottom?
Ensure your crust is well-compressed and chilled before adding wet layers. Also, don’t over-soak the bananas—toss them quickly and layer efficiently.
Summary
Banana Pudding Lush is a creamy, no-bake dessert that layers vanilla wafers, ripe bananas, instant pudding, and whipped topping over a buttery crust for a nostalgic Southern-inspired treat. Easy to assemble and perfect for any occasion, it’s a crowd-pleasing classic that balances sweetness, texture, and comfort in every bite.