Introduction
Welcome to a warm, comforting, and nutritionally balanced start to your day—Apple Cinnamon Breakfast Quesadillas! This innovative twist on the classic Mexican favorite transforms breakfast into a harmonious blend of sweet, spicy, creamy, and crisp textures—all wrapped in golden, lightly toasted whole-grain tortillas. Far from being just a brunch experiment, these quesadillas bridge culinary traditions: borrowing the cozy spice profile of American apple pie, the protein-rich heartiness of a savory breakfast staple, and the portable convenience of a handheld morning meal. Whether you’re fueling up before school drop-off, packing a satisfying office lunch, or seeking a family-friendly weekend treat that satisfies both kids and adults, Apple Cinnamon Breakfast Quesadillas deliver flavor, function, and flexibility—all without compromising on quality ingredients or wholesome nutrition.
The History
While traditional quesadillas trace their origins to 16th-century central Mexico—where indigenous cooks folded native corn tortillas around cheese and roasted squash blossoms—the modern breakfast quesadilla is a delicious product of cultural fusion and American culinary innovation. The concept of incorporating fruit into savory-sweet breakfast dishes has deep roots: colonial New Englanders baked apples with cinnamon and butter as early as the 1700s; German immigrants brought apple-filled pancakes and strudels to the Midwest; and Tex-Mex cuisine—emerging along the U.S.–Mexico border in the 19th and 20th centuries—pioneered ingredient hybridization, including the now-iconic breakfast taco. The apple cinnamon breakfast quesadilla likely gained traction in the late 1990s and early 2000s, buoyed by the rise of food blogs, lifestyle magazines like Real Simple and Parents, and the growing demand for “breakfast reinventions.” Chefs and home cooks alike began experimenting with adding seasonal fruits, nut butters, and warming spices to breakfast wraps—recognizing that the structural integrity of a lightly grilled tortilla made it the perfect vessel for soft-cooked apples, melted cheese, and even a drizzle of maple syrup. Today, this dish appears on menus from Portland food trucks to Dallas diners—and continues to evolve with gluten-free flours, plant-based cheeses, and functional superfood add-ins like chia seeds and ground flax.
Ingredients Breakdown
Every ingredient in this recipe serves a distinct purpose—flavor, texture, nutrition, or function. Let’s explore them in detail:
- Whole-Grain or Sprouted Grain Tortillas (8–10 inch): Provide complex carbohydrates, dietary fiber (3–5g per tortilla), B vitamins, and sustained energy release. Sprouted varieties offer enhanced digestibility and increased bioavailability of iron, zinc, and folate.
- Granny Smith Apples (2 medium, ~300g): Chosen for their high pectin content (ensuring they hold shape when cooked), bright acidity (which balances sweetness), and rich polyphenol profile—including quercetin and chlorogenic acid—linked to antioxidant and anti-inflammatory benefits.
- Unsweetened Applesauce (¼ cup): Acts as a natural binder and moisture enhancer while contributing additional soluble fiber (pectin) and eliminating the need for refined sugar or excess oil during cooking.
- Pure Maple Syrup (2 tbsp): Adds nuanced caramelized sweetness and trace minerals (manganese, zinc). Opt for Grade A Dark Color/Robust Flavor for deeper molasses notes that complement cinnamon.
- Ground Cinnamon (1½ tsp, preferably Ceylon): Contains cinnamaldehyde—the compound responsible for its warming aroma and studied metabolic benefits, including improved insulin sensitivity. Ceylon (“true”) cinnamon has significantly lower coumarin levels than Cassia, making it safer for daily consumption.
- Nutmeg (¼ tsp, freshly grated): Enhances warmth and complexity; contains myristicin, which may support cognitive function at culinary doses.
- Vanilla Extract (1 tsp, pure, alcohol-based): Deepens aromatic richness and helps emulsify the apple mixture for even distribution.
- Unsalted Butter or Ghee (1 tbsp): Used for sautéing apples—adds mouthfeel, promotes Maillard browning, and carries fat-soluble compounds like vitamin K2 (in grass-fed ghee).
- Sharp Cheddar or Gouda Cheese (1 cup shredded, ~115g): Provides high-quality protein (7g per ¼ cup), calcium, phosphorus, and conjugated linoleic acid (CLA)—a fatty acid associated with metabolic health. Aged cheddars offer more robust umami and lower lactose.
- Plain Greek Yogurt or Ricotta (⅓ cup): Adds creaminess, tang, and extra protein (10–12g per ⅓ cup); acts as a “cheese extender” to reduce saturated fat while boosting satiety.
- Optional Add-Ins: Toasted walnuts or pecans (for crunch + omega-3 ALA), chia or ground flaxseed (for fiber + lignans), unsweetened coconut flakes (for texture + MCTs), or a pinch of cardamom or allspice for layered spice complexity.
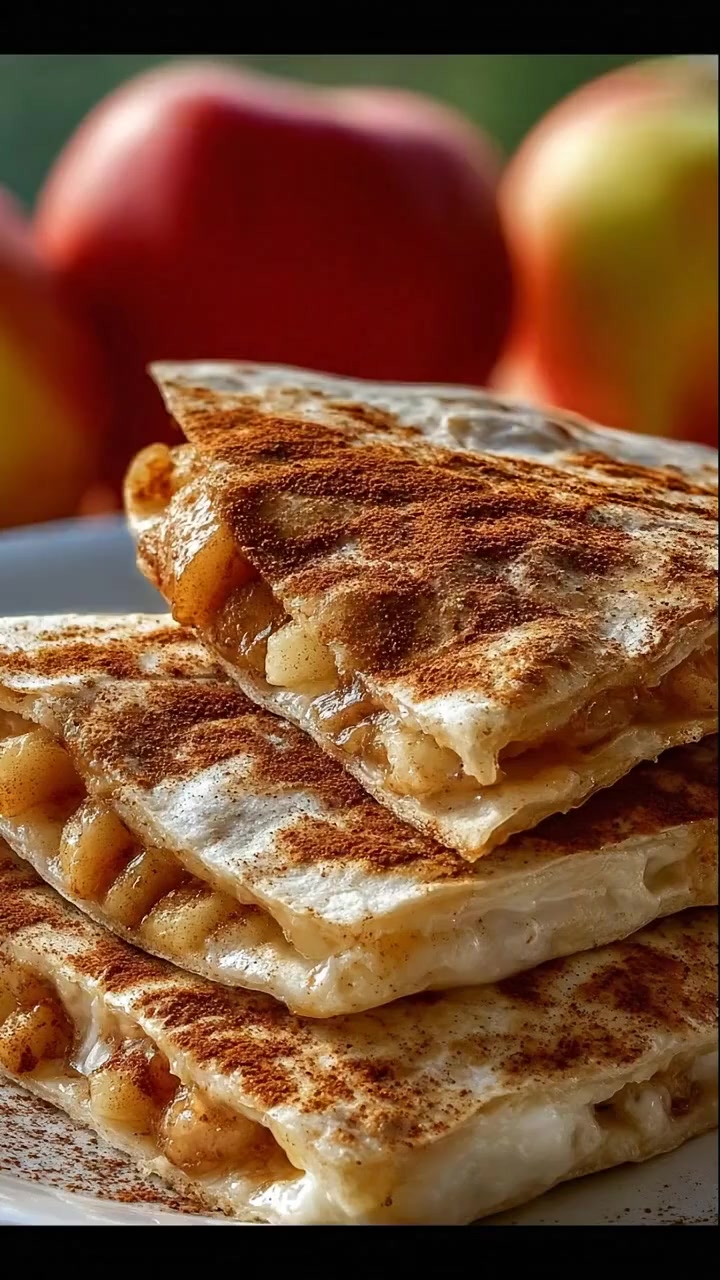
Step-by-Step Recipe
- Prepare the Apple Filling: Peel, core, and finely dice 2 Granny Smith apples (¼-inch pieces). In a nonstick skillet over medium heat, melt 1 tbsp unsalted butter. Add apples, ¼ cup unsweetened applesauce, 2 tbsp pure maple syrup, 1½ tsp ground cinnamon, ¼ tsp freshly grated nutmeg, and 1 tsp pure vanilla extract. Stir well to coat. Cook, stirring frequently, for 6–8 minutes until apples soften slightly but retain gentle bite—avoid overcooking into mush. Remove from heat and let cool 5 minutes.
- Assemble the Cheese Blend: In a small bowl, combine 1 cup shredded sharp cheddar (or smoked gouda), ⅓ cup plain full-fat Greek yogurt (or whole-milk ricotta), and a pinch of flaky sea salt. Stir until evenly blended—this creates a luxuriously creamy, meltable filling that won’t separate or weep during grilling.
- Preheat & Prep Surface: Heat a cast-iron or heavy-bottomed nonstick skillet over medium-low heat (325°F surface temp). Lightly brush or spray with neutral oil (avocado or grapeseed) or use a buttered parchment square for easy release.
- Layer the First Tortilla: Place one 8–10 inch whole-grain tortilla in the skillet. Evenly spread half the cheese-yogurt mixture (about ¾ cup) over the surface, leaving a ½-inch border. Spoon half the cooled apple mixture (approx. ¾ cup) over the cheese, distributing evenly—not heaping—to ensure structural integrity.
- Seal & Grill First Side: Top with a second tortilla. Press gently with a spatula. Cook undisturbed for 2.5–3.5 minutes, until the bottom tortilla develops light golden-brown spots and the cheese begins to melt visibly at the edges.
- Flip with Confidence: Slide a wide, flexible spatula fully underneath, lift slightly, then swiftly—but carefully—flip the quesadilla. If resistance occurs, let cook 30 seconds longer before attempting again. Avoid piercing or pressing down hard, which can squeeze out filling.
- Finish the Second Side: Cook another 2–3 minutes until deeply golden, crisp, and fragrant. The internal temperature should reach at least 165°F for food safety (especially if using dairy). Optional: During the last 30 seconds, sprinkle a pinch of cinnamon-sugar or crushed walnuts over the top for garnish.
- Rest & Slice: Transfer to a wire rack or cooling tray (not a plate—steam buildup softens crispness). Let rest 2 minutes—this allows residual heat to finish melting and lets starches in the tortilla set, preventing slippage when cut. Slice into 4–6 wedges using a serrated knife or pizza cutter.
Tips
- Apple Texture Mastery: For optimal bite-and-give, dice apples uniformly and cook only until just tender—overcooking releases too much pectin and water, causing sogginess. If apples are overly juicy post-cooking, drain briefly on paper towels.
- Cheese Melting Science: Shred your own cheese—pre-shredded versions contain anti-caking agents (e.g., cellulose) that inhibit smooth melting. Let cheese sit at room temperature for 10 minutes pre-mixing for even integration.
- Tortilla Temperature Matters: Warm tortillas slightly (5 seconds per side in dry skillet) before assembling—they’ll be more pliable and less prone to cracking during flipping.
- Low-and-Slow Grilling: Resist cranking the heat. Medium-low ensures even browning without burnt exteriors and under-melted interiors. Use an infrared thermometer to verify skillet surface temp stays between 300–350°F.
- Flipping Pro-Tip: For foolproof flips, place a second inverted skillet or large plate over the quesadilla, invert both together, then slide the quesadilla back into the hot pan. Or use two wide spatulas—one under, one on top—for maximum control.
- Make-Ahead Strategy: Prepare apple filling up to 3 days ahead and refrigerate in an airtight container. Assemble quesadillas fresh—but you can portion cheese-yogurt mix and store covered for 2 days. Freeze uncooked assembled quesadillas (wrap individually in parchment + foil) for up to 1 month; thaw overnight, then grill directly from fridge (add 1–2 min per side).
- Crispness Retention Hack: Serve immediately—or reheat in a toaster oven or air fryer (375°F for 3–4 min) instead of microwave, which steams and softens.
- Batch Cooking: Double the recipe and keep a stack of cooked, cooled quesadillas in the fridge for quick reheating—ideal for busy weekday mornings or after-school snacks.
Variations and Customizations
This recipe is intentionally designed as a flavorful canvas—adaptable to dietary needs, seasonal produce, pantry availability, and personal taste preferences. Explore these thoughtfully crafted variations:
- Vegan Version: Swap dairy cheese for a meltable cashew-chia “cheese” (soaked cashews + lemon juice + nutritional yeast + tapioca starch + turmeric), use coconut yogurt instead of Greek, and replace butter with refined coconut oil. Add 1 tsp apple cider vinegar to mimic tang.
- Gluten-Free: Use certified GF brown rice or cassava tortillas (look for brands with minimal gums—like Siete or Simple Mills). Note: GF tortillas are more fragile—cook at lower heat and flip with extra care.
- Protein-Packed: Fold in 2 scrambled eggs (cooled), ¼ cup crumbled cooked bacon or turkey sausage, or 2 tbsp hemp hearts per quesadilla. Add black pepper and a dash of smoked paprika for depth.
- Oatmeal-Inspired: Stir 2 tbsp rolled oats (quick or old-fashioned) into warm apple mixture before cooling—adds chewy texture and beta-glucan fiber.
- Fall Harvest Edition: Add 2 tbsp roasted diced sweet potato or butternut squash, 1 tsp pumpkin pie spice, and a swirl of tahini instead of yogurt.
- Tropical Twist: Replace apples with peeled, diced firm mango or pear; swap cinnamon for ground ginger and cardamom; use mild Monterey Jack and coconut yogurt; top with toasted coconut and lime zest.
- Kid-Friendly “Hidden Veggie”: Puree ¼ cup steamed cauliflower or zucchini into the applesauce base—undetectable in flavor, boosts fiber and micronutrients.
- Overnight Prep Option: Assemble uncooked quesadillas, wrap tightly in plastic, and refrigerate overnight. The tortillas will hydrate slightly, yielding a softer—but still delicious—texture ideal for little ones or those preferring less crunch.
- Mini Appetizer Style: Use 6-inch corn tortillas, halve fillings, and cook in batches. Serve with warm spiced apple butter or cinnamon-sugar yogurt dip.
Health Considerations and Nutritional Value
A single serving (one 10-inch quesadilla, made with whole-grain tortilla, ½ Granny Smith apple, ½ cup cheese-yogurt blend, and minimal added sweeteners) delivers approximately:
- Calories: 385–420 kcal
- Protein: 22–26g (supports muscle maintenance, satiety, and blood sugar regulation)
- Fiber: 6–8g (40% DV—primarily from whole grains and apples, promoting gut motility and microbiome diversity)
- Healthy Fats: 16–19g (mostly monounsaturated and saturated from dairy; includes CLA from grass-fed sources)
- Vitamin C: 12% DV (from apples and optional citrus garnish)
- Calcium: 30% DV (critical for bone health, nerve transmission, and muscle contraction)
- Iron (non-heme): 15% DV (enhanced absorption when paired with vitamin C-rich apples)
- Antioxidants: High ORAC value from cinnamon, apples, and optional nuts—linked to reduced oxidative stress and cellular aging.
Dietary Notes:
- Blood Sugar Friendly: Low glycemic load (~8–10) due to fiber, protein, and healthy fats slowing carbohydrate absorption—ideal for prediabetes or metabolic syndrome management.
- Lactose Sensitivity: Greek yogurt and aged cheeses contain minimal lactose (<0.5g per serving); many tolerate well. Substitute lactose-free yogurt or vegan alternatives if needed.
- Sodium Conscious: Naturally low in sodium (under 320mg/serving) when unsalted butter and low-sodium cheese are used—suitable for hypertension protocols.
- Not Keto-Friendly: Due to apple carbs (~15g net per serving); however, keto adaptation is possible by replacing apples with stewed rhubarb + erythritol, increasing cheese/nuts, and using almond-flour tortillas.
- Allergen Alert: Contains dairy and gluten (unless GF tortillas are substituted). Tree nut options (walnuts/pecans) introduce potential allergens—label accordingly.
Consult a registered dietitian before modifying for therapeutic diets (e.g., renal, IBS low-FODMAP, or post-bariatric surgery), as individual tolerances vary widely.
Ingredients
- 2 medium Granny Smith apples (about 300g), peeled, cored, and finely diced (¼-inch)
- ¼ cup unsweetened applesauce (no added sugar)
- 2 tablespoons pure maple syrup (Grade A Dark preferred)
- 1½ teaspoons ground cinnamon (Ceylon recommended)
- ¼ teaspoon freshly grated nutmeg
- 1 teaspoon pure vanilla extract
- 1 tablespoon unsalted butter or grass-fed ghee
- 2 (8–10 inch) whole-grain or sprouted grain tortillas (certified gluten-free if needed)
- 1 cup shredded sharp cheddar or smoked gouda cheese (preferably block, freshly grated)
- ⅓ cup plain full-fat Greek yogurt or whole-milk ricotta
- Pinch of flaky sea salt (optional, to enhance cheese flavor)
- Neutral cooking oil (avocado, grapeseed) or additional butter for griddling
- Optional garnishes: extra cinnamon, maple drizzle, toasted walnuts, apple butter, or plain yogurt for dipping
Directions
- In a medium nonstick skillet over medium heat, melt butter. Add diced apples, applesauce, maple syrup, cinnamon, nutmeg, and vanilla. Stir to combine. Cook, stirring frequently, for 6–8 minutes until apples are softened but still hold their shape. Remove from heat and let cool for 5 minutes.
- In a small bowl, mix shredded cheese and yogurt (or ricotta) with a pinch of salt until smooth and cohesive. Set aside.
- Preheat a clean skillet or griddle over medium-low heat (325°F). Lightly grease with oil or butter.
- Place one tortilla in the skillet. Spread half the cheese-yogurt mixture evenly over it, leaving a ½-inch border. Spoon half the cooled apple mixture on top, spreading gently.
- Carefully place the second tortilla on top. Press down lightly with a spatula.
- Cook for 2.5–3.5 minutes until the underside is golden brown and crisp, and cheese begins to melt at the edges.
- Using a wide, flexible spatula, carefully flip the quesadilla. Cook for another 2–3 minutes until deeply golden and heated through.
- Transfer to a wire rack. Rest for 2 minutes before slicing into wedges with a serrated knife or pizza cutter.
- Serve warm, optionally with a side of warm apple butter, a dollop of yogurt, or a light dusting of cinnamon sugar.
FAQ
- Can I make these ahead and reheat?
- Absolutely. Cooked quesadillas keep well refrigerated for up to 4 days. Reheat in a toaster oven or air fryer at 375°F for 4–5 minutes for best crispness—or in a skillet over medium-low heat for 2 minutes per side. Avoid microwaving unless absolutely necessary (cover loosely with damp paper towel and heat 45–60 seconds).
- Why use Greek yogurt instead of sour cream or cream cheese?
- Greek yogurt adds significantly more protein (nearly 3x more than sour cream), less saturated fat, and a clean, tangy acidity that cuts through sweetness—without heaviness. Its thick, strained consistency prevents excess moisture and improves binding. Sour cream works in a pinch but yields a richer, less stable filling.
- My quesadilla fell apart while flipping—what went wrong?
- Common causes include: tortillas too cold or dry (warm first), filling too wet (drain apples well), cheese not melty enough (use freshly grated, not pre-shredded), or heat too high causing rapid exterior crisping before interior adhesion. Try lower heat, better cheese prep, and the two-spatula flipping method.
- Are there lower-sugar options?
- Yes. Reduce maple syrup to 1 tbsp—or omit entirely and rely on natural apple sweetness. You can also substitute 1 tsp monk fruit–erythritol blend or ½ mashed very ripe banana for subtle sweetness and binding. Avoid artificial sweeteners that may caramelize poorly or impart off-notes.
- Can I bake these instead of stovetop grilling?
- You can—but texture suffers. Bake at 400°F on parchment-lined baking sheet for 12–14 minutes, flipping halfway. Expect less crispness and more “baked sandwich” texture. For best results, finish under the broiler for 30–60 seconds per side to restore golden color.
- What’s the best cheese for melting and flavor?
- Sharp cheddar offers bold flavor and reliable melt. Smoked gouda adds depth and pairs beautifully with apples. For milder options, try fontina or havarti. Avoid feta, cotija, or paneer—they don’t melt smoothly and lack binding power.
- Can I freeze Apple Cinnamon Breakfast Quesadillas?
- Yes! Assemble uncooked quesadillas, wrap individually in parchment paper, then place in a freezer bag. Freeze up to 1 month. To cook, thaw overnight in fridge, then grill as directed—add 1 minute per side. Or cook from frozen: start at low heat (300°F) for 5 minutes per side, then increase to medium for final browning.
- Is this suitable for toddlers or picky eaters?
- Highly adaptable! Reduce cinnamon to ½ tsp, omit nutmeg, use mild Monterey Jack, and finely mince apples. Serve cut into small triangles with a side of applesauce for dipping. Many children love the familiar flavors of apple pie + grilled cheese—a winning combo for expanding palates.
Summary
Apple Cinnamon Breakfast Quesadillas are a nutritionally intelligent, culturally rich, and deeply satisfying morning meal that celebrates seasonal fruit, artisanal dairy, and whole-food grains—all brought together through simple, mindful technique.
With endless customization pathways—from vegan and gluten-free adaptations to protein-boosted and kid-approved versions—this recipe isn’t just a dish, but a versatile, joyful framework for nourishing yourself and your loved ones, one golden, cinnamon-scented wedge at a time.